


Packing for an overnight trek often turns into a spatial puzzle when a bulky sleep system threatens to overwhelm internal volume. Learning how to secure sleeping bag to backpack hardware allows hikers to preserve critical interior capacity for food, layers, and hydration bladders. While ultralight down quilts compress into tiny spaces, larger synthetic bags frequently require external mounting to avoid crowding out trail essentials. Understanding proper attachment geometry ensures that your bedroll stays anchored tightly to your pack body without bouncing or unbalancing your stride.
External gear lashing requires deliberate technique because an unstable load quickly leads to severe shoulder fatigue, lower back strain, and excessive trail sway. High quality external and internal frame packs provide specific attachment zones designed to support outboard gear when internal compartments reach capacity. By utilizing dedicated nylon webbing, reliable buckles, and balanced weight distribution, you can prevent awkward pendulum momentum over steep terrain. Securing your insulation properly keeps you comfortable on the trail while ensuring a warm, dry sleep system at camp.



Step-by-Step Methods and Strap Techniques for Securing a Sleeping Bag
Securing a sleep system to the outside of your pack balances gear volume against walking ergonomics and trail stability. When internal capacity fills with food, shelter, and layers, exterior attachment becomes the most practical way forward. The primary objective is anchoring the bedroll close to your spine while preventing lateral sway and weather exposure.
Internal Packing vs. External Rigging: Weight Distribution Dynamics
Packing your sleep system inside the main body remains the standard recommendation whenever interior volume allows. Internal packing safeguards technical fabrics from sharp branches, abrasive rocks, and sudden rainstorms. It also creates a cushioned base in the bottom compartment that supports heavier mid-pack items like food bags and cook kits.
External rigging solves severe space limitations when carrying bulky three-season synthetic bags or thick sleeping pads. Lashing gear to exterior loops immediately reclaims internal liters needed for extra clothing, rations, and water filtration gear. The tradeoff involves managing potential snag hazards and altered pack balance through disciplined, symmetrical strap tensioning.
Weight placement dictates whether external rigging feels stable or exhausting over miles of rough trail. A heavy bundle hanging outward pulls your upper body backward, forcing your neck and hip flexors to work harder. This balance challenge often arises on budget trail backpacks featuring compact interior compartments. Keeping outboard gear tightly compressed and centered prevents unnecessary torso fatigue across long elevation gains.
Identifying Built-in Pack Hardware: Lash Tabs, Webbing Loops, and Compression Zones
Before purchasing auxiliary straps, inspect your backpack to locate existing anchor points engineered into the seams. Many packs include dual webbing loops sewn directly beneath the base panel for sleeping pads or bivy sacks. Classic heritage packs often showcase reinforced hypalon or leather patches known as pig-snout lash tabs that disperse pulling forces across heavy-duty bar-tack stitching.
Daisy chains running vertically down the pack front offer another adaptable mounting surface for custom lashing. These reinforced loops allow you to thread utility straps at variable heights depending on the diameter of your stuffed bag. Side compression straps rarely suit sleeping bags because placing high-volume gear on one flank destroys lateral balance and blocks water bottle pockets.
Floating lid compartments present an additional anchor option on technical multi-day packs. A floating lid connects via adjustable webbing ladders, allowing the top pocket to elevate above the main drawstring collar. This mechanism creates an adjustable cradle where a compressed sleeping bundle can sit securely against the top frame.
Auxiliary Utility Straps and Hardware: Nylon Webbing and Buckle Selection
Many modern lightweight packs omit built-in bottom straps to minimize unladen tare weight. Hikers must therefore rely on aftermarket utility straps to secure bulky bedding to existing loops. Standard one-inch nylon webbing provides the ideal balance between high tensile strength, minimal weight, and compatibility with universal hardware.
A simple and reliable option is the Cosmos Pack of 2 Black Color Mattress Backpack strap set. These straps measure 42 inches in length and one inch in width, featuring a non-slip sewn-on slide-stop buckle designed to maintain tension under movement. The slide lock mechanism grips standard nylon webbing firmly, preventing accidental slippage during long descents without adding noticeable weight.
For hikers carrying high-volume synthetic sleeping bags or wide sleeping pads, longer webbing becomes essential. The Modixun 8Pack Utility Straps with Quick-Release system delivers 59 inches of adjustable length alongside serrated quick-release buckles. The internal teeth bite into the webbing to stop creeping, and excess nylon can be trimmed and heat-sealed to suit your specific pack dimensions.
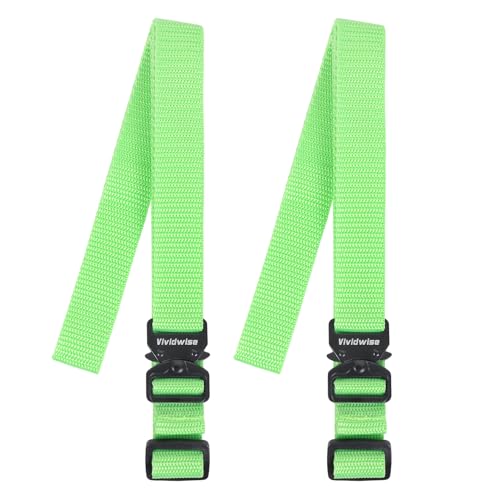
Durability-focused backpackers may prefer metallic hardware over polymer clips in freezing alpine conditions. The Vividwise Utility Straps with Metal Quick Release feature sturdy metal clip buckles and 48-inch nylon straps engineered for heavy-duty outdoor use. Alternatively, the YBEATY 6 PCS Utility Straps with Quick Release set offers 42-inch tensile-resistant nylon straps with flexible cinch buckles, giving hikers multiple spares for field repairs.
Step-by-Step Procedure: Securing Your Sleeping Bag to the Bottom Lash Loops
Begin by compressing your sleeping bag into the tightest, most symmetrical cylinder possible using a sturdy compression sack. Unevenly stuffed bags create loose bulges that slip out from under tensioned webbing during transit. Tighten the radial compression straps progressively in small increments to create a firm, uniform roll that will not deform against your pack base.
Thread your utility straps through the pack base loops before placing the sleeping bag in position. Pass each one-inch strap through the left and right anchor loops so that the female buckle ends sit accessible at the front. Position the compressed sleeping bag horizontally across the bottom panel, pressing it firmly upward into the seams before snapping the buckles shut.
Apply tension incrementally across both buckles rather than cinching one side down entirely at once. Pull the working end of the left strap until snug, then match the tension on the right side to keep the bundle centered. Continue tightening alternately until the sleeping bag compresses firmly against the pack bottom with zero play or lateral wobble.
Finally, dress and secure the dangling strap tails so they do not catch on trail brush or drag in mud. Long loose tails can easily snag on roots, trip your feet on steep switchbacks, or loosen buckle tension. Roll the excess strap length tightly toward the buckle and secure it using elastic keepers or a half-hitch knot around the standing line.
Top-Mounting Technique: Lashing Under the Floating Lid
Mounting your sleeping bag under the top lid offers a practical alternative to bottom lashing on challenging routes. This configuration keeps your bedroll high on your torso, aligning its weight closer to your center of gravity. Top mounting also protects insulation from wet grass, puddle splashes, and dirt when you rest your bag on the ground during trail breaks.
To execute this setup, loosen the rear webbing ladders that attach the floating lid to the pack frame. Pack the interior body of the backpack fully, draw the primary collar cord tight, and secure any interior compression straps over the top opening. Lay your compressed sleeping bag horizontally across the gathered collar, aligning it squarely before snapping the front lid buckles shut.
Tension the lid straps evenly from both sides until the top pocket wraps firmly around the contours of the sleeping bundle. Inspect the setup from the side to verify that the roll does not obstruct your head movement or force your neck forward. Managing this upper bulk requires similar care to packing dedicated backpack compartments where uneven loads disrupt your walking cadence.
Weather Protection Protocols: Sealing Insulation from Trail Moisture
External sleeping bag mounting exposes your most critical survival layer directly to rain, humidity, and ground moisture. Standard nylon stuff sacks offer little water resistance, allowing needle holes and unsealed seams to siphon water during sustained downpours. Wet down feathers lose their loft completely, eliminating thermal value and creating serious hypothermia risks in cold conditions.
Always encase your sleeping bag in a dedicated roll-top dry bag before lashing it to the exterior of your pack. Look for dry sacks constructed from siliconized ripstop nylon or polyurethane-coated fabrics with factory-taped seams. Purge residual air from the sack before executing at least three tight rolls along the collar, then snap the buckle shut to lock out moisture.
Deploying a full-coverage pack rain cover provides an essential secondary line of defense in foul weather. Ensure that your rain cover is sized generously enough to envelop the extended perimeter created by your external sleeping bundle. Combining an internal dry bag with an exterior pack cover delivers complete peace of mind through torrential mountain storms.
Trail Ergonomics and Center of Gravity: Preventing Lumbar Strain
The human body moves most efficiently when backpack weight remains centered close to the thoracic spine and lumbar curve. Attaching a bulky item to the extreme bottom of a pack creates a noticeable lever arm that pulls backward and downward. This dynamic shifts your center of gravity rearward, forcing you to lean forward at the waist and straining lower back muscles.
Loose lashing amplifies this ergonomic penalty by generating a destructive pendulum motion with every stride. If the sleeping bundle swings back and forth, your stabilizing core muscles must constantly fire to maintain balance. This rhythmic oscillation can also cause the pack hip belt to slip down past the iliac crest, transferring weight onto your shoulders.
Fine-tune your pack suspension harness after securing your exterior gear to restore proper weight distribution across your hips. Tighten the primary hip belt first so that sixty to seventy percent of the total pack weight rests on your pelvic structure. Snug the shoulder straps gently, then tension your load lifters to pull the upper pack closer to your spine.
Common Lashing Mistakes and Buckle Hardware Slippage
One of the most frequent mistakes backpackers make is using elastic bungee cords to attach sleeping bags to pack exteriors. Bungee cords stretch continuously under dynamic trail movement, allowing heavy bundles to bounce violently and slide out sideways. Smooth nylon webbing combined with mechanical locking buckles provides the rigid, non-elastic tension necessary for absolute gear retention.
Buckle slippage represents another widespread issue, especially when using smooth webbing across basic plastic sliders. Under continuous trail vibration, webbing can slowly slip through non-serrated buckles, causing the sleeping bag to sag unexpectedly after a mile of walking. Utilizing utility straps with serrated buckle teeth or threading a half-hitch knot behind the slider prevents spontaneous slipping.
Over-tightening straps directly against thin, uncompressed sleeping bag shells can also cause serious gear damage. Narrow one-inch webbing can pinch shell fabrics with extreme force, risking seam stress or crushing delicate synthetic insulation fibers. Always keep the sleeping bag fully protected within its heavy-duty stuff sack or compression sleeve before cinching utility webbing down tight.
Trail Verification: The Pre-Hike Shake Test and Clearance Check
Never begin your hike without performing a thorough physical shake test on your fully loaded pack. Stand the backpack upright on the ground, grasp the top haul handle firmly, and shake the entire bag vigorously in all directions. If the externally mounted sleeping bag shifts, tilts, or rattles against the pack body, your straps require immediate re-tensioning.
After completing the shake test, shoulder your pack and walk a short distance while paying close attention to lower body clearance. If your sleeping bag is mounted to the bottom loops, ensure that the roll does not bump repeatedly against your buttocks or hamstring muscles. Constant contact with your legs disrupts your natural hiking cadence and can cause annoying chafing over long trail days.
Mastering the technique of securing sleep gear externally gives you unmatched flexibility across varying trip lengths and weather conditions. By selecting durable utility straps, using waterproof dry sacks, and balancing weight evenly against your torso, you preserve both comfort and stamina. Whether you lash under the base loops or beneath a floating lid, disciplined rigging protects your bedroll and ensures a restful night at camp.





Write Your Review
No reviews yet. Be the first to share your experience!