


Planning a trek along rugged ridgelines demands careful calculation of gear volume, carrying comfort, and total trail weight. Selecting the wrong pack volume can leave you either cramming essential shelter systems into an overstuffed bag or hauling unnecessary fabric bulk across steep switchbacks. Determining what size backpack for appalachian trail excursions requires matching your pack capacity in liters to the duration of your trek and the bulk of your sleeping, cooking, and clothing systems. When balancing heavier multi-day loads across rocky ascents, well-structured internal frame hiking backpacks help transfer substantial pack weight directly to the hips to preserve stamina.
Trail conditions along the Appalachian corridor fluctuate dramatically between humid summer valleys, cold mountain summits, and unpredictable rainstorms. A compact daypack serving a short afternoon summit push requires vastly different internal dimensions than a load-hauling pack equipped for multi-day resupply intervals between trail towns. Focusing on torso fit, liter capacity, and harness ergonomics ensures that your chosen pack stabilizes your gear without causing shoulder pinching or lumbar fatigue. Evaluating your personal shelter setup, insulation bulk, and food storage needs provides the clearest foundation for choosing the right pack profile before stepping onto the white-blazed path.







Sizing and Capacity Guide for Appalachian Trail Backpacks
Choosing the correct pack volume for the Appalachian Trail requires looking beyond arbitrary gear lists and examining your specific trekking itinerary. A backpack functions as an integrated suspension frame rather than a simple storage sack, meaning internal space directly dictates how balanced your load feels across technical terrain. Understanding how pack volume in liters correlates with trip duration, seasonal weather changes, and your core sleep system prevents both dangerous under-packing and exhausting over-packing. By establishing your exact trail requirements before buying gear, you can dial in a comfortable load that supports long-distance endurance.
Defining Appalachian Trail Hiking Profiles and Volume Requirements
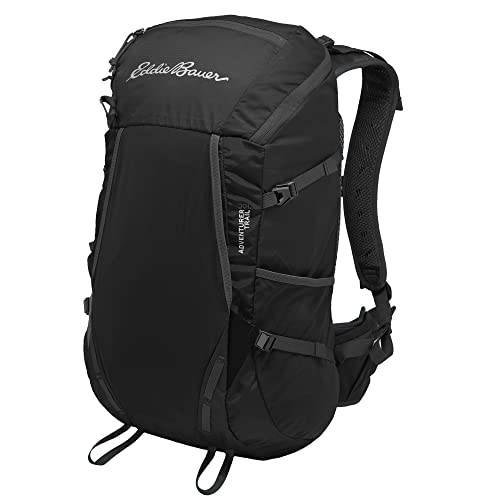
Day hiking on the Appalachian Trail involves carrying essentials for single-day outings without the burden of heavy overnight shelters. Day packs ranging between 15 and 30 liters offer ample space for a hydration bladder, lightweight rain gear, trail snacks, and a compact emergency first aid kit. Technical daypacks like the Black Diamond Trail Vista 28 or the Eddie Bauer Adventurer Trail 30L provide sufficient volume for cold-weather day treks where an extra fleece layer and insulated gloves are necessary. These smaller packs keep total weight close to your spine, preventing upper body strain during steep ascents up exposed ridgelines.
Weekend trips and short section hikes lasting two to four days typically require a backpack volume between 40 and 55 liters. This capacity range easily accommodates a three-season sleeping bag, a compact one-person or two-person tent, cooking hardware, and several days of dehydrated trail meals. Section hikers frequently appreciate this middle-tier volume because it allows comfortable packing without requiring razor-thin ultralight gear choices. It provides enough interior depth to pack warm layers securely without forcing you to strap bulky items onto the outside of the bag.
Full thru-hikes spanning the entire distance from Georgia to Maine generally demand packs between 50 and 65 liters for traditional backpacking setups. This volume bracket accommodates extended food carries between trail towns, which often stretch across four to six days in remote stretches like the Hundred-Mile Wilderness. Traditional hikers carrying freestanding double-wall tents, synthetic sleeping insulation, and structured camp cookware rely on this capacity to keep gear contained within the main compartment. A pack in this bracket distributes heavy multi-day loads across an internal perimeter frame, protecting your hips and shoulders from excessive stress.
Experienced long-distance backpackers with streamlined ultralight gear can successfully thru-hike using compact packs between 40 and 50 liters. Achieving this reduced capacity requires investing in highly compressible down quilts, minimalist trekking pole shelters, and lightweight, calorie-dense meal strategies. Ultralight packs reduce unladen bag weight significantly, but they demand rigorous gear discipline and offer less rigid frame support under heavy loads. If your total base weight exceeds fifteen pounds before adding food and water, choosing a pack closer to 55 or 60 liters remains the safer, more supportive decision.
Separating Pack Liter Capacity from Torso Sizing
A common mistake among first-time long-distance hikers is confusing internal pack volume with physical harness sizing. Internal capacity represents the total volume inside the pack body and exterior pockets, measured in liters. Harness size, by contrast, refers strictly to the distance between your neck vertebrae and your hip bones. A petite hiker may comfortably carry a 60-liter high-capacity pack if the harness matches their short torso, while a tall hiker will suffer severe back pain in a 45-liter pack designed with an undersized frame.
Measuring your torso length requires finding the prominent bony bump at the base of your neck, known as the C7 vertebra. From that point, run a flexible tape measure down the curve of your spine until you reach the level of your iliac crest, which is the top ridge of your hip bones. Torso lengths typically range between 15 and 22 inches, independent of overall body height. Knowing your exact torso measurement allows you to select the appropriate harness bracket or adjust a telescoping back panel to align with your spine.
When a backpack harness fails to match your torso length, pack weight shifts improperly onto the delicate trapezius muscles of your shoulders. If the frame is too short, the shoulder straps will wrap tightly over your collarbones, pulling the entire load down onto your upper back and causing numbness or neck spasms. Conversely, an overly long frame leaves a visible gap between the shoulder straps and your body, causing the pack to sway backward and pull you off balance on rocky descents. A proper torso fit ensures that the shoulder harness contours smoothly over the curve of your shoulders without bearing significant vertical weight.
The primary load-bearing component of any multi-day trail pack is the padded hip belt, which must sit directly over the iliac crest. When cinched firmly around the pelvis, the hip belt should support roughly 70 to 80 percent of the total laden pack weight. This mechanical transfer directs heavy trail loads through your hips and legs, which are naturally equipped for sustained endurance. Modern trail packs often feature pivoting or contoured hip belts that flex with your natural walking gait, preventing painful friction and bruising over hundreds of miles.
How Appalachian Trail Seasonal Shifts Dictate Pack Volume
Starting a northbound thru-hike in early spring at Springer Mountain in Georgia introduces freezing temperatures, snowstorms, and persistent mountain rain. Hikers starting in March or April must carry cold-weather sleep systems, including 15- or 20-degree sleeping bags, thermal sleeping pads, and substantial down jackets. These lofty winter layers consume substantial internal space, often requiring a 55- to 65-liter pack to accommodate the bulk without extreme compression. Attempting to fit early-season winter gear into an undersized 40-liter pack often forces hikers to leave behind vital safety layers or risk soaking their gear in cold rains.
As hikers progress into the mid-Atlantic states during mid-summer, nighttime temperatures climb into the sixties and seventies, dramatically altering packing volume. Many hikers arrange gear swaps in Virginia, mailing bulky winter sleeping bags and thermal base layers home in exchange for lightweight summer quilts and minimalist clothing. This warm-weather gear profile compresses down substantially, allowing a 55-liter pack to cinch down cleanly or opening up space for carrying extra water during dry ridge sections. Summer conditions also reduce the bulk of spare clothing, making compact 45- to 50-liter capacities much more practical for section hikers tackling sunny stretches.
Entering the White Mountains of New Hampshire and the rugged wilderness of Maine in late summer or early autumn brings a swift return to unpredictable alpine weather. Exposed ridgelines above tree line frequently experience near-freezing rain, gale-force winds, and sudden temperature drops even in August and September. Hikers must once again pack cold-weather insulation, hard-shell rain gear, and extra food reserves to wait out severe weather cycles in backcountry shelters. Maintaining a pack with generous compression straps allows you to expand capacity back up to 55 or 60 liters when autumn mountain conditions demand heavier protective equipment.
Critical Gear Categories That Drive Internal Volume Needs
Your sleep system represents the single largest volume consumer inside your backpack and largely determines your minimum liter requirements. Synthetic sleeping bags offer dependable warmth in damp climates, but their polyester insulation fibers remain significantly bulkier and heavier than goose or duck down. Hikers carrying synthetic bags typically require an extra 5 to 10 liters of pack volume compared to those using high-fill-power down sleeping quilts. Furthermore, closed-cell foam pads must be strapped to the exterior of a bag, whereas compact inflatable air mattresses roll down to the size of a standard water bottle and pack securely inside.
Shelter systems also heavily influence whether you can manage a smaller pack or require an expanded volume profile. Traditional freestanding tents feature rigid aluminum pole sections and dedicated rainflies that demand structured interior room or exterior side-pocket storage. Ultralight non-freestanding shelters utilize your trekking poles for support, rolling into compact bundles that easily fit inside smaller 40- to 45-liter packs. Balancing shelter durability against pack space is an essential consideration, particularly when navigating wet campsite setups along rainy Appalachian ridges.
Food storage methods on the Appalachian Trail create noticeable volume shifts depending on local wildlife regulations. While many sections allow lightweight bear bags hung using standard counter-balance methods, certain zones like Blood Mountain in Georgia mandate hard-sided bear canisters during peak spring months. Hard-sided canisters do not compress, occupying a rigid cylinder of 10 to 12 liters directly inside the center of your backpack. When evaluating hiking packs with insulated compartments for shorter recreational day trips, hikers notice how dedicated dividers consume space, which reinforces why multi-day trail packs rely on flexible, open cavities for bulky food containers.
Hydration setups require consistent exterior access without compromising the stability or shape of the main pack compartment. Water bladders placed against the back panel keep heavy liquid mass centered against your spine, but refilling them in camp often requires unpacking your entire load. Durable exterior stretch mesh pockets designed to hold one-liter bottles eliminate this hassle and free up interior space for dry gear. Ensuring your pack has deep, reinforced side pockets prevents water bottles from tumbling out when bending over to negotiate steep rock scrambles.
Pack Suspension Mechanics and Weight Distribution Principles
Proper weight distribution inside your backpack is just as critical as selecting the correct capacity rating in liters. Loading a pack haphazardly creates leverage against your lower back, causing the entire frame to pull backward and strain your abdominal and shoulder muscles. As a rule of thumb, light and bulky items like your sleeping bag and sleep clothing should be placed in the very bottom of the pack cavity. This creates a stable, padded foundation that cushions the frame against your lower back while filling out the lower corners of the pack.
The heaviest gear items, including your dense food sack, camp stove, and water reservoir, should be packed directly above your sleep system, nestled flush against the back panel. Placing dense mass close to your spine keeps the combined center of gravity aligned directly over your pelvis and feet. Surrounding these heavy items with lighter gear, like your shelter body and extra clothing layers, prevents dense items from shifting during long walking days. Lighter essentials, rain shells, and small snacks belong at the top of the pack or inside quick-access exterior stretch pockets for easy trail retrieval.
Fine-tuning your harness adjustments on the trail prevents muscle spasms and fatigue before they derail your hiking schedule. When putting on a loaded pack, always loosen all straps before fastening the hip belt snugly around the top of your pelvic bones. Next, pull the main shoulder strap tensioners downward and back until the harness hugs your torso comfortably without pinching your collarbones. Finally, clip the sternum strap across your mid-chest to keep the shoulder straps from splaying outward across your arms.
Load-lifter straps, located at the top of the shoulder harness where it connects to the upper frame, play a crucial mechanical role. Cinching these straps to roughly a 45-degree angle pulls the top of the pack closer to your neck, preventing the load from sagging backward. If overtightened, load-lifters will lift the shoulder harness off your collarbones, transferring unnatural pressure onto your shoulders and collarbone nerves. Periodically adjusting these straps while climbing or descending allows you to shift weight slightly between your hips and shoulders, giving tired muscle groups temporary relief.
Material Durability and Weather Protection along the Appalachian Corridor
The Appalachian Trail is notorious for punishing gear with dense rhododendron tunnels, abrasive granite ledges, and unrelenting precipitation. Standard daypacks and budget bags constructed from lightweight polyester fabrics often suffer tears when scraped against wet rock walls in the Mahoosuc Notch. For multi-day trekking, packs made from 210-denier to 400-denier high-tenacity nylon or ripstop composites deliver the optimal balance of tear resistance and pack weight. When researching accessible gear choices, exploring budget hiking backpack options highlights how heavier fabrics can provide basic utility, though technical long-distance packs prioritize reinforced high-wear zones at the base and hip belt.
Water resistance is another vital consideration, because prolonged rain along the Appalachian chain can quickly penetrate untreated backpack seams. Most traditional backpack textiles feature a durable water repellent coating on the exterior and a thin polyurethane laminate on the interior face. However, needle holes along structural seams and exposed zipper tracks allow water to seep inward during multi-hour downpours. Relying exclusively on an external pack cover is often insufficient in heavy mountain winds, making heavy-duty contractor trash bags or silnylon dry sacks essential internal liners to keep your sleeping insulation dry.
Maintaining the structural integrity of your backpack requires regular inspections of high-tension stress points like shoulder strap anchor stitching and hip belt buckles. Grit and trail mud ground into zipper coils can cause teeth to split under tension, so wiping down hardware with a damp sponge preserves smooth operation. Furthermore, you should never hang a fully loaded pack by its top haul loop from shelter nails, as this concentrated stress can tear upper seam stitching. Storing your pack away from direct sunlight between section hikes protects technical fabric coatings from premature degradation and delamination.
Practical Strategies for Downsizing Your Trail Load
The most effective strategy for identifying your optimal backpack size is to purchase your pack only after finalizing your core camping gear. Gathering your actual shelter, sleeping bag, sleeping pad, cooking hardware, and clothing layers allows you to measure their packed volume accurately in a large cardboard box or laundry bin. Buying a spacious 70-liter pack first almost always leads to packing unnecessary duplicate items simply because unused space exists. Selecting a pack that closely matches the exact volume of your audited gear forces deliberate, thoughtful packing decisions.
Conducting an honest gear shakedown before arriving at the trailhead eliminates pounds of redundant gear that consume precious pack volume. Common packing mistakes include hauling multiple heavy camp knives, full-sized toiletry bottles, excessive changes of hiking clothing, and heavy electronic battery banks. A single set of quick-drying hiking clothes paired with dedicated dry camp sleeping layers is standard practice along long-distance trails. Trimming away non-essential items not only lowers pack weight, but it also allows you to drop down into a more agile 50- to 55-liter pack size.
Section hikers and thru-hikers alike benefit from testing their loaded packs on challenging local terrain before embarking on extended mountain journeys. Carrying your full setup on a ten-mile weekend training hike quickly reveals whether your gear volume shifts awkwardly or causes painful pressure points over your hips. If your gear feels cramped and forces the pack seams to bulge, stepping up to a slightly larger liter tier prevents zipper blowouts on the trail. Taking the time to dial in your equipment volume ensures that your Appalachian Trail adventure remains focused on scenic ridgelines rather than back pain.






Write Your Review
No reviews yet. Be the first to share your experience!