


Carrying bulky sleep gear on rugged trails presents immediate challenges for balance, pack volume, and center of gravity. When internal compartment volume runs out, learning how to attach sleeping bag to backpack exteriors becomes essential for maintaining comfort and protecting sleep insulation. Securing loose bulk improperly often leads to violent pack sway, sore trapezius muscles, and gear tears against low branches. Outdoor travelers and weekend hikers frequently turn to external strapping systems to keep their sleeping insulation stable across changing elevations.
Standard daypacks and multi-day packs offer varied external lash points, bottom loops, and side compression zones to anchor extra gear. Modern utility straps provide adjustable tension and secure buckles to keep heavy bedrolls firmly tethered without distorting the pack harness. Pairing durable webbing with reliable attachment points prevents shifting and distributes trail weight evenly across your torso. Hikers outfitting a versatile rig can review our insights on budget-friendly hiking packs to evaluate exterior webbing options that support heavy loads without straining seams.

Mastering Sleeping Bag Attachment, External Webbing, and Load Balance
Anchoring a bulky sleeping bundle outside a pack demands a firm grasp of gear geometry and strap tension. When your main cavity is filled with food, hydration bladders, and spare layers, exterior mounting solves critical space deficits. Successful attachment prevents pendulum swing while protecting delicate nylon fabrics from abrasive brush. Understanding these foundational mechanics ensures that your sleep system stays dry, compact, and centered during long ascents.
Assessing Pack Architecture and External Lash Points
Backpack designs incorporate specific lash tabs, ice axe loops, and webbing ladders intended for auxiliary gear carry. The most common location sits beneath the bottom panel, where paired nylon loops or buckled compression webbing accept rolled cylinders. Side compression straps present an alternative anchor point, though they require balancing equivalent bulk on the opposite side to prevent lateral pull. Inspecting these reinforced stress points ensures the bag fabric and bartack stitching can manage the dynamic downward tug of a rolled sleep system.
Many trail packs feature external daisy chains, which run vertically along the back panel as rows of bar-tacked loops. These loops do not tighten on their own, requiring third-party utility straps or accessory cords to create custom lashing bridges. When using daisy chains, threading dedicated webbing through multiple loops prevents the attachment from twisting sideways during movement. Checking the stitching reinforcement around these loops ensures that heavy bouncing on steep descents will not tear the seams away from the pack body.
Step-by-Step Attachment Process Using External Utility Straps
Begin by compressing the sleeping bag into the tightest cylindrical shape possible using its dedicated compression sack. A loose, bulky roll acts like a sail in the wind and creates severe leverage against your lower back. Once compressed, position the sack horizontally along the designated lash zone, aligning it symmetrically with the pack frame. Centering the bundle prevents one side from hanging lower, which would otherwise pull the harness unevenly against your shoulders.
Next, route the accessory straps around the bundle and through the pack attachment anchors. For systems using slide-stop locks like the Cosmos Pack of 2 Black Color Mattress Backpack straps, guide the forty-two-inch webbing through the slide lock before pulling tight. Maintain firm, even tension on both straps so the sleeping bag compresses directly against the pack fabric without shifting. Tuck away any excess webbing tails into keeper loops or tie them down to avoid tripping over loose ends on narrow trails.
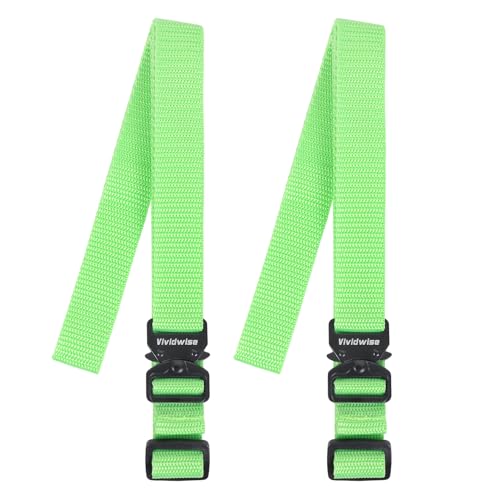
For straps featuring hardware like the Vividwise Utility Straps with Metal Quick Release, snap the metal clip into place and pull the forty-eight-inch nylon tail until snug. The quick-release mechanism allows for swift detachment at camp without having to unthread the entire strap assembly. Always tug the rolled sleeping bag firmly in multiple directions before beginning your hike to verify that neither strap slips under lateral force. If the roll wiggles or slides forward, reposition the straps closer to the ends of the cylinder and re-tension the buckles.
Weight Distribution and Center of Gravity on the Trail
Where you lash your sleeping bag directly alters the center of gravity of your entire load. Mounting the sleep system to the bottom loops keeps the pack profile narrow, making it easier to navigate through dense brush and rocky corridors. However, placing excessive weight far below the lumbar region can create backward torque, causing the harness to pull heavily on your collarbones. Down sleeping bags are generally light enough to sit at the bottom without causing severe leverage issues, but heavier synthetic bags demand caution.
Securing a sleeping bag to the top lid represents another popular approach, especially when traversing wet ground or creek crossings. Placing bulk high on the pack raises your center of gravity, which aids an upright posture on smooth, well-graded paths. The drawback comes during steep scrambles, where a top-heavy pack can reduce lateral balance and induce upper body sway. Hikers carrying internal frame hiking backpacks must assess frame rigidity, because structured systems like rigid frame backpack designs transfer upper weight down to the hips more effectively than frameless packs.
Some backpackers choose to strap their sleep roll vertically along the exterior back panel when top and bottom points are occupied. This orientation keeps the mass closer to your spinal line, minimizing the leverage that causes lower back fatigue. The primary drawback of vertical center mounting is that it blocks access to rear zip compartments and pushes the load outward. Balancing these trade-offs depends on your specific trail conditions, the total weight of your sleep gear, and your pack frame structure.
Webbing Materials and Buckle Hardware Mechanics
Webbing hardware plays a critical role in maintaining continuous tension against shifting gear rolls. Lightweight plastic slide locks, such as those found on forty-two-inch utility straps, rely on friction teeth to prevent nylon webbing from creeping loose. These buckles add virtually no unladen weight to your kit and resist corrosion in wet environments. However, cold temperatures or muddy conditions can make feeding stiff webbing through narrow plastic slots slightly cumbersome with gloved fingers.
Metal quick-release buckles provide rapid detachment and exceptional resistance to impact damage on rocky terrain. The Vividwise utility straps utilize metal clip buckles that lock firmly, preventing accidental detachment during transport or rough handling. The primary benefit of metal quick-release hardware lies in its simplicity when setting up camp after dusk, as a simple pinch releases the entire bundle. While metal buckles add a small amount of weight compared to minimal plastic friction slides, their mechanical reliability in abrasive environments appeals to rugged trail users.
Width and weave also dictate how securely a strap grips cylindrical loads under repeated trail vibration. One-inch nylon webbing represents the industry standard for backpack accessories, balancing surface friction with flexibility. Narrower cords often bite into fabrics and cause localized pressure tears, while wider webbing can be difficult to thread through standard pack lash loops. Selecting straps with reinforced sewn buckle attachments ensures that high tension does not rip the hardware away from the webbing end.
Protecting Sleeping Gear Against Weather and Trail Abrasion
Attaching your primary insulation to the exterior of your pack immediately exposes it to precipitation, mud splashes, and trail hazards. A soaked sleeping bag poses serious risks in backcountry conditions, making secondary waterproofing mandatory for external mounting. Never rely solely on a standard water-resistant stuff sack when strapping sleep gear outside. Encasing the rolled bundle in a heavy-duty waterproof dry bag with taped seams ensures that down or synthetic fibers remain completely dry during unexpected downpours.
Abrasion presents another persistent threat, particularly when carrying sleep systems beneath the bottom panel of your backpack. Setting your pack down on rough granite, wet soil, or pine needles repeatedly grinds external straps and delicate shell fabrics against the ground. Using a rugged outer sack made from dense, high-denier fabric shields the fragile, lightweight nylon of your sleeping bag from punctures. Inspecting the contact points between the straps and the stuff sack after rough scrambles helps catch friction wear before a tear develops.
Snagging against low branches and dense brush represents a common hazard on overgrown trails. Cylindrical rolls that extend past the width of your torso act as hooks, catching foliage and throwing you off balance. Positioning the sleeping bag so its ends do not protrude wider than your shoulders prevents snagging and preserves your momentum. If trail conditions involve dense bushwhacking, pulling a full pack rain cover over both the backpack and the externally lashed bundle provides an additional layer of snag defense.
Ergonomic Harness Adjustments for External Cargo
Lashing external gear alters how a backpack distributes weight across your skeletal structure. Adding significant bulk to the exterior levers the pack away from your spine, which increases strain on the trapezius muscles and upper shoulders. To counter this effect, tighten your shoulder strap adjusters until the pack body pulls flush against your back. Ensure that the hip belt remains seated securely over the iliac crest, so the primary load transfers directly to your hips rather than hanging from your collarbones.
Sternum straps and load lifters require fine-tuning whenever you change your external gear configuration. Fastening the sternum strap across your mid-chest pulls the shoulder straps inward, preventing them from slipping off your shoulders under the backward tug of an external roll. Adjusting the load-lifter straps to roughly a forty-five-degree angle draws the upper pack volume closer to your center of gravity. This balance adjustment stabilizes external bundles, minimizing the sway that often causes lower back fatigue during long mileage days.
Conducting a physical shake test before departing trailhead parking verifies proper harness alignment and gear stability. With the pack loaded and strapped on, bounce gently in place and lean slightly forward to observe how the external bundle responds. If the sleeping bag bounces independently from the pack body, cinch the utility straps tighter to lock the roll against the pack frame. Eliminating independent movement between the bag and the pack harness is the single most effective way to prevent muscle exhaustion on the trail.
Troubleshooting Instability and Common Lashing Errors
The most frequent mistake outdoor travelers make is leaving excessive slack in their external utility straps. When straps are insufficiently tensioned, the sleeping bag acts as a pendulum, swinging rhythmically with every stride. This oscillating motion wastes kinetic energy, destabilizes footing on narrow switchbacks, and places repetitive stress on lash loop seams. Tightening straps until the compressed sleeping bag shows slight indentations creates a solid, unified load that moves harmoniously with your body.
Another common issue stems from routing straps unevenly across asymmetrical anchor points on the backpack. Pulling one strap significantly tighter than the other causes the sleeping bag to cant diagonally, skewing your pack balance and twisting the harness. Always verify that both straps sit parallel to each other and maintain identical tension across the width of the roll. If your pack lacks paired bottom lash points, consider cross-lashing webbing in an X-pattern to evenly distribute pressure across the available anchor hardware.
Finally, forgetting to secure loose strap tails can create surprising tripping hazards or damage the webbing itself. Long nylon ends flapping behind you can catch on trail brush, rocks, or even trekking poles, violently unbuckling the load. Rolling excess strap tails tightly and securing them with elastic bands or web dominators keeps your pack profile tidy and hazard-free. Taking a few moments to inspect and tidy your lashing configuration before every trek guarantees a safer, more comfortable journey through the backcountry.
Strategic Gear Organization and Camp Breakdown Efficiency
Mastering how your sleep bundle integrates into your daily packing routine speeds up both morning departures and evening camp setups. Keeping utility straps organized during the day prevents you from rummaging through packed gear when twilight fades. When you unbuckle your sleeping roll upon reaching camp, loosely re-clipping the straps to their respective pack anchors keeps them from tangling in the dirt. This simple habit preserves clean hardware and ensures your straps are immediately positioned for the next morning pack.
Weather shifts during multi-day excursions often demand adapting your lash strategy on the fly. If unexpected afternoon rain sets in, repositioning your sleeping bundle from bottom loops into the top lid area allows a rain cover to envelop it more completely. Keeping external utility straps readily accessible in an exterior pocket allows for swift adjustments without unpacking internal gear. Thoughtful gear management ensures that your pack remains balanced, weather-protected, and comfortable regardless of how rugged the terrain becomes.
Final Gear Verification Before Hitting the Trail
A final mechanical inspection of your straps and anchor points prevents unexpected gear failures miles away from the trailhead. Examine the stitching where the webbing meets the buckle, checking for fraying fibers or stress elongation after intense cinching. Inspect the slide locks or metal release clips for grit, dirt, or hairline fractures that could cause slippage under dynamic trail forces. Taking sixty seconds to confirm that every buckle clicks securely and every strap sits taut provides absolute peace of mind for the journey ahead.






Write Your Review
No reviews yet. Be the first to share your experience!