


Heavy textbooks, mobile workstations, and daily accessories quickly turn an everyday commute into a battle against neck fatigue and shoulder strain. Determining exactly how high should backpack be positioned against your spine makes an immediate difference in how that load transfers across your body. When a pack hangs too low, gravitational leverage pulls your shoulders backward, forcing your neck to crane forward and fatiguing your lumbar muscles. Balancing your load requires understanding torso anatomy and using the adjustment straps engineered into modern bags.
High-capacity commuter packs often feature internal compression straps and contoured harnesses to keep heavy gear centered against your upper back. While specialized designs like structured frame backpacks rely on rigid internal stays for heavy backcountry loads, daily urban packs depend on careful strap positioning to achieve proper ergonomic support. Adjusting your shoulder straps and sternum webbing shifts the center of mass toward your body’s natural balance point. Dialing in this height protects your posture, stabilizes your gait, and keeps fragile electronics secure across busy travel days.
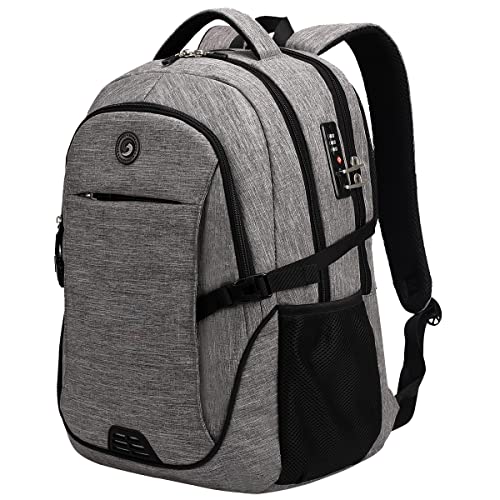


Ergonomic Backpack Height and Harness Alignment Guide
A properly adjusted backpack must sit centered against your upper and mid-torso, never dropping below the waistband of your pants. The top edge of the pack should rest roughly two inches below your shoulders, while the bottom base settles comfortably in the natural curve of your lumbar region. When a bag sags lower, the distance between your spine and the pack increases, creating leverage that pulls your shoulders backward and strains your neck. Setting the bag at the correct height ensures that the padded back panel maintains constant contact with your body, distributing the load across broad muscle groups rather than pinching isolated nerves.
Anatomical Landmarks for Backpack Positioning
Locating your body’s skeletal reference points provides the most reliable way to position any daypack. The upper limit of your pack should align just below the prominent C7 vertebra, which is the noticeable bony bump at the base of your neck when you tilt your head forward. The bottom of the bag must never extend past your iliac crest, the curved top edge of your hip bones that you can feel on either side of your waist. Keeping the pack entirely within this vertical span protects both your cervical spine and your pelvic girdle from abnormal angular stress.
When a pack extends lower than the iliac crest without a dedicated hip belt, every step causes the pack base to collide with your tailbone or buttocks. This repetitive impact forces your pelvic muscles to contract unevenly, leading to premature fatigue and lower back soreness. In contrast, keeping the base nestled in the lumbar curve stabilizes the bag against your center of gravity. That snug alignment prevents the pack from swaying side to side as you navigate train platforms, campus stairs, or busy sidewalks.
Leverage and Spinal Biomechanics Under Load
Carrying gear is fundamentally an exercise in managing physical leverage against your skeletal frame. The farther a heavy load sits from your vertical center of mass, the more torque it exerts on your postural muscles. A low-hanging backpack acts as a long lever arm, constantly pulling your upper torso backward and forcing your abdominal wall to fight against the pull. To compensate for this backward pull, most wearers instinctively lean forward from the hips and thrust their chin outward.
This hunched posture, often called forward head posture, places tremendous mechanical stress on the cervical spine and trapezius muscles. For every inch your head drifts forward past your shoulders, the effective weight supported by your neck muscles multiplies significantly. Keeping your backpack hitched up into the mid-back zone neutralizes this rotational force. With the load held tightly against your thoracic spine, your head can remain balanced directly over your shoulders, preserving your natural upright posture.
Step-by-Step Harness Adjustment Sequence
Achieving the ideal carry height requires a methodical adjustment routine whenever you load your bag. Start by loosening both shoulder straps completely before swinging the loaded backpack onto your shoulders. Once the pack is on your back, lean forward slightly at the waist so the weight settles naturally along the flat contour of your back panel. From this position, pull the adjustment webbing on both shoulder straps downward and backward until the pack pulls firmly against your back.
Make sure you do not overtighten the shoulder straps to the point where they lift the pack above your shoulder line. The anchor points where the shoulder straps attach to the bag should rest roughly one to two inches below the top of your shoulders. After dialing in the shoulder tension, fasten the sternum strap across your chest, adjusting its vertical slider so it sits roughly one inch below your collarbones. Tightening this chest strap draws the shoulder harnesses inward, preventing them from chafing against your armpits or pressing into sensitive nerve clusters.
Integrating Compression Straps and Volume Control
Harness tension alone cannot maintain your pack’s height if the internal cargo is allowed to slump toward the bottom base. Bags equipped with side compression straps, such as the High Sierra Loop, allow you to pull the front panel toward the back panel. Cinching these compression straps reduces the overall depth of the bag and prevents loose gear from settling into a bulky, low-hanging pocket. This mechanical compression locks the mass against your spine, maintaining the height you established during strap adjustment.
When compression straps remain loose, heavy items inevitably shift downward with every footstep, pulling the fabric taut at the lowest seam. This creates an uneven weight distribution where the majority of your load sags below your waistline even if the shoulder straps are tight. Taking a moment to tighten exterior compression straps before heading out keeps the internal volume compact. That compactness maintains the vertical center of gravity exactly where your back muscles can support it with minimal effort.
Matching Pack Dimensions to Your Torso Length
Backpack fit depends much more on your torso measurement than on your total standing height. A tall individual can easily have a relatively short torso, while a shorter person might have a long back that accommodates a taller bag profile. Many popular multi-compartment backpacks feature fixed back panels measuring around nineteen inches in length. If your measured torso length from the C7 vertebra to the iliac crest is significantly shorter than the bag’s frame, the pack will naturally overhang your waistline.
Before selecting a daily carry pack, measuring your torso helps you identify whether a specific bag height will fit your frame. To measure, place your hands on your hips with your thumbs pointing backward toward your spine to mark your iliac crest level. Have a partner measure the vertical distance along your spine from that thumb line up to the base of your neck. If a pack exceeds this measurement by several inches, its lower structure will inevitably drop below your beltline regardless of how tightly you pull the shoulder webbing.
Organizing Cargo for Height Stability and Balance
The way you load your equipment inside individual compartments dictates how well the pack maintains its height during daily transit. The heaviest items, such as large laptops, textbooks, or power bricks, should always sit in the compartment closest to your back panel. Many modern packs, including the SHRRADOO laptop backpack, feature dedicated laptop sleeves that hold devices vertically flush against the back cushioning. Suspending this dense weight along your spine prevents the pack from sagging outward and dragging the harness down.
Medium-weight items like notebooks, light jackets, or tech organizers belong in the main central cavity directly in front of the laptop sleeve. The lightest gear, including pens, keys, and small cables, should occupy the outer front organizer pockets. Packing in this layered sequence keeps the center of mass high and close to your body rather than low and distant. Placing heavy dense objects in bottom or outer pockets creates downward torque that stretches webbing and pulls shoulder pads out of position.
Suspension Straps, Padding, and Cushioning Mechanics
Shoulder harness construction plays a major role in stabilizing carry height during dynamic movements like walking or running. Contoured S-curve shoulder straps follow the natural curvature of your chest, distributing pressure evenly across the pectoral and trapezius regions. In addition, suspension systems built into straps, such as those on the High Sierra Loop, integrate elastic dampening elements that absorb vertical shock. These dampening components cushion the jarring impact of each step, preventing the pack from bouncing heavily and sliding down your back.
Back panel construction also directly impacts how well a pack stays anchored at your ideal carrying height. Molded foam padding with breathable air mesh channels creates friction against your clothing while facilitating airflow to reduce heat buildup. That surface grip helps the backrest remain seated in the small of your back without slipping downward on smooth synthetic jackets or shirts. High-density foam backrests cushion your vertebrae against hard laptop corners while supporting a stable, upright posture throughout long days.
Transit Commuting and Everyday Carry Realities
Navigating crowded subways, airport terminals, and bus aisles introduces unique challenges for backpack height management. Tightening your harness for a snug high fit is ideal while walking, but sitting down in cramped transit seats often requires temporary strap adjustment. If you keep your pack strapped on while seated, the base of the bag will hit the seat pan, pushing the entire harness up into your neck. Loosening the shoulder straps slightly or taking the bag off avoids awkward spinal twists in tight seats.
For travelers navigating busy airports, built-in luggage straps allow you to slide a backpack over rolling suitcase handles, removing all vertical strain from your shoulders entirely. When choosing versatile gear for varied outdoor activities or campus commutes, comparing different designs like budget outdoor daypack options can help you find lightweight silhouettes that minimize empty tare weight. Lighter packs place less initial strain on suspension webbing, making it far easier to maintain consistent height adjustment throughout a full day of walking.
Troubleshooting Pain Symptoms and Harness Misalignment
Persistent physical discomfort often signals that your backpack is positioned incorrectly on your torso. If you experience aching or burning across the top of your trapezius muscles, your pack is likely sitting too low and dragging your shoulders backward. Cinching the shoulder straps to raise the pack two inches often provides immediate relief by shifting weight toward the thoracic spine. However, if your fingers tingle or your collarbones feel bruised, your straps are probably overtightened, pinching the nerve bundles near your collarbone.
Lower back fatigue and aching lumbar muscles usually indicate that your pack is sagging past your waistband and bouncing against your tailbone. Tightening the sternum strap and cinching bottom strap adjusters helps bring the pack back against the lumbar curve. You should also check whether your bag’s internal load has shifted toward the bottom seam during wear. Reorganizing dense tech items closer to the top and spine eliminates the bottom-heavy sag that pulls your pelvis out of alignment.
Managing Heavy Specialized Loads and Gear Types
Carrying unusually heavy or specialized cargo requires even stricter attention to pack height and stability. Dense loads like multiple water bottles, specialized tools, or insulated backpack cooler designs loaded with chilled drinks can rapidly shift your balance if positioned improperly. Liquids and dense thermal packs tend to settle firmly at the bottom of a pack cavity, exaggerating lower spinal pull. Keeping such specialized packs adjusted high against the mid-back minimizes fatigue and keeps the load from swaying during movement.
General ergonomic guidelines suggest limiting your total backpack load to no more than ten to fifteen percent of your body weight. When your cargo approaches or exceeds that threshold, maintaining proper pack height becomes twice as critical for injury prevention. An overloaded bag worn low creates severe shearing forces across your lumbar discs that can lead to chronic strain over time. Keeping the harness snug, engaging breast straps, and securing all compression points preserves your posture even when hauling heavy academic or work gear.
Sustaining Proper Ergonomic Fit Over Time
Maintaining proper backpack height is not a one-time adjustment, because strap webbing naturally loosens with routine use and movement. Friction buckles can slip gradually over the course of a long walking commute, causing the pack to settle lower without you noticing. Periodically checking your pack height in a mirror or feeling the position of the base relative to your beltline ensures you stay in the optimal ergonomic zone. If the bottom seam drops past your waistband, take five seconds to reset and re-cinch both shoulder adjusters.
Inspecting the condition of your shoulder harness, stitching, and buckle teeth also ensures your adjustments hold firmly over years of use. Reinforced bar-tack stitching at strap anchor points prevents seam stretching that could alter how the pack hangs against your back. Foam padding that has completely collapsed or lost its density should be monitored, as degraded foam transfers raw pressure directly onto your shoulders. Taking proactive care of your harness hardware and maintaining balanced height alignment keeps your daily carry comfortable, healthy, and effortless.







Write Your Review
No reviews yet. Be the first to share your experience!