


Moving across varied outdoor terrain often requires stowing trekking gear quickly when hands need to remain completely free for balance or navigation. Learning how to tie hiking pole to backpack attachment points prevents loose shafts from snagging brush, clattering against external frames, or shifting your center of gravity during steep ascents. A properly secured pair stays stable against pack sidewalls, protecting delicate adjustment lever locks and carbide tips from scraping rocks. Hikers carrying a rigid frame hiking pack or lightweight daypack benefit from keeping pole tips oriented safely toward the ground to prevent accidental gear punctures.
Modern trail packs utilize diverse attachment methods ranging from built-in shock-cord toggles to aftermarket elastic lanyards and side compression straps. Selecting the right method depends heavily on whether your pack features dedicated bottom tool loops, daisy chains, or dual side cinch straps. Exploring reliable securing techniques, hardware checks, and safety practices ensures your poles stay quiet, balanced, and ready for deployment whenever trail conditions change.
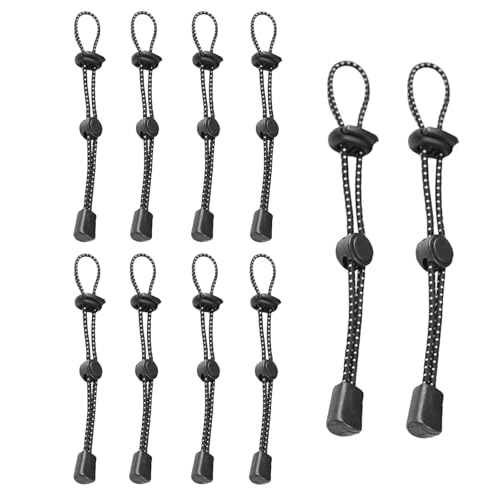
Pros
- Generous 10-pack quantity allows multiple attachment points across several hiking packs or shared family gear
- Extends up to 15 inches to accommodate varied pole diameters, sun hats, and lightweight trail essentials
- Integrated reflective strip enhances visibility around the campsite or along roads in dim lighting
- Dual buckle mechanism holds tension securely without complex knot tying
Cons
- Elastic cord tension may degrade over time with heavy sun exposure and repeated full-stretch use
- Requires existing backpack webbing loops, daisy chains, or anchor points to function effectively
- Not suitable for heavy or load-bearing gear such as climbing hardware
The CHIVOLONA Backpack Hiking Stick Holders are dedicated external gear retainers designed for day hikers, section hikers, and backpackers who need a fast, reliable method to lash trekking poles and loose outdoor items to the outside of their packs. Arriving as a 10-pack, these elastic lanyards solve the common issue of trekking poles sliding loose or bouncing during steep scrambles when your hands need to be free. Their universal loop design also makes them practical for hanging sun hats, securing light water bottles, or keeping trail accessories anchored to exterior daisy chains.
In practical trail use, these retainers function through tension-based elastic rubber cordage that relaxes at 8.3 inches and extends to a maximum length of 15 inches. This stretch range offers enough clearance to wrap around standard aluminum or carbon-fiber trekking pole shafts, including folded Z-poles or telescoping sections. By threading the cord through existing backpack lash tabs, ice-axe loops, or side compression straps, hikers can quickly lock gear against the pack frame, stabilizing the load and preventing noisy, off-balance shifts while walking.
Build quality is centered on high-elasticity rubber bands wrapped with a protective sheath featuring embedded reflective striping. Each unit includes two plastic locking buckles that grip the cord, allowing users to slide and lock the fastener into place under tension. The reflective accents serve a dual safety role by making your backpack visible to headlamps in dark camps or near trailheads at dawn, while also making dropped or detached cords easier to spot on the forest floor.
Setting up the CHIVOLONA holders is straightforward and completely tool-free. Hikers can pass the bungee through any standard webbing loop or attachment point on their pack, insert the gear, and cinch the dual buckles down to eliminate slack. Maintenance is equally simple, requiring only an occasional rinse with clean water to clear trail dust or grit from the cord and buckle springs. Weighing just 0.01875 pounds, individual lanyards add negligible weight to your trail setup and store flat inside any hip-belt pocket or pack brain.
Realistic limitations should be kept in mind before relying on these retainers on technical terrain. These cords are non-load-bearing accessories designed strictly for lightweight gear retention, meaning they cannot support heavy tools or be used for safety-critical tasks. In addition, their effectiveness depends entirely on your backpack having suitable exterior anchor points, and like all elastic rubber components, prolonged exposure to severe ultraviolet rays can eventually cause the cord to lose its initial snap.
For hikers and backpackers seeking an affordable, customizable external lashing solution, the CHIVOLONA 10-Pack offers outstanding practical value. It provides enough spare retainers to outfit multiple packs or replace worn loops across several seasons, making it a handy organizational upgrade for keeping trekking poles and trail accessories right where you need them.
The CHIVOLONA Hiking Stick Holders serve as secondary external attachment points for packs that lack dedicated pole carry systems. By anchoring through existing loops, webbing, or lash tabs, they give hikers an easy way to lash trekking poles securely against the side or front panel of a daypack or backpacking pack.
Beyond hiking sticks, the stretch capacity from 8.3 inches up to 15 inches allows these cords to hold items like wide-brim sun hats, light rolled layers, or small gear items that hikers want to access quickly without unzipping main compartments.
Each holder features a resting length of 8.3 inches (with specified product dimensions listed at 0.4 by 0.4 by 7.5 inches) and an expanded stretch capacity up to 15 inches. This length accommodates single pole shafts, paired poles, and broad accessory brims.
The entire setup weighs approximately 0.01875 pounds and comes in a 10-piece package. The hardware includes two adjustable plastic locking buckles per lanyard combined with a black elastic rubber band and high-visibility reflective striping.
Mastering Trekking Pole Attachment: Methods, Mechanics, and Trail Stability
Securing trekking poles to a backpack requires understanding how weight, shaft geometry, and anchor points interact on the trail. Hikers often encounter terrain where poles become unnecessary or hazardous, such as boulder scrambles or steep river crossings. Letting loose poles dangle from wrist straps compromises hand safety and increases tripping risks on uneven ground. Learning dependable attachment methods keeps your hands free while shielding aluminum or carbon fiber shafts from sudden impacts.
Backpack chassis provide diverse combinations of webbing loops, elastic retainers, and compression tracks to anchor gear. Knowing which points hold rigid shafts without distorting internal pack space keeps your load balanced and comfortable. When you organize these anchor points properly, stowing or deploying poles takes only moments without needing to remove your pack completely.
The Core Hardware on Modern Trail Packs
Standard hiking packs typically feature dedicated tool loops positioned at the bottom corners of the exterior shell. Originally designed for ice axes, these low-profile webbing rings serve as the foundational base anchor for trekking poles. Factory setups usually pair each bottom loop with an upper shock cord and a spring-loaded cord lock. The lower loop secures the baskets and tips, while the upper cord stabilizes the collapsed shafts against the pack body.
Side compression straps offer another structural anchor point common across daypacks and larger multi-day packs. These horizontal nylon webbing bands pull external gear tight against the pack sidewall while stabilizing internal contents. Packs equipped with dual compression straps on each side allow hikers to sandwich pole shafts securely against the reinforced side seams. This position maintains balanced weight distribution and leaves the rear panel open for hydration access.
External daisy chains and laser-cut webbing slots deliver modular anchor possibilities on minimalist or technical packs. These vertical webbing ladders allow hikers to route auxiliary shock cords or clips at customized heights. Modular ladders prove especially helpful when factory loops sit too low or when bulky gear obstructs standard attachment zones. Custom anchor placement gives you full control over shaft angle, tension, and trail clearance.
Method 1: The Loop Flip and Cinch Technique
The loop flip method is the classic approach for packs equipped with standard bottom tool loops. First, collapse your poles to their shortest setting and close all lever locks or twist mechanisms securely. Feed the carbide tips of both poles downward through the lower loop until the baskets rest against the webbing. The baskets create a mechanical stop that prevents the poles from dropping through the opening.
Rotate the pole shafts upward 180 degrees toward the top panel of your backpack. This twisting motion wraps the webbing loop around the lower shafts, locking the baskets firmly in place. The resulting tension keeps the carbide tips pinned against the pack base so they cannot slip backward. This simple rotation eliminates downward sliding even during fast ascents or rough scrambles.
Align the upper shafts flat against the pack body and secure them with the upper bungee cord. Press the cord lock button, cinch the elastic loop snug around both shafts, and release the toggle to maintain tension. Ensure the bungee rests directly beneath the pole grips so the shafts cannot migrate upward. This three-point retention system holds poles quiet and stable against the pack body.
Method 2: Side Compression Webbing and Pocket Anchoring
Stowing poles along the side panels provides excellent balance and keeps tips away from following hikers. Slide the collapsed pole tips into an exterior stretch mesh water bottle pocket, seating them firmly at the bottom. The elastic pocket fabric creates a protective envelope that isolates sharp carbide tips from accidental contact. This placement also shields tips from catching on low rocks or brush along tight trails.
Slide the upper shafts beneath the lower and upper side compression straps of the pack. Loosen the compression buckles slightly so the shafts sit flush against the pack fabric without twisting the webbing. Position the poles behind your water bottle to keep the rigid shafts closest to the pack frame. Cinch both compression straps firmly until the poles are held securely against the side panel.
Check that the pole handles do not rise above the pack frame or interfere with your arm movement. Collapsing three-section poles completely keeps the grips level with the pack top lid. When carrying a budget hiking backpack options setup lacking dedicated front tool loops, this side compression method provides dependable retention.
Method 3: Utilizing Elastic Rope Lanyards with Locking Buckles
Aftermarket elastic holders offer a versatile solution when a pack lacks built-in pole attachments. Products like the CHIVOLONA Backpack Hiking Stick Holders,Elastic use durable stretch lanyards made of high-elasticity rubber bands. Each lanyard measures 8.3 inches in resting length and stretches up to 15 inches to grip single or bundled poles. Dual fixed locking buckles allow hikers to adjust tension precisely around varying shaft diameters.
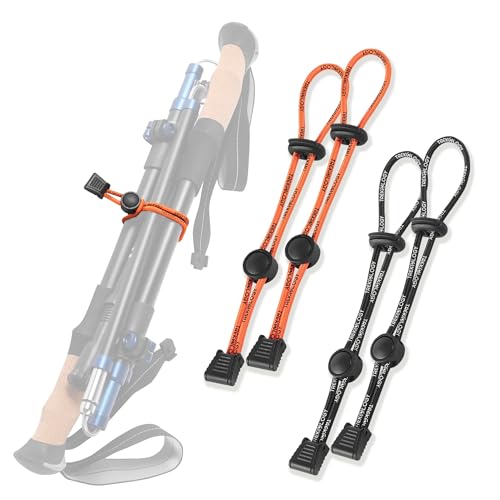
Loop the lanyard through an exterior daisy chain, shoulder strap webbing, or haul loop to create an anchor point. Feed the locking buckle through the loop and cinch the cord securely against the pack webbing. Stretch the remaining elastic loop around your collapsed pole shafts and tighten the locking buckles. The elastic tension secures the poles firmly without applying excessive localized pressure to thin shaft walls.
These specialized elastic cords also incorporate reflective stripes woven along the lanyard surface. The reflective material bounces light in dark conditions, serving as a helpful safety marker during night hikes. This visibility also helps you find attachment points or retrieve gear around camp in low light. Having multiple holders lets you secure other gear, such as sun hats or bottles, alongside your poles.
Shaft Material Considerations: Carbon Fiber Versus Aluminum
Trekking pole materials require distinct handling when securing shafts under heavy strap tension. Carbon fiber poles provide outstanding lightweight performance, but they possess lower lateral crush resistance against concentrated pressure. Overtightening rigid buckles directly over thin carbon sections can cause surface damage or hairline cracks. Using elastic cords or distributing strap tension evenly preserves carbon fiber tubes during rugged trail use.
Aluminum poles offer exceptional resilience and easily handle firm compression strap tension. High-strength aluminum alloys resist impact damage and bend rather than shatter under sudden stress. You can pull side straps tight across aluminum shafts without risking hidden delamination. However, avoid clamping metal buckles directly over lever lock hardware to keep adjustment screws aligned.
Locking mechanisms also require inspection before securing poles to any backpack exterior. Close all external lever locks completely so the plastic tabs do not catch on passing tree limbs. If your poles use twist-lock expanders, verify that each section is snug so they do not vibrate loose. Keeping collapsed shafts firmly locked preserves a compact profile that prevents trail snags.
Protecting Pack Fabrics and Trail Partners from Carbide Tips
Carbide tips grip dirt and rock effectively, but their sharp points can damage pack fabrics. Unprotected tips rubbing against ripstop nylon or mesh pockets can cause friction tears or punctures. Always slide protective rubber caps over carbide tips before securing poles to your pack. Rubber caps cushion the sharp edges and protect delicate fabric laminates from abrasive wear.
Downward tip orientation also safeguards fellow hikers walking behind you in tight single-file formations. Carrying poles with tips facing upward turns them into hazardous eye-level obstacles on narrow switchbacks. Storing poles with tips pointed toward the ground or seated in pockets keeps the trail safe for everyone. This downward orientation prevents accidental injury when stepping over obstacles or pausing abruptly.
Baskets also need careful positioning to prevent catching on branches along overgrown corridors. Replace broad winter powder baskets with compact mud rings when hiking summer trails. Position the baskets flat against the pack shell rather than letting them flare outward into trailside brush. Keeping baskets tucked close to the pack body maintains a clean silhouette through dense vegetation.
Biomechanics, Weight Distribution, and Center of Gravity
Attaching external gear affects how your backpack transfers load weight across your hips and shoulders. Maintaining an efficient carry requires placing dense mass close to your spine and centered between your shoulder blades. Poles are relatively light, but mounting them far back on the rear panel creates leverage that pulls your torso backward. This rearward pull increases shoulder fatigue and strains upper back muscles during long ascents.
Mounting poles symmetrically along both side panels balances weight and stabilizes your walking stride. Placing one collapsed pole on each side avoids uneven torso torque and promotes balanced arm movement. If you secure both poles together on one side, counterbalance the other side with a full water bottle. Equalizing side-to-side weight keeps your harness centered and prevents shoulder strap chafing.
Vertical shaft alignment provides far greater trail clearance than diagonal mounting methods. Diagonal angles often cause pole handles to extend past the pack edges, catching on rocks or low branches. Aligning shafts vertically keeps your profile narrow and prevents awkward snags in tight passages. A streamlined vertical profile helps you move smoothly through rocky scrambles and dense timber.
Troubleshooting Rattle, Slip, and Hardware Wear
Shaft rattle is a common annoyance when hiking with poles attached to pack exteriors. This sound occurs when two shafts tap together or vibrate against an internal pack frame stay. Prevent rattling by nesting poles handle-to-tip or placing a small band around both shafts at the midpoint. Dampening shaft contact keeps your pack quiet and prevents irritating noise during quiet trail walks.
Downward slippage happens when smooth composite or painted shafts lose grip against slick nylon webbing. If poles slide down while walking, wrap the lower loop around the shafts twice before cinching the toggle. This extra wrap creates additional surface friction that stops downward migration under walking vibration. Checking strap tension during rest breaks ensures poles remain firmly anchored throughout the day.
Routine inspection of elastic cords, buckles, and webbing seams prevents unexpected gear failures on the trail. Shock cords gradually lose elasticity when exposed to ultraviolet sunlight, grit, and repeated stretching. Check for frayed cords, cracked toggles, or weakened stitching before heading out on remote backcountry routes. Replacing tired bungees with fresh elastic holders ensures your poles stay secure in all conditions.
Pre-Trail Stability Checks and Final Verification
Performing a quick physical stability check before hiking ensures your poles stay anchored all day. Lift your packed backpack by the top grab handle and give it a firm vertical shake. If the poles slide, rattle, or tilt sideways, readjust your straps and locking buckles immediately. Taking a moment to verify attachment points prevents lost gear and frustrating trail stops.
Choose your attachment method based on how often you plan to deploy your poles. Use quick-release elastic cords if you need to alternate rapidly between pole use and hand scrambling. For long stretches where poles stay stowed, cinch heavy side compression straps for maximum security. Selecting the right setup keeps your hands free, your gear safe, and your trek enjoyable.






Write Your Review
No reviews yet. Be the first to share your experience!