


Unexpected downpours can quickly turn an enjoyable trail outing or daily walking commute into a soggy gear emergency. Knowing how to backpack in the rain requires more than simply tossing on a waterproof jacket and hoping your pack fabric repels moisture. Standard nylon and polyester weaves resist light mist, but prolonged saturation eventually forces water through needle holes, uncoated zipper tracks, and contact points along your back panel. Carrying the right external protection and arranging internal gear barriers prevents soaked sleeping bags, ruined electronics, and waterlogged hip belts.
Effective moisture defense relies on layered water protection that shields both the exterior shell and sensitive cargo resting against your spine. Whether you choose heavy-duty rain covers from brands like Unigear and Evotopf or rely on dedicated waterproof bags, sealing vulnerable openings remains essential for maintaining pack balance. Hikers carrying load-bearing gear such as internal frame hiking backpacks must also monitor strap tension, as damp shoulder harnesses stretch and shift weight across wet trail miles. Planning your packing layout beforehand ensures quick access to emergency layers without exposing the dry contents of your main compartment.




Mastering Wet Weather Backpacking and Gear Waterproofing
Traveling through steady rain demands an organized system that shields vulnerable gear while maintaining carrying comfort. Moisture penetrates untreated fabrics rapidly, turning dry insulation into useless dead weight and threatening delicate electronics. Relying on a single line of defense rarely protects your pack during extended storms or intense cloudbursts. By combining an external shield with smart interior compartmentalization, you can hike through severe weather without soaking your critical camp essentials.
Understanding Water Resistance Versus Complete Waterproofing
Pack fabrics and accessories feature distinct water protection levels that behave differently under prolonged downpours. Basic water resistance usually relies on a light surface durable water repellent finish that causes raindrops to bead and roll away. But sustained hydrostatic pressure or heavy drops will eventually push water directly between woven fibers. Fully waterproof materials, such as the coated polyurethane fabrics seen on urban bags like the RAINS Book Daypack, create a solid barrier against moisture ingress.
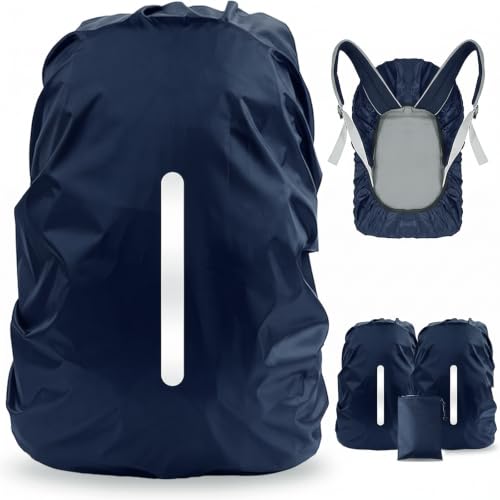
Stitched seams represent the most vulnerable failure point on nearly all traditional outdoor daypacks. Standard sewing needles punch thousands of tiny perforations along pack seams where moisture readily seeps under tension. External accessories like the WSZCML cover counter this issue by incorporating multi-layer fabric rated up to 8000mm hydrostatic resistance. Similarly, models from Unigear feature 5000mm coatings designed to keep persistent rain from breaching the main compartment exterior.
The Multi-Layer Gear Defense Strategy
Experienced hikers never rely solely on a single waterproof layer to keep vital gear dry across long trail days. External rain covers form your first barrier by absorbing the brunt of falling precipitation and driving winds. Beneath the outer pack shell, an internal lining adds a crucial second layer of insurance against perimeter leaks. Heavy contractor trash bags or purpose-built silicone pack liners create an impenetrable envelope inside your main compartment cavity.
The third layer of protection focuses on micro-organization for items that cannot tolerate any moisture exposure whatsoever. Pack your sleeping bag, dry base layers, and fleece inside individual roll-top dry sacks. Storing dry garments separately ensures that opening your pack in steady drizzle will not expose your entire sleep system to falling drops. For high-value mobile phones, power banks, and navigation GPS units, transparent zip-lock pouches or structured dry cases provide targeted moisture isolation.
This redundant layering strategy safeguards against unexpected equipment failure or accidental submersion. If an external rain cover snags on a sharp branch and tears, your interior contractor bag prevents water from flooding your gear. Even when navigating budget-friendly gear setups with affordable hiking backpacks, this multi-barrier approach provides exceptional protection against catastrophic water damage. Redundancy costs almost nothing in pack weight but delivers absolute peace of mind during relentless storms.
Sizing and Securing External Backpack Rain Covers
Selecting an external pack cover requires matching its volume envelope to your fully loaded pack capacity. Rain covers from brands like LAMA and MOPHOEXII often come in distinct liter sizes to cover compact daypacks ranging from 18 to 25 liters. Larger expedition packs demand extended profiles, such as the XL and XXL sizing available from GRSECPO for massive gear hauling. Buying a cover that fits too tightly strains perimeter seams and leaves lower corners completely exposed to splashback.
High winds present a major challenge when using external elasticized rain covers along exposed mountain ridges. Gusts can easily catch beneath the edges of a loose cover and peel it directly off your pack body. Premium rain covers solve this problem by incorporating adjustable cross-buckle straps behind the harness. Options from Evotopf and Unigear utilize durable anti-slip buckle straps that anchor the cover firmly behind the back panel.
Poorly fitted covers also risk acting as reservoirs if water begins pooling along the bottom elastic hem. When moisture runs down your back panel, it can settle inside the lower edge of an improperly tensioned cover. Inspect your pack base periodically to ensure water drains away rather than accumulating around your lower gear. Tightening the perimeter cinch cord keeps the lower fabric taut and directs runoff harmlessly toward the ground.
Strategic Interior Packing for Rainy Conditions
Arranging gear inside your pack during wet weather requires careful consideration of access priority and center of gravity. Everything needed during trail movement must remain accessible without opening your main waterproof compartment. Stow your rain jacket, pack cover, trail map, and daily snacks inside accessible exterior stash pockets or under top lids. Opening the main body of your bag while standing under heavy rain invites moisture directly into your dry zone.
Dense, heavy items belong low and close to your spine to preserve carrying balance on slick, slippery terrain. Pack your sealed sleeping bag and spare camp clothes in the lowest section of the internal liner bag. Place heavy food containers, cook kits, and water bladders directly above your sleep system against the pack frame. This weight configuration keeps the load centered over your hips and minimizes accidental slips across muddy trail surfaces.
Never pack soaked shelter components inside the dry liner of your main pack compartment. A dripping wet rainfly or muddy tent footprint will quickly transfer moisture to surrounding gear if packed together. Store wet tent parts in external mesh front pockets, side sleeves, or lashed securely under bottom compression straps. Isolating wet items outside the dry envelope ensures your sleeping quarters remain comfortable once camp is established.
Managing Back Panel Moisture and Strap Runoff
Even the best external rain cover leaves a significant vulnerability along the back panel and shoulder harness. Because the harness rests against your torso, rain covers cannot wrap entirely around the rear frame of the pack. Rain that hits your neck and shoulders flows downward, saturating the back padding and harness foam. Over several hours of walking, this channeled moisture can seep through the pack back panel into internal gear.
Wearing a properly sized rain jacket with an extended drop-tail hem helps deflect water past the open harness gap. Hikers walking in warmer rainy conditions often wear loose ponchos that drape completely over both hiker and backpack. This poncho setup creates a seamless canopy that eliminates the exposed back panel vulnerability entirely. However, ponchos catch wind easily on exposed alpine ridges, requiring caution in gusty mountain environments.
Internal perspiration poses an equal threat to clothing layers during sustained aerobic hill climbs in wet weather. Heavy waterproof jackets trap body heat, causing sweat to accumulate on your skin and base layers. Ventilate early by unzipping underarm pit zips and adjusting your pace before heavy sweating soaks your hiking clothes. Pairing your system with breathable lightweight hiking pants helps manage lower-body heat and dries rapidly during brief lulls in precipitation.
Urban Commuting in Downpours Versus Wilderness Trekking
City transit commuting in heavy rain presents distinct gear protection demands compared to backcountry trail journeys. Commuters routinely transport fragile tech, laptops, and paperwork through urban weather corridors without carrying multi-day camping equipment. Bags like the RAINS Book Daypack feature smooth waterproof polyurethane coatings tailored specifically for daily work commutes. These clean urban profiles shed heavy rainfall while maintaining a sleek, professional aesthetic suitable for modern office settings.
Laptops require dedicated protection against both wet weather intrusion and accidental impact shocks on transit floors. Verify that internal laptop sleeves include a suspended false bottom that keeps device corners elevated off the floor. In heavy storms, slipping your laptop into a slim neoprene sleeve before packing adds critical splash defense. Urban commuters using standard fabric packs can deploy multi-pack covers like those from LAMA to achieve quick protection during sudden downpours.
Harness Ergonomics and Wet Weather Trail Stability
Wet weather alters how backpack suspension systems sit and distribute load across your shoulders and pelvis. Heavy nylon webbing and dual-density strap foam absorb moisture, which can cause straps to stretch and slip under load. Check your shoulder strap tension, sternum strap height, and hip belt tightness regularly during long rainy days. Keeping your harness properly tensioned prevents the bag from sagging backward and straining your lower lumbar spine.
Wet fabric creates higher friction against clothing, significantly increasing the risk of painful skin chafing. Ensure your hip belt remains seated firmly over your iliac crest to stop side-to-side friction against your waistline. Fasten the sternum strap across your mid-chest to pull shoulder straps inward and away from sensitive armpit contours. Eliminating harness movement prevents abrasive rubbing that turns minor dampness into miserable trail raw spots.
Trekking poles provide vital stability when balancing a heavy wet pack over slick rocks, exposed roots, and mud. Carrying a water-laden pack shifts your center of mass unexpectedly when your boots lose traction. Planting dual poles widens your stability base and reduces fatigue on your knees and stabilizing ankle muscles. Maintaining three points of contact on steep, rain-slick descents keeps you upright and protects your gear from hard falls.
Camp Setup and Wet Gear Isolation Protocols
Arriving at your campsite in pouring rain requires a methodical routine to protect your dry shelter interior. Pitch your tent outer rainfly first, or set up a freestanding tarp overhead, before opening your backpack. Never leave your pack sitting uncovered on wet ground while searching for tent stakes or pitching cords. Lean the pack upright against a tree or keep its protective cover cinched tightly until overhead shelter is established.
Establish a strict segregation zone inside your tent vestibule for thoroughly soaked gear before crawling inside. Strip off dripping rain jackets, wet gaiters, and muddy boots directly under the vestibule canopy. Remove your external pack cover, shake off standing surface water, and store the cover near the vestibule door. Only bring your internal waterproof dry bags inside the main tent body to ensure your dry sleep insulation stays pristine.
Post-Trip Pack Drying and Fabric Maintenance
Proper post-trip maintenance prevents fabric degradation, mold accumulation, and premature coating failure on your gear. Never store a damp backpack or wet rain cover inside a dark closet or sealed plastic bin. Trapped moisture triggers polyurethane hydrolysis, causing waterproof backings to turn sticky, flake off, or develop foul odors. Unpack every compartment completely and invert all interior liner pockets to expose hidden damp surfaces to circulating air.
Hang your pack and accessories to air-dry naturally in a well-ventilated, shaded indoor area away from heat. Avoid placing technical fabrics near household radiators or using high-heat clothes dryers that can melt synthetic fibers. High temperatures degrade delicate seam-taping adhesives and permanently warp structural foam shoulder padding. Allow all nylon webbing, air-mesh back panels, and buckle straps to dry completely before packing them away.
Inspect zipper coils and slide tracks for collected trail mud, fine grit, and mineral buildup after wet hikes. Rinse dirty zipper tracks with lukewarm tap water and brush gently using a soft nylon bristle brush. Once the fabric dries thoroughly, check whether water still beads cleanly on the exterior surface. If fabric begins absorbing water rather than repelling droplets, spray a specialized technical durable water repellent treatment across high-wear panels.
Final Preparations for Wet Trail Confidence
Mastering wet weather backpacking comes down to consistent preparation, methodical gear organization, and disciplined trail habits. Inspecting your rain cover seams, securing internal dry bags, and maintaining harness tension ensures steady comfort through grueling downpours. High-visibility reflective accents, featured on covers from WSZCML and MOPHOEXII, also improve safety during low-light road walks and emergency trail exits. With the right protective layers and careful packing, rain becomes just another memorable element of your outdoor journey.







Write Your Review
No reviews yet. Be the first to share your experience!