


Traditional duffel bags excel at swallowing bulky expedition gear, but hauling a fully loaded bag by hand quickly strains forearms and shoulders during long airport treks or transit commutes. Converting that duffel into a functional backpack redistributes heavy gear across both shoulders, transforming an unwieldy load into an agile, balanced carry setup. Understanding how to convert patagonia duffel to backpack ensures you can switch between hand carry and hands-free transit in seconds without wrestling with twisted webbing or loose attachment points.
Modern convertible bags like the Patagonia Black Hole line utilize removable, ergonomically shaped shoulder straps designed to interface directly with reinforced exterior anchor loops. While these convertible systems lack the rigid internal stays found in dedicated internal frame backpack designs, proper strap tensioning and strategic weight distribution provide surprising stability on the move. Mastering the correct hardware orientation, ladderlock routing, and internal packing sequence prevents collarbone fatigue and keeps your gear secure across diverse travel environments.

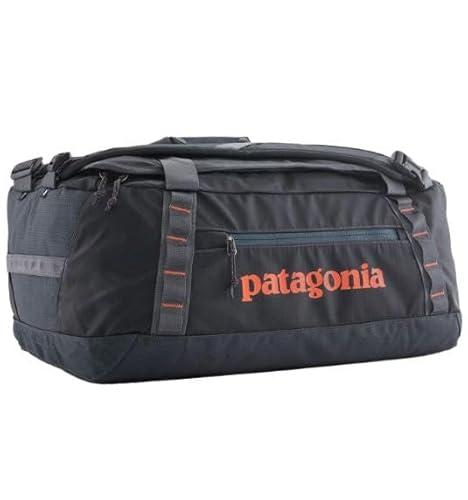


Mastering the Patagonia Duffel Backpack Conversion and Ergonomic Setup
Converting a Patagonia Black Hole duffel into a backpack is straightforward once you understand how the modular harness connects to the bag body. The system relies on two removable, contoured shoulder straps that attach to dedicated webbing loops mounted on the top lid and bottom corners. Because duffel bags feature a flexible barrel profile rather than a molded foam backboard, correct strap tension and thoughtful interior gear placement are critical to achieving a stable carry. Taking a few moments to route the hardware properly prevents strap slippage, protects your neck from chafing, and keeps heavy loads balanced during transit.
Locating and Preparing the Detachable Shoulder Straps
Most Patagonia Black Hole duffels ship with their shoulder straps detached and stowed inside the interior mesh lid pocket. When unpacking your bag or retrieving it from storage, unzip the main U-shaped opening to locate the strap pair. Each strap features dense dual-density foam padding encased in durable fabric, engineered to cushion heavy gear loads across your shoulders. Setting the bag flat on a clean table or floor before starting allows you to examine the hardware without fighting an awkward, shifting shape.
Before attaching anything, inspect both straps to identify their ergonomic orientation. The straps are cut with an anatomical curve that matches the natural slope of the human neck and chest. Placing the straps side by side reveals that the inner curves should face toward each other when installed correctly. Installing them backward or upside down causes the rigid outer edge of the foam to press uncomfortably into your neck muscles.
Identifying Anchor Points and Hardware Mechanics
The Black Hole duffel features two distinct sets of attachment points designed specifically for backpack mode. Near the top lid hinges and haul handle, you will find two reinforced webbing loops secured with heavy bar-tack stitching. At the opposing lower corners of the bag body, another pair of reinforced webbing loops anchors the lower strap tails. These anchor points are separate from the side daisy chains, which are intended for clipping carabiners or lashing bulky gear to the exterior.
Patagonia utilizes metal gatekeeper clips or heavy-duty plastic slider toggles at the top of each strap. These gatekeeper clips feature a spring-loaded wire gate or a directional slot that slips firmly over the reinforced webbing loop. The lower end of each strap features an adjustable ladderlock buckle threaded with a durable nylon webbing tail. Familiarizing yourself with these hardware components makes clipping and unclipping the harness quick and effortless in crowded airport terminals.
Step-by-Step Attachment of the Upper Gatekeeper Clips
Start by placing your duffel face down on a flat surface with the zippered top lid facing upward. Take the left shoulder strap and orient the cushioned side so it will rest against your torso during wear. Position the top gatekeeper clip over the reinforced webbing loop located near the top haul handle. Depress the wire gate or slide the open slot through the webbing until the loop sits fully inside the metal hardware cavity.
Release the spring gate and pull upward firmly to confirm that the clip has latched securely over the loop. Repeat this exact process with the right shoulder strap on the opposite top webbing anchor point. Both upper clips must sit flush against their respective anchor loops without pinching or bunching the webbing fabric. A partially seated clip can pop loose under tension when lifting a heavily packed duffel onto your back.
Routing the Lower Webbing Tails Through Ladderlock Buckles
Once the top clips are anchored, extend the lower webbing tail from the bottom corner of the duffel toward the strap buckle. Check the entire length of the webbing strap to ensure there are no twists or inversions along the line. Smooth, flat webbing feeds cleanly through plastic buckles, whereas twisted webbing causes uneven pressure points and premature buckle wear. Align the webbing straight with the corresponding ladderlock mechanism at the base of the padded shoulder section.
Thread the webbing tail up through the lower slot of the ladderlock buckle and down over the central friction bar. Pull several inches of excess webbing through the buckle to engage the friction teeth against the textured nylon weave. Complete the same sequence on the opposite side, matching the threaded length as closely as possible. Proper threading ensures that the buckle locks under downward tension while still releasing smoothly when lifted by the release tab.
Dialing in Harness Tension and Torso Positioning
After attaching both straps, pick up the duffel by its top haul handle and slip your arms through the shoulder loops. Reach down to grasp the lower webbing tails and pull downward and backward simultaneously to cinch the bag closer to your spine. Unlike standard backpacks that feature rigid internal stays, a convertible duffel relies entirely on strap tension to pull its bulk against your body. Tightening the harness lifts the base of the duffel above your lower lumbar region, preventing painful downward sag.
Position the bag so the top lid rests flat against your upper back rather than pulling away from your shoulders. If the bag leans backward and pulls on your collarbones, tighten the webbing tails by another inch or two. Conversely, over-tightening can pull the padded foam into your armpits and restrict arm movement while walking. Aim for balanced contact across the entire padded shoulder zone so no single pressure point bears the brunt of the load.
Managing Center of Gravity and Internal Gear Placement
The physical comfort of a duffel in backpack mode depends heavily on how you pack the main cavity. Traditional packs incorporate dedicated frames and molded backboards, but a duffel has only a flexible layer of fabric between your spine and your packed gear. For travelers accustomed to specialized designs, exploring budget hiking backpacks demonstrates how even basic structured packs isolate gear points from your lumbar curve. Without an integrated frame, any rigid or sharp item packed carelessly inside a duffel will jab directly into your back.
Always create a soft protective barrier along the back-facing lid of the duffel using folded clothing, fleeces, or padded packing cubes. Dense, heavy items like footwear, toiletries, and bulky gear should sit as close to the bottom and center of the bag as possible. Positioning heavy weight low and tight against your back stabilizes your center of gravity, preventing the bag from swaying side to side as you walk. Never pack hard electronic chargers, metal water bottles, or books flush against the back panel.
Converting Between Duffel Sizes: 40L, 55L, and 70L Dynamics
The practical feel of backpack carry varies significantly across the different volume capacities in the Black Hole family. The compact 40L model functions exceptionally well as a temporary backpack because its shorter overall length matches average human torso dimensions. Its smaller volume naturally limits total carrying weight, making it comfortable for walking between airport terminals or navigating subway stations. It fits within most standard airline overhead compartments, allowing for seamless one-bag travel transitions.
The popular 55L size represents a middle ground that provides ample storage for week-long excursions while remaining manageable on the back. When filled to capacity, however, a 55L duffel requires disciplined strap adjustment to control pack depth and prevent barrel bulge. The larger 70L model offers massive hauling capability, but its extended length often extends below the tailbone on shorter individuals. On bags of that volume, backpack mode is best reserved for short transfers between luggage carousels and ground transportation rather than extended pedestrian commuting.
Troubleshooting Strap Slippage and Uneven Tension
If you notice a shoulder strap slipping loose while walking, the webbing tail is almost certainly threaded incorrectly through the ladderlock. When webbing is routed in reverse, the buckle friction bar cannot bite into the fabric weave, causing gradual slippage under load. Unthread the lower tail completely, verify that the textured side of the webbing engages the teeth, and rethread it over the central bar. Taking thirty seconds to correct buckle routing eliminates the frustration of constantly readjusting strap length on the move.
Uneven strap tension is another frequent culprit behind neck strain and shoulder fatigue during transit. When one strap is cinched tighter than the other, the entire weight of the duffel shifts diagonally across your spine. Set the bag down on a level surface, pull both strap tails until the buckles sit at identical heights, and verify alignment before hoisting the load. Ensuring symmetrical tension keeps your posture upright and allows the contoured foam to distribute weight evenly across both trapezius muscles.
Protecting Technical Fabrics and Water-Resistant Coatings
Patagonia Black Hole duffels feature durable recycled polyester ripstop fabric laminated with a weather-resistant thermoplastic polyurethane film. This shiny exterior coating provides dependable protection against rain, slush, and transit grime, but it requires mindful care to prevent premature wear. When converting the bag on abrasive surfaces like asphalt or gravel, avoid dragging the coated fabric across sharp stones. Sharp abrasions can puncture the outer laminate and compromise the water-resistant barrier that shields your clothing.
Routine cleaning should be done by hand using lukewarm water, a mild non-detergent technical soap, and a soft microfiber towel. Never run a convertible duffel through a home washing machine, as the violent agitator and spinning cycle can peel internal seam tapes and crack the exterior film. Similarly, keep the bag away from high-heat clothes dryers, which can melt synthetic coatings and deform the foam shoulder straps. Allow the bag to air dry fully in a shaded, well-ventilated area before unclipping the harness and packing it into storage.
Convertible Duffels Versus Purpose-Built Travel Backpacks
Convertible duffels deliver unmatched packing volume and weather protection, but they represent a functional compromise when compared to dedicated backpacks. A purpose-built backpack often incorporates internal aluminum stays, load-lifter straps, integrated hip belts, and suspended mesh back panels that maximize airflow. In contrast, carrying a smooth TPU-coated duffel flush against your spine traps body heat, leading to noticeable back sweat on warm summer walks. While rugged and adaptable, a duffel will never provide the ventilated comfort of dedicated hiking or travel systems.
Specialized outdoor packs, such as a dedicated hiking cooler pack designed for hauling chilled trail provisions, prioritize ergonomic chassis structure and active thermal insulation over raw gear capacity. If your itinerary involves walking several miles across town with heavy gear, a framed travel pack with an active suspension harness is typically the more comfortable choice. However, for travelers who value open-cavity loading, burly weather resistance, and flexible carry modes between trains, boats, and flights, the convertible Black Hole duffel remains a versatile workhorse.
Taking the time to master strap attachment, tensioning, and internal weight distribution unlocks the full potential of your convertible bag. By pairing correct hardware orientation with organized packing cubes, you can navigate busy transit hubs with hands-free mobility and peace of mind. Check your attachment points periodically, keep the webbing free of grit, and enjoy the dependable versatility that a dialed-in convertible duffel provides.





Write Your Review
No reviews yet. Be the first to share your experience!