


Packing dense trail gear into a standard pack often creates severe space constraints, leaving bulky closed-cell foam or inflatable pads competing for internal volume against tents and warm apparel. Securing heavy or oversized sleep systems externally becomes necessary, yet an unstable bundle can pull the load-lifters back, induce trapezius strain, and disrupt natural balance over rocky trail terrain. Understanding how to strap sleeping mat to backpack frames correctly ensures your sleep gear remains immobile while preserving the pack center of gravity. Proper anchoring prevents trail brush from ripping foam surfaces and keeps the pack balanced against your spine.
Harness stabilization begins with selecting the correct attachment points, whether using bottom compression webbing, dedicated side loops, or top lid cinch points. Traditional external and rigid frame backpacks offer substantial anchor stability, but modern frameless and internal packs require intentional lash techniques to prevent dangerous pendulum swing. Using dedicated nylon webbing with reliable friction buckles ensures the sleeping mat stays compressed without slipping during miles of steep ascents. Taking time to position and compress this gear properly transforms an unwieldy load into a balanced, comfortable trail setup.


Mastering Sleep Mat Attachment and Pack Weight Distribution
Securing a sleeping pad to the outside of a rucksack requires balancing convenience against ergonomic stability. Placing bulky gear externally frees up essential interior capacity for dry clothes, food rations, and sensitive electronics that require total moisture protection. However, hanging extra weight off your frame alters how gravity pulls on your shoulders and lower spine. Learning the right lashing mechanics guarantees your sleep pad stays firmly anchored without swaying across rough wilderness trails.
Evaluating Sleeping Mat Styles and External Rigging Demands
Closed-cell foam mats represent the classic candidate for external pack attachment because their rugged composition resists punctures from thorns and granite edges. These pads take up significant physical volume that can overwhelm a pack interior, making exterior lashing the most logical packing strategy. Folding accordion pads stack neatly against flat pack panels, whereas cylindrical rolled pads require wider curved lash points. Both varieties demand continuous strap tension to prevent air gaps that allow the pad to slide out during sudden trail movements.
Inflatable sleeping pads, on the other hand, usually compress into compact cylinders designed to ride inside the pack body. Lashing an inflatable pad to the outside leaves delicate air chambers exposed to sharp branches, thorns, and jagged rock faces. If limited internal space forces you to strap an inflatable mattress externally, placing it inside a dedicated heavy-duty stuff sack is essential. Double-checking strap tension across smooth stuff sack fabric prevents the slick nylon material from working free under heavy stride vibrations.
Anatomical Weight Distribution and Center of Gravity Mechanics
A properly packed rucksack keeps dense mass resting against the spine near the upper lumbar area to maintain natural posture. When you attach a bulky sleeping mat to the bottom exterior of your bag, you shift the center of mass lower and further away from your core. This placement can cause the pack to pull backward against your shoulders, forcing your neck and upper torso forward to compensate. Understanding this biomechanical leverage helps you determine whether a bottom, top, or vertical side mount best suits your body geometry.
Heavier self-inflating pads generate noticeable leverage when strapped to the lower sleeping bag loops. If your mat carries notable weight, securing it near the top lid or vertically along a side compression panel helps keep the mass higher and closer to your center of gravity. Conversely, lightweight closed-cell foam pads weigh very little, making bottom mounting far less fatiguing on the lower back. Matching the weight profile of your sleep system to your harness capabilities keeps your stride efficient and reduces trail fatigue.
Selecting Optimal Mounting Locations: Bottom, Top, and Side Lash Points
Bottom attachment using dedicated equipment loops is the most widespread technique on traditional hiking packs. This setup utilizes dual webbing straps that loop underneath the bottom pack compartment, holding the sleeping pad horizontally across your lower back. While this position leaves the main compartment easily accessible, it lowers your clearance when scrambling over boulders or ducking under fallen trees. Hikers must also take care when setting the pack down on wet soil or muddy ground, as the bottom-mounted mat absorbs moisture and dirt directly.
Top lid mounting positions the mat horizontally across the upper collar of the backpack, secured beneath the brain or floating lid straps. This orientation keeps the pad elevated above wet ground and thick underbrush, significantly reducing the likelihood of tears or dirt accumulation. Because the pad rides higher, it avoids hitting the back of your thighs during steep inclines and rock steps. However, an oversized pad on top can bump against low-hanging branches and restrict head mobility when wearing a climbing helmet or looking up steep pitches.
Vertical side mounting relies on the side compression straps found on most modern trekking packs. Sliding a rolled pad vertically down one flank keeps the pack profile narrow, making navigation through dense overgrown brush far more manageable. The primary challenge with this approach is asymmetry, as placing a pad on one side can unbalance lateral weight distribution. To counteract this imbalance, hikers must pack water bottles, tent poles, or fuel canisters on the opposite flank to maintain equal side-to-side equilibrium.
Step-by-Step Rigging Method for Secure External Pad Mounting
Begin the strapping process by tightly rolling or folding your sleeping pad to eliminate trapped air and excess bulk. If dealing with an accordion-style foam pad, press the folds together firmly so the edges form a compact, uniform rectangular block. For cylindrical roll mats, roll the material as tightly as possible from one end to the other, smoothing out creases as you progress. Securing the rolled bundle temporarily with elastic bands or cordage keeps the profile tight while you prepare the main attachment straps.
Next, feed your utility straps through the structural lash tabs or daisy chain loops on your pack before positioning the sleeping pad. Passing the webbing through dedicated gear loops prevents the straps from sliding laterally across the pack fabric once cinched. Place the rolled sleeping mat squarely against the pack panel, ensuring equal overhang on the left and right sides. Centering the pad precisely prevents uneven lateral drag and keeps the bundle from bumping into your arms during natural walking motion.
Once the pad is positioned, wrap each utility strap completely around the bundle and engage the buckle mechanisms. Tighten both straps incrementally, alternating back and forth between them to maintain balanced tension across the entire width of the mat. Pulling one strap completely tight before the other can distort the pad shape and cause the looser side to work free over time. Continue tightening until the webbing creates a slight indentation in the foam, confirming that the pad is clamped firmly against the pack chassis.
Finally, secure the excess strap webbing tails to eliminate loose ends that could snag on trail vegetation. You can thread long strap tails back through the buckle slide or tuck them neatly beneath the compressed pad body. Give the mounted pad a firm shake in multiple directions to verify that there is zero slippage or rotational movement. If the pad shifts even slightly during this physical check, release the tension, realign the straps, and tighten them down with greater force.
Webbing Hardware and Strap Mechanics: Slide Locks and Quick-Release Buckles
The hardware anchoring your utility straps determines how well your rigging resists vibrational slippage over hours of walking. Many standard lash accessories, such as the Cosmos Pack of 2 Black Color Mattress Backpack straps, incorporate a non-slip sewn-on slide-stop buckle paired with slide locks across a forty-two-inch length. These slide-stop mechanisms rely on friction against one-inch nylon webbing to maintain tension without gradual loosening. Friction buckles excel in wet or freezing environments where plastic snap clips might suffer from brittle failure or latch freezing.
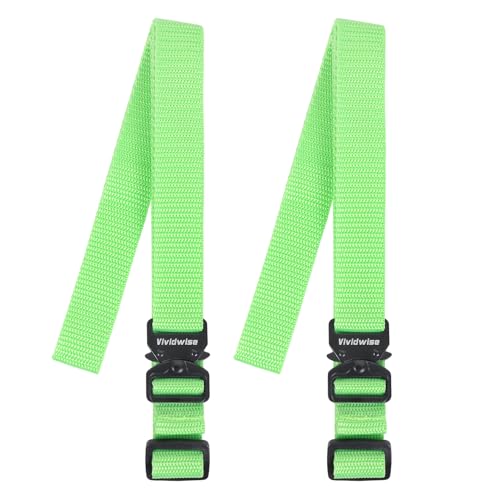
For hikers who prioritize rapid setup and breakdown at camp, quick-release buckles provide immediate convenience. The Vividwise Utility Straps with Metal Quick Release feature durable metal clip buckles on forty-eight-inch nylon webbing, combining rapid push-button release with dependable structural strength. Metal hardware eliminates the risk of accidental plastic cracking when stepping on a buckle or compressing gear in sub-zero temperatures. The extended forty-eight-inch length also provides generous working slack for bulky winter sleeping pads or oversized foam systems.
When multiple lashing needs arise, carrying modular sets like the YBEATY 6 PCS Utility Straps with Quick Release provides flexible redundancy for varied gear setups. These forty-two-inch black nylon straps utilize adjustable cinch buckles that allow rapid adjustment around different item diameters. Having multiple uniform straps lets you reinforce primary attachment points or lash secondary gear such as camp shoes and rain fly sheets. Reliable nylon construction resists moisture stretching, ensuring consistent tension whether trekking under clear skies or continuous downpours.
Harness Tuning and Posture Balance Under External Loads
Attaching exterior sleep systems shifts how your pack harness distributes weight across your shoulders and pelvic girdle. When carrying an external pad on affordable hiking backpacks, setting your hip belt correctly over the iliac crest is critical to prevent the lower load from pulling down on the lumbar spine. Tightening the lower stabilizer straps pulls the pack base snugly against your sacrum, neutralizing backward leverage. Once the hip belt bears the load, tension the shoulder straps just enough to keep the harness flush against your collarbones without biting.
Fine-tuning your load-lifter straps at the top of the harness helps counterbalance any rearward pull generated by an externally mounted sleeping pad. Adjusting these upper straps to roughly a forty-five-degree angle draws the pack mass closer to your shoulder blades, restoring vertical posture. Fastening the sternum strap across your mid-chest keeps the shoulder straps from splaying outward under the wide footprint of the exterior load. This comprehensive harness adjustment keeps the total weight centered, allowing your legs to drive forward without excessive upper-body fatigue.
Safeguarding Foam and Fabric from Trail Hazards and Harsh Weather
External gear remains continuously exposed to environmental hazards including abrasive rock scrambles, thorn bushes, and sudden mountain downpours. A closed-cell foam pad can withstand surface punctures, but dense thorn thickets will gradually shred the outer skin and degrade thermal performance. Wrapping your sleeping pad in an ultralight silicone nylon cover or heavy-duty trash bag shields the foam from physical abrasion and dirt accumulation. A clean sleeping surface is vital for protecting your shelter floor from abrasive grit when you set up camp at night.
Moisture management is equally critical when navigating wet wilderness environments with an exterior pad setup. While closed-cell foam does not absorb water into its closed pores, moisture trapped within rolled layers can easily transfer to your sleeping bag. Similar to packing insulated food and hydration gear in cooler daypacks, isolating moisture-sensitive sleep gear behind water-resistant barriers prevents cold camp surprises. Storing external pads inside sealed waterproof dry bags ensures you have a bone-dry sleep foundation regardless of rain, sleet, or river crossings.
Avoiding Common Rigging Pitfalls on Extended Treks
One frequent mistake among new backpackers is allowing the sleeping mat to hang loose, creating a pendulum effect that saps walking energy. A loose pad swings with every step, forcing your core muscles to work continuously to stabilize your torso on uneven ground. To prevent this fatigue, inspect your rigging before taking your first step and cinch all webbing down until the pad moves as a single unit with the pack. Eliminating all play between the pad and the pack body keeps your stride smooth and preserves precious energy.
Another common rigging error involves over-tightening straps across softer foam pads, which can crush internal air cells and compromise insulation. Nylon webbing can bite deeply into lightweight EVA foam if cinched with excessive brute force, leaving permanent creases that reduce nighttime warmth. Apply firm, steady tension that anchors the pad solidly without deeply gouging the foam material. Distributing the clamping force across wide one-inch webbing rather than thin accessory cords protects the structural integrity of your sleep pad over long seasons of trail use.
Hikers also frequently make the error of blocking critical pack access points when lashing bulky sleeping mats across exterior zippers. Securing a pad across the lower sleeping bag compartment zipper or top lid opening forces you to undo your rigging every time you need gear. Plan your lash locations so that high-frequency access pockets, hydration reservoirs, and first-aid kits remain unobstructed. Thoughtful strap routing ensures your gear stays readily accessible throughout the day without requiring complete pack deconstruction.
Trailside Inspections and Long-Term Rigging Maintenance
Routine inspections during trail breaks help catch loosening straps before a sleeping mat shifts out of place or falls off entirely. Thermal expansion, moisture, and continuous trail vibration can gradually loosen buckle friction over miles of strenuous walking. Taking ten seconds at rest stops to touch your utility buckles and give the mat a quick tug ensures the rigging remains rock solid. If rain begins to fall, remember that wet nylon webbing can stretch slightly, requiring a quick retightening to maintain initial clamping force.
Maintaining your utility straps after returning from the backcountry preserves their holding power for future outdoor adventures. Brush away dried mud, pine pitch, and grit from buckle teeth and slide locks to prevent mechanical abrasion against the nylon fibers. Inspect the bar-tack stitching where buckles attach to the webbing, checking for loose threads or frayed edges that could fail under tension. Storing your utility straps clean, dry, and rolled loosely in your pack pocket ensures they remain ready for dependable performance on every upcoming trail excursion.





Write Your Review
No reviews yet. Be the first to share your experience!