


Scrambling up rocky ridgelines or bushwhacking through dense brush often requires having both hands completely free for balance and safety. When the trail flattens out or turns into a steep hand-over-hand scramble, knowing how to store trekking poles on backpack rigs prevents bent aluminum shafts, snapped carbon fiber sections, and dangerous tripping hazards. Hikers often wrestle with loose shafts that rattle against pack frames or sharp carbide tips that snag on passing branches. When evaluating daypack capacity and exterior attachment options, having a secure, rattle-free mounting system keeps your gear centered and preserves your forward momentum.
Different trail conditions call for distinct transport methods, ranging from rapid-access harness straps to clean interior packing. When organizing essential wilderness backpacking gear, securing your poles properly protects your pack fabric while keeping weight close to your center of gravity. Whether you rely on classic base tool loops, add-on elastic cord fasteners, or specialized protective sleeves, proper pole stowage protects your equipment and enhances trail comfort. Exploring the most reliable attachment techniques ensures your walking sticks remain stable, secure, and ready the moment the trail descends.




Proven Methods for Storing Trekking Poles on Any Backpack
Securing your trekking poles properly transforms how efficiently you move through technical backcountry terrain. Every pack features unique lash points, side pockets, and harness designs, which means no single attachment method fits every trail scenario. Resolving this challenge requires matching your specific pole construction, whether folding Z-poles or three-section telescoping shafts, to the attachment options available on your pack.
Understanding the mechanical advantages and trade-offs of each carrying method helps you avoid gear damage and trail fatigue. When sharp tungsten carbide tips point haphazardly or telescoping sections slide loose under movement, both your equipment and your hiking partners face avoidable hazards. The following practical breakdown details the most dependable techniques to secure your hiking sticks cleanly, safely, and comfortably.
External Pack Attachment: Utilizing Built-in Trekking Pole Loops and Tool Lashings
Most traditional hiking and expedition packs come equipped with lower tool loops paired with upper elastic cinches. To use this system correctly, collapse your poles to their shortest usable length and secure all cam lever clamps firmly. Insert the sharp tips downward through the bottom fabric loop until the mud or snow baskets prevent the shaft from slipping through. Once seated, rotate the pole handle upward toward the top of the pack, creating a natural twist in the lower loop that locks the basket securely in place.
The upper shaft section must align directly against the pack frame before securing the top closure. Position the upper shaft beneath the top bungee or hook-and-loop retention strap, keeping the natural cork or EVA foam grips oriented toward the pack lid. Pull the tension cord tight to eliminate lateral shaft wobble while walking. If your pack carries two poles together, nest the handles snugly against each other to prevent them from rubbing together and degrading grip foam over high-mileage hikes.
Securing Poles with Dedicated Elastic Cord Fasteners and Strap Hardware
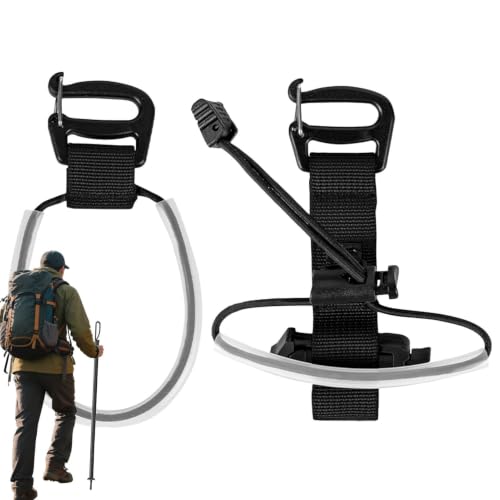
Many lightweight daypacks and minimalist backpacking bags lack dedicated tool loops, requiring modular attachment hardware. Elastic cord fasteners, such as the 10pcs Hiking Stick Holder Straps Backpack Bungee and the luzen 2Pcs Black Backpack Hiking Pole Ropes, provide a versatile solution by wrapping securely around external daisy chains, side compression straps, or webbing lash points. These systems utilize heavy-duty elastic cord combined with plastic pig-nose or barrel buckles, allowing hikers to create custom attachment points anywhere on the pack exterior.
Installing these bungee systems requires threading the elastic band through an anchor loop on your pack and sliding the buckle to set the baseline tension. Options like the 6 Pcs Backpack Hiking Stick Holders offer tool-free installation that can be easily manipulated while wearing gloves in chilly weather. Place one fastener along the lower third of the pack to grip the shaft near the basket, and attach a second fastener higher up near the handle collar. This dual-point fixation prevents heavy aluminum or carbon fiber shafts from swinging outward during vigorous ascents.
For hikers logging dawn or dusk trail miles, reflective hardware provides an additional safety advantage. Straps such as the IIUIKOO 5PCS Backpack Attachments Elastic Bungee incorporate woven reflective threading that catches headlamp beams in low-light conditions. This feature makes it effortless to spot your gear at a dim campsite or signal your position along exposed ridges. Similar to lashing bulky sleep gear to external pack loops, keeping exterior hardware streamlined prevents elastic cords from snagging on overhanging brush.
Side Pocket Stowage: Balancing Shafts with Compression Straps
Side pocket stowage remains one of the simplest external methods, especially for three-section telescoping poles that collapse to moderate lengths. Slide the collapsed pole tips into the exterior side water bottle pocket, ensuring the rubber storage feet are installed over the metal tips to protect the mesh fabric. If you carry two poles, grouping them into one pocket keeps your opposite pocket open for hydration bottles. Alternatively, you can place one pole in each pocket to create balanced weight symmetry across your pack suspension.
Relying solely on elastic mesh pockets allows tall poles to tip outward, shifting your center of gravity on uneven switchbacks. To stabilize the load, route the pack side compression straps directly across the outer pole shafts. Unclip the compression webbing, pass it around both poles above the lower locking clamp, and clip it securely before cinching the strap tight. This mechanical anchor pins the poles flush against the main pack body, eliminating vertical bounce and preventing loose shafts from catching on low trail branches.
Take extra care when routing straps over cam lever mechanisms or flip locks. Never clamp compression webbing directly on top of plastic or aluminum lever hinges, as excessive pressure can crack the lever body or loosen tension screws. Instead, position the webbing across bare shaft tubing between the locking collars. This positioning preserves the integrity of your hardware while holding the poles rigidly in place across steep drops and boulder scrambles.
On-the-Go Shoulder Harness and Vest Quiver Attachments
Trail runners, fastpackers, and speed hikers frequently alternate between running flats and power-hiking steep inclines, making pack removal highly inefficient. On-the-go storage systems mount directly to shoulder straps or pack harnesses to allow instant pole access without breaking your stride. The Hiking Pole Holder, for Backpack Hands and modular harness straps attach to shoulder webbing, providing an elastic cradle that secures folded poles across the chest or under the arm. This configuration lets you secure or release poles in seconds, preserving your trail momentum.
For running vests and fastpacks, dedicated quiver pouches offer another streamlined carry method. The AONIJIE Trekking Pole Pouch Waterproof Hiking is designed specifically to lash to pack harnesses and running vests, weighing only forty-four grams while providing dedicated water resistance. A quick-release drawcord allows you to slide folded Z-poles over your shoulder into the pouch without unbuckling your sternum straps. Integrated perforated drainage holes at the base ensure that trail splash and rainwater drain freely rather than pooling inside the pouch fabric.
Harness-mounted systems require careful adjustment to avoid chafing across the chest or restricting arm swing. Position the upper attachment point near the collarbone and the lower anchor near the waist belt or lower vest hem. Ensure the pole grips sit higher than the metal tips to keep sharp hardware directed away from your neck and torso. Once tensioned properly, front harness carry offers exceptional control, allowing you to transition effortlessly between free-hand scrambling and pole-assisted climbs.
Internal Storage: Folding Z-Poles and Tri-Fold Collapsibility
Storing trekking poles inside your backpack offers maximum protection against rock abrasions, snagging branches, and adverse weather. This approach works best with tri-fold and Z-pole designs that collapse into remarkably compact dimensions. Models such as the Ryno Tuff Trekking Poles, Fits Inside A Backpack are engineered specifically to break down into short, parallel shaft sections that easily slide inside standard packs. Because these 7075 aluminum shafts fold cleanly, they fit into internal hydration sleeves or sit vertically along the pack backsheet.
Similarly, the CONTOOSE Collapsible Hiking Poles for Women feature a compact tri-fold architecture that collapses down to between thirty-three and thirty-seven centimeters. This minimal packed length allows hikers to stow poles inside weekend backpacks, daypacks, or travel duffels without protruding from exterior compartments. When packing poles inside the main bag, place them vertically along the spine of the pack near your back panel. This alignment keeps heavy metal components centered close to your body, optimizing pack balance and reducing leverage on your shoulder harness.
Internal stowage provides distinct advantages during bushwhacking through dense off-trail brush where exterior gear easily snags and tears. Stowing poles inside protects carbon fiber and aluminum finishes from scratches and prevents external hardware from catching on rocks. However, stowing poles inside requires stopping to open your pack lid or main roll-top closure, making it less convenient for fast-changing terrain. If you expect sustained stretches of open trail or easy walking paths where poles are unnecessary, storing them internally remains the safest and cleanest option available.
Protecting Pack Fabric and Gear with Protective Storage Sleeves
After hours of traversing muddy bogs, alpine scree, and dusty riverbeds, trekking poles collect abrasive trail debris. Placing dirty poles directly against delicate silicone-coated tent fabrics or down sleeping bags inside your pack can cause staining and abrasion damage. Utilizing a dedicated carrying case, such as the Scicalife Hiking Pole Storage Bag, provides a protective physical barrier between your hiking gear and the elements. Measuring over nineteen inches long and weighing less than an ounce, this water-resistant fabric sleeve isolates trail grit and residual moisture cleanly.
Dedicated sleeves also prevent metal flip locks, cam levers, and carbide tips from wearing holes through lightweight nylon pack fabrics. When stowed inside a tightly packed internal compartment, exposed pole edges can press against neighboring gear under compression, leading to friction wear. A snug drawstring sleeve keeps the folded sections bundled tightly together, preventing shaft rattle and eliminating fabric friction. This setup is equally valuable when packing poles into luggage for flights or bus travel, ensuring tips do not puncture gear duffels.
Maintaining clean storage bags requires basic trail care between outings. After returning from damp or muddy hikes, turn the storage sleeve inside out to rinse away collected grit and let it air dry completely. Storing damp aluminum or carbon poles inside a sealed, non-breathable pouch for extended periods can promote corrosion on internal tension cords or lock hardware. Pairing a durable water-resistant bag with clean, dry poles ensures both your carrying case and your hiking sticks remain trail-ready for years.
Tip Orientation, Basket Management, and Trail Safety Protocols
Trail safety dictates that sharp carbide tips should almost always point downward toward the ground when secured externally on a pack. An exposed carbide tip pointing upward or outward at eye level poses an immediate puncture risk to following hikers, especially along narrow singletrack trails or crowded switchbacks. When poles are strapped to side pockets or rear tool loops, keeping the pointed ends directed downward prevents accidental facial or hand injuries. Always cap metal tips with rubber pavement feet or protective tip caps to safeguard nearby hikers and pack fabric alike.
Mud and snow baskets play a dual role in stabilizing your poles during external pack stowage. Wide powder snow baskets can catch on lower tool loops, preventing shafts from seating fully against the pack base. If you use interchangeable winter baskets, confirm that they sit flat against the pack body or remove them temporarily if they interfere with compression straps. For standard mud discs, use the basket lip as a mechanical anchor inside bottom webbing loops, preventing the shaft from sliding downward during high-impact descents.
Before strapping poles to your pack, take a moment to verify that all external lever locks and folding push-buttons are firmly engaged. Loose telescoping sections can slide open while walking, dragging behind your pack or catching violently on trailside rocks. Tighten the knurled thumbscrews on cam locks just enough to maintain secure holding tension on collapsed sections. Confirming that your poles are locked at their shortest dimensions guarantees that the shafts remain rigid and motionless throughout your hike.
Selecting the Right Storage Setup for Day Hikes, Thru-Hikes, and Air Travel
Choosing the optimal storage method depends heavily on trail distance, terrain difficulty, and transit requirements. For casual day hikes across maintained trails, side mesh pockets secured with side compression straps offer the simplest and most accessible solution. This setup allows you to stow poles quickly when stopping for lunch or crossing wide meadows without requiring specialized attachment cords. You retain instant access to your poles whenever the gradient steepens or your knees need downhill joint relief.
Thru-hikers and wilderness backpackers tackling technical ridges or class-three scrambles require maximum security and zero shaft play. On rugged terrain where a loose pole could catch a boulder and pull you off balance, modular bungees or dedicated tool loops keep shafts flush against the pack profile. In dense backcountry brush, shifting your poles inside the pack compartment or enclosing them in a protective sleeve prevents lost gear and torn pack fabric. Evaluating the specific obstacles of your route ensures your carrying setup never compromises your stability.
Travel logistics introduce additional storage considerations, particularly when boarding commercial flights or long-distance buses. Aviation security guidelines generally prohibit trekking poles with sharp tungsten carbide tips in carry-on cabin baggage. For airline travel, collapsible poles must be packed securely inside checked luggage, making compact tri-fold designs and protective travel sleeves invaluable. Stowing your poles neatly inside your main bag protects external straps from airport baggage conveyor belts and guarantees your gear arrives intact at the trailhead.
Mastering how to attach and store your walking sticks transforms your backcountry efficiency and keeps your hands free whenever technical terrain demands total focus. By selecting the right combination of pack loops, modular bungee cords, side compression straps, or protective sleeves, you protect both your investment and your fellow hikers. Before setting out on your next mountain adventure, test your chosen storage configuration at home to verify that every strap holds fast and every shaft sits securely against your pack.








Write Your Review
No reviews yet. Be the first to share your experience!