


Descending steep, rock-strewn trails places intense repetitive stress on knees, hips, and ankle joints. Dialing in the correct pole length provides the necessary structural support to offload lower-body impact and maintain upright posture across uneven terrain. Understanding exactly What Height Should Trekking Poles Be ensures your upper body works in harmony with your legs rather than causing premature shoulder fatigue. Setting a dependable baseline height before leaving the trailhead transforms your poles from cumbersome sticks into responsive extensions of your stride.
Modern hiking poles feature diverse adjustment systems, including three-section telescoping levers and compact folding Z-pole configurations. Pairing properly adjusted shafts with trail gear designed for knee comfort can significantly reduce fatigue on multi-day backpacking trips. Slipping locks or incorrect shaft extensions not only waste energy but can also create sudden balance hazards during technical river crossings or loose scree descents. This guide outlines the biomechanical rules, terrain adjustments, and hardware considerations you need to dial in the ideal pole height for every mile.




Sizing Trekking Poles for Proper Biomechanics, Terrain, and Stability
Establishing correct trekking pole height begins with a simple biomechanical baseline on flat, level ground. When standing upright with relaxed shoulders, your elbows should rest at a crisp ninety-degree right angle while your hands grip the handles. This neutral arm position ensures optimal lever mechanics, allowing your triceps and lats to absorb ground impact without overextending your shoulder joints. From this starting measurement, trail slope, pack weight, and footwear stack height dictate minor working adjustments.
The Ninety-Degree Elbow Rule: Establishing Your Flat-Ground Baseline
The ninety-degree elbow bend represents the golden standard for baseline trekking pole adjustment. To measure your baseline accurately, wear your standard hiking shoes or trail runners and stand on a level surface with your arms hanging naturally at your sides. Bend your elbows until your forearms are parallel to the floor, forming a clean right angle at the elbow joint. Adjust the pole sections so the carbide tip rests on the ground while your hand grips the contoured handle comfortably.
If the pole is set too long, your hands will rise toward your chest, forcing your shoulders into a shrugged posture that strains the trapezius muscles. Conversely, a pole that is adjusted too short forces you to lean forward, curving your spine and compromising your balance over technical terrain. Maintaining that level forearm angle ensures that downward force travels directly through the pole shaft into the ground. This efficient energy path minimizes wrist fatigue and maximizes upper-body propulsion during long miles on flat or gently rolling terrain.
Trekking Pole Sizing Reference by Hiker Height
While arm length and torso proportions vary, standard height reference charts offer a reliable starting point for selecting and configuring poles. Hikers measuring under five feet tall generally require a pole length set between one hundred and one hundred and five centimeters. Those standing between five feet one inch and five feet seven inches typically settle into a range between one hundred and ten and one hundred and twenty centimeters. Trekkers measuring five feet eight inches to six feet tall usually find their neutral ninety-degree angle around one hundred and twenty to one hundred and twenty-five centimeters.
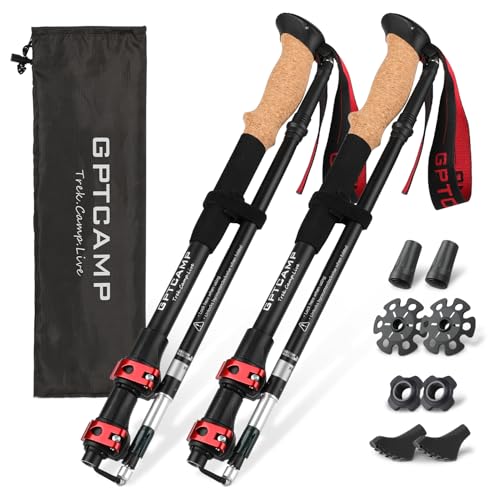
Hikers over six feet tall generally need pole extensions between one hundred and twenty-five and one hundred and thirty-five centimeters or more. Several modern designs accommodate broad height demographics through generous adjustment spans. For example, the GPTCAMP Collapsible Hiking Trekking Poles and GPTCAMP Collapsible Hiking Trekking Poles offer an adjustable range spanning thirty-one to fifty-one inches, which corresponds to roughly seventy-nine to one hundred and thirty centimeters. According to manufacturer specifications, that span comfortably accommodates users ranging from four feet four inches up to six feet five inches tall.
Other models cater to specific stature segments through dedicated length brackets. The Covacure Trekking Poles Collapsible provides options tailored for different hiker heights, including a compact pair adjusting from one hundred to one hundred and twenty centimeters for hikers standing five feet eight inches or shorter. Taller users can select extended variants reaching up to one hundred and thirty-five centimeters to ensure the shafts can reach the ground without overextension. Similarly, the A ALAFEN 7075 Aluminum Collapsible Ultralight features a dedicated quick-lock adjustment scale spanning forty-three to forty-nine inches, designed specifically for hikers between five feet three inches and six feet two inches.
Adjusting Length for Steep Ascents and Descents
Hiking trails rarely remain perfectly flat, meaning your baseline pole height must adapt to shifting trail gradients. When tackling prolonged uphill climbs, the ground rises in front of you with every forward step. Leaving your poles at their flat-ground setting forces you to reach upward, elevating your elbows above your chest and rapidly fatiguing your shoulders. Shortening each pole shaft by five to ten centimeters, or roughly two to four inches, restores your natural ninety-degree forearm angle and allows you to push efficiently through your lats and core.
Descending steep mountain trails reverses this dynamic entirely because the ground drops away beneath your feet. Lengthening your trekking poles by five to ten centimeters allows you to plant the tips further downhill ahead of your body without bending forward at the waist. Planted downhill poles create a sturdy forward tripod, transferring significant braking impact from your patellar tendons directly into your arms. This extra length helps keep your chest open, improves stability over loose scree, and prevents jarring vertical shock from punishing tired knees.
On undulating terrain with frequent switchbacks, stopping repeatedly to manipulate lock levers can disrupt your hiking rhythm. Many hikers take advantage of extended EVA foam grip sleeves located beneath the primary handle to navigate rapid terrain changes. Choking down onto the lower foam grip provides an immediate short-pole effect when powering up short, steep rises without requiring mechanical adjustments. Once the trail levels out or tilts downhill, moving your hands back up to the primary handle immediately restores your full extension for downhill braking.
Sizing Differences Between Telescoping and Folding Mechanisms
Trekking pole architecture plays a major role in how length adjustments are executed in the field. Traditional three-section telescopic designs utilize two independent telescoping shafts secured by external lever clamps. Both sections feature printed measurement increments, allowing users to distribute extension evenly between the middle and lower shafts for balanced rigidity. For instance, the Hiking Poles, Ultra-Light Telescopic Trekking and Hiking Poles, Ultra-Light Telescopic Trekking collapse down to twenty-four point eight inches, providing a versatile telescopic range for routine trail use.
In contrast, folding Z-poles feature segmented shafts connected by an internal tension cord that snap together at fixed lower lengths. Height adjustment on these folding models is isolated to a single telescoping upper section controlled by an external cam lock. Tri-fold models like the covacure Hiking Poles, 7075 Aluminum Tri-fold offer roughly twenty centimeters of length adjustment while packing down under fourteen inches. Hikers preparing for wilderness flights can review a carry-on pack capacity guidelines resource to evaluate how compact folding poles integrate into standard luggage dimensions.
Single walking aids and folding canes operate under distinctly different sizing parameters compared to dual mountain poles. A model such as the Folding Cane, Walking Poles with Adjustable height extends to thirty-six point six inches across five push-button settings. Canes are engineered specifically for low-impact auxiliary balance assistance on flat surfaces rather than active mountain propulsion. Recognizing whether you need a dedicated single balance aid or a pair of adjustable mountain poles ensures your gear matches the demands of your chosen route.
Respecting the Stop Indicator and Preventing Clamp Slippage
Every adjustable trekking pole shaft includes a clearly etched line labeled with a stop warning indicator. Extending any section beyond this demarcation line leaves insufficient overlap inside the outer tube, creating an immediate structural weak point. Placing full body weight onto an overextended shaft can bend aluminum alloys or cause sudden joint slippage on steep descents. If your height requires more extension than the stop mark permits, you must transition to a larger pole sizing bracket rather than risking equipment failure.
External cam levers rely on precise clamping friction against the anodized shaft to hold their set length under vertical load. Trail grit, temperature drops, and plastic collar expansion can gradually reduce clamping pressure during long hikes. Hikers should periodically inspect the thumbscrew on each lever lock to ensure the clamp snaps shut with firm mechanical resistance. A loose lever allows the shaft to telescope downward under pressure, which can lead to unexpected falls when navigating slippery boulders or river crossings.
Shaft materials also react differently when subjected to bending forces and sudden downward stress. Aircraft-grade 7075 aluminum alloy, featured on models like the A ALAFEN Aluminum Collapsible Ultralight Trekking, offers high yield strength that resists permanent deformation under heavy loads. While aluminum can bend slightly under severe lateral pressure without snapping, maintaining proper section overlap keeps the shaft rigid. Inspecting your locking collars before each hike ensures your chosen pole height remains rock solid throughout the journey.
Wrist Strap Ergonomics and Hand Placement
Wrist strap configuration directly affects your effective pole length and energy transfer. Rather than inserting your hand downward through the loop, bring your hand up through the bottom of the strap opening. Grasping the handle and strap webbing together creates a secure cradle beneath the heel of your palm. This proper alignment allows you to transfer body weight onto the strap without squeezing the handle with a white-knuckle grip.
Adjusting strap tension ensures your hand sits at the exact engineered height of the grip contour. If the strap is excessively loose, your hand slides down the shaft, artificially shortening your working pole length by several centimeters. Conversely, an overly tight strap restricts blood flow and forces your wrist into an unnatural upward angle. Proper strap adjustment maintains consistent biomechanical alignment, reducing forearm fatigue over high-mileage trail days.
Structural Considerations for Ultralight Shelter Pitching
Backpackers frequently utilize adjustable trekking poles as structural ridge supports for non-freestanding ultralight tents and tarps. Most A-frame and pyramid trekking-pole shelters require fixed apex heights ranging between one hundred and fifteen and one hundred and thirty-five centimeters. Having a pole with dependable height markings allows you to establish the exact pitch geometry needed to shed heavy rain and high winds. Backpackers carrying heavy loads in rigid frame hiking pack options often rely on dual-purpose gear to keep overall pack weight manageable.
Using poles for shelter pitching demands that your locking mechanisms hold firm without creeping downward overnight. Moisture, condensation, and gusting winds place steady downward pressure on shelter apexes, testing the vertical holding power of your pole clamps. Confirming that your pole reaches the tent manufacturer’s specified peak height ensures adequate canopy tension and head clearance inside the shelter. Verifying your pole height settings during camp setup prevents sagging canopies and keeps your shelter sturdy throughout rough weather.
Footwear and Trail Hardware Influences on Working Height
The footwear you choose directly influences how far your hands sit from the trail surface. Minimalist trail runners position your heel close to the ground, requiring slightly shorter pole extensions to maintain a ninety-degree elbow angle. Heavy mountaineering boots with thick Vibram outsoles can add an inch or more to your standing height, necessitating a corresponding increase in pole length. Factoring your shoe stack height into your baseline measurements ensures your elbow angles remain biomechanically sound regardless of your footwear.
Interchangeable trail accessories also alter how deeply your poles penetrate the ground surface. Bare tungsten carbide tips sink slightly into soft soil and forest duff, whereas broad rubber road boots sit flush on hard pavement and rocky slabs. In winter conditions, wide powder snow baskets prevent shafts from plunging into deep drifts, preserving your intended working height. Swapping baskets and tip protectors allows you to maintain consistent leverage across loose mud, packed dirt, and frozen mountain passes.
Final Trailside Checks and Maintenance Verification
Before stepping onto the trail, take thirty seconds to verify your pole height and clamp tension. Stand naturally, plant the tips firmly beside your feet, and lean downward with moderate upper-body weight to confirm the clamps do not slip. If a section creeps downward, release the lever, tighten the tension thumbscrew a quarter-turn, and re-clamp the collar. Conducting this simple load test at the trailhead prevents mid-stride collapses that can lead to ankle twists or falls on uneven terrain.
After completing your hike, wipe away dirt and moisture from the telescoping sections to prevent corrosion inside the tubes. Storing your poles with the lever clamps open prevents long-term fatigue in the plastic collars and ensures reliable holding power for future adventures. Taking time to master pole sizing and maintenance keeps your gear dependable across thousands of vertical feet. With your poles dialed to the ideal height, you can tackle steep mountain ascents and technical descents with confidence, balance, and joint relief.








Write Your Review
No reviews yet. Be the first to share your experience!