


Maintaining upright stability and joint comfort often comes down to dependable equipment and proper posture. Learning how to use leki walking poles allows walkers to offload up to twenty-five percent of joint impact away from vulnerable knees, hips, and ankles. Whether managing an orthopedic recovery or navigating neighborhood streets with balance hesitation, matching your stride to a supportive shaft restores walking confidence. Integrating poles into daily walks helps manage lower-extremity load alongside supportive knee trail apparel to cushion sensitive joints. Proper technique ensures that each contact point provides genuine mechanical relief rather than awkward compensation.
LEKI designs mobility aids with distinct configurations ranging from dual trekking poles to specialized single-staff walking canes. Equipment featuring ergonomic Aergomed grips delivers dedicated palming support, whereas dual-pole setups promote an active reciprocal arm swing. Adjusting the telescoping aluminum shafts to your exact anatomical height prevents painful shoulder elevation and lower back strain. Understanding proper locking engagement and tip selection keeps you moving smoothly across varied indoor and outdoor terrain. A small investment in learning fundamental mechanics transforms these supportive tools into seamless extensions of your natural gait.



Biomechanical Setup and Field Techniques for LEKI Walking Poles
Mastering how to use leki walking poles requires coordinating anatomical sizing, secure hardware locking, and purposeful gait biomechanics. Whether utilizing a cane-style single pole or paired trekking poles, correct technique maximizes lower-extremity offloading and prevents repetitive upper-body strain. Establishing proper habits from your very first outing protects your joints and builds lasting balance confidence.
Anatomical Height Calibration and Joint Alignment
Proper pole height forms the baseline for safe balance and efficient energy transfer. Sizing a cane-oriented model like the LEKI Wanderfreund Makalu, Unisex or the LEKI Super Micro Trekking Pole begins with standing upright on a flat surface in regular walking shoes. Allow your arms to hang naturally at your sides with relaxed shoulders. The top of the handle should align directly with your wrist crease or the greater trochanter of your hip. This anatomical measurement establishes an elbow flexion angle of roughly fifteen to twenty degrees when resting your palm across the grip.
Setting the pole too tall forces the shoulder upward into an unnatural shrug, creating tension along the trapezius and neck. Conversely, adjusting the shaft too short causes forward trunk flexion, which rounds the spine and increases stress on the lower back. Paired poles used for brisk fitness walking require a slightly different elbow position, typically holding the forearm at a ninety-degree angle to the ground. For individuals with shorter statures, compact options like the LEKI Super Micro Trekking Pole (Single) adjust from sixty-six to ninety centimeters to ensure an exact fit. Checking your arm geometry in a mirror verifies that your joints remain in an unforced, neutral position.
Operating Speed Lock and Super Lock Systems
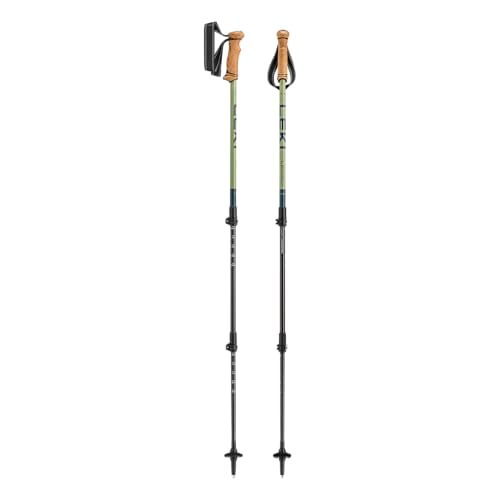
Telescoping aluminum shafts rely on dependable locking mechanisms to bear partial body weight without slipping. External cam designs, such as the Speed Lock Plus and Speed Lock 2 levers found on the LEKI Legacy Lite Trekking Poles – Denimblue and the Wanderfreund, allow rapid length adjustments. Open the lever arm fully, slide the shaft section to your measured centimeter marking, and press the lever firmly closed against the pole wall. If the shaft slides under moderate pressure, open the lever and turn the knurled adjustment wheel clockwise to increase clamping tension. You should feel noticeable mechanical resistance when snapping the lever into the flush, locked position.
Internal twist-lock models like the Super Lock system on the LEKI Voyager Trekking Poles – Blue – White utilize expanding internal spreaders. Hold the upper pole section firmly with one hand while turning the lower section clockwise to tighten or counter-clockwise to loosen. Twist until you feel firm resistance, but avoid over-tightening with excessive hand force to protect the internal threads. Never extend any telescoping section past the marked stop line, as insufficient overlap inside the tube severely compromises structural strength. Always conduct a downward weight test before walking by leaning your upper body firmly onto the locked poles on level ground.
Single-Pole Walking Cane Mechanics for Balance Support
Using a single pole as an assistive walking aid requires deliberate hand placement relative to lower-body weaknesses. The pole should always be held in the hand opposite the injured, painful, or weaker leg. When managing a left knee or hip condition, grip the pole with your right hand. Holding the device on the opposite side preserves your natural reciprocal walking pattern, allowing the opposite arm to swing forward in tandem with the recovering limb. This positioning transfers fifteen to twenty-five percent of your body weight through the shaft, significantly unloading the vulnerable joint during weight-bearing phases.
Compact single-pole models pack down to roughly eighteen inches, making them easy to slide into a carry-on travel pack when traveling between cities. To initiate a step, advance the single pole forward simultaneously with the affected leg. Plant the tip firmly on the ground roughly four to six inches lateral to your foot to maintain a wide, stable base of support. As you step forward with your stronger leg, push downward through your palm to distribute body weight into the pole shaft. Avoid planting the pole too far ahead of your body, which creates an awkward reach and destabilizes your center of gravity.
Dual-Pole Reciprocal Gait and Trail Rhythms
Walking with dual trekking poles involves a rhythmic reciprocal cadence that mimics natural arm movement. As your left foot steps forward, your right arm naturally swings forward to plant the right pole tip. Conversely, as your right foot advances, your left arm plants the left pole tip. Keep the poles angled slightly backward rather than perpendicular to the ground to generate gentle forward propulsion. Maintain a relaxed grip on the handle to prevent premature forearm fatigue and numbness in the fingers.
Adjusting your pole length to match changing terrain maintains optimal posture and joint leverage. When ascending sustained inclines, shorten both poles by five to ten centimeters. Shortening the shafts prevents excessive shoulder flexion and keeps your hands at a comfortable chest height as the slope rises in front of you. Focus on pushing backward through the poles to assist your leg muscles rather than pulling your weight upward. Take even, steady strides while keeping the pole tips planted slightly behind your advancing feet for continuous forward momentum.
Descending Grades and Navigating Staircases Safely
Downhill walking places heightened eccentric braking forces across the quadriceps and patellar tendons. Before descending a steep hill, lengthen both poles by five to ten centimeters to preserve an upright torso without leaning forward over your knees. Place the pole tips slightly ahead of your feet to create a stable braking tripod with each downward step. Rest the palms of your hands over the rounded grip tops to absorb ground shock through your arms rather than your knees. Keep your knees slightly bent to absorb impact rather than locking your joints with each foot strike.
Navigating stairs requires strict adherence to physical therapy sequencing principles to prevent trips and missteps. When ascending stairs, follow the sequence of stepping up with your unaffected leg first, followed by bringing your affected leg and pole up to the same step. When descending stairs, reverse the sequence by moving the pole and your affected leg down first, followed by your stronger leg. Always maintain a firm hand on a sturdy wall handrail whenever one is available, carrying your pole in the opposite hand. Never place the pole tip directly on the slippery edge of a stair riser where it could slip off under load.
Handle Ergonomics, Aergomed Palming, and Strap Utilization
Grip geometry plays a fundamental role in palm pressure distribution and long-term joint comfort. Models equipped with an Aergomed grip, like the Wanderfreund Makalu and Super Micro, feature an expansive, flattened head shaped specifically for walking cane support. Resting the fleshy base of your palm across this rounded surface distributes downward force evenly across the thenar eminence, protecting the carpal tunnel and ulnar nerve from focal pressure. Traditional trekking models like the Legacy Lite feature an EVOCON Cor-Tec grip, blending natural cork and rubber to conform gradually to your hand shape while absorbing sweat. Soft rubber materials also help dampen trail vibrations before they reach delicate wrist bones.
Utilizing wrist straps correctly enhances stability while preventing accidental drops on uneven pathways. To secure standard trekking straps, slip your hand upward from underneath the strap loop before grasping the handle and strap webbing together. This technique allows your wrist to bear weight against the wide webbing, reducing the grip force required to hold the pole securely. On steep descents or technical terrain, however, many walkers prefer slipping their hands out of the straps entirely. Leaving your hands unlooped ensures you can drop the poles quickly and extend your arms to break a fall if you lose your balance.
Tip Selection and Surface-Specific Traction
Interchangeable ground attachments determine how securely your pole grips different walking surfaces. LEKI poles come standard with a short carbide flex tip, engineered from extremely hard metal to bite into dirt, gravel, packed trails, and ice. Carbide tips provide reliable purchase on yielding terrain, but they slide unpredictably on hard surfaces like concrete, asphalt, and polished ceramic tile. Using bare metal tips on paved sidewalks also creates an annoying metallic clicking sound while transmitting harsh vibrations upward through your forearm joints. Switching tips according to the specific path ahead ensures constant traction and quieter movement.
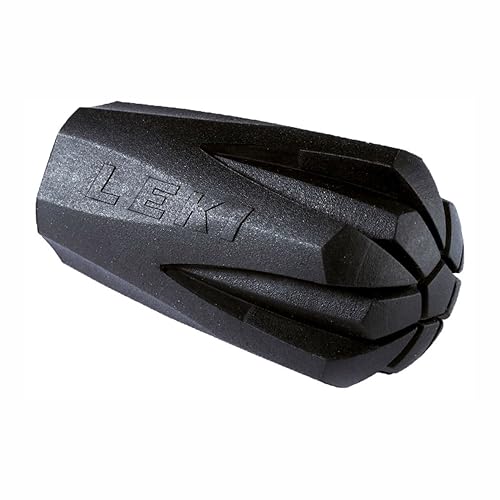
Installing protective rubber covers resolves traction and noise problems across smooth surfaces. Accessories like the LEKI Rubber Walking Tip and the vulcanized LEKI Walking Rubber Tip slide snugly over the carbide point to deliver slip-resistant grip on sidewalks, pavement, and indoor flooring. These vulcanized rubber pads feature directional tread grooves that channel water away to maintain friction on wet pavement. Routinely inspect the bottom of the rubber tip to ensure the interior metal washer has not punctured through the rubber base. Replace worn tips immediately when tread grooves wear smooth or whenever the internal carbide tip begins poking through the rubber.
Maintenance, Shaft Cleaning, and Wear Prevention
Routine maintenance prevents telescoping shaft seizure, locking failure, and premature material corrosion. After walking in wet, muddy, or dusty conditions, completely pull apart the telescoping sections and wipe down the aluminum tubing with a dry microfiber cloth. Moisture trapped inside closed aluminum shafts causes oxidation and white powder accumulation that jams internal locking mechanisms. Never apply oil, grease, lubricants, or penetrating sprays to the shaft walls or locking spreaders. Lubricants cause the internal locking wedges and external friction clamps to slip catastrophically under body weight.
Inspecting your equipment before every walk ensures structural integrity and dependable support. Check the aluminum tubing for deep scratches, dents, or bends that could cause sudden buckling under compressive loads. Inspect external Speed Lock lever screws periodically, tightening the knurled dial if the clamping action feels loose or spongy. Store your poles fully disassembled or with the levers open in a dry environment to relieve continuous tension on the mechanical components. Replacing worn rubber tips, baskets, and strap webbing as needed keeps your walking poles functioning safely across seasons of regular use.
Mobility Aid Boundaries and Clinical Consultation
Understanding the functional limits of walking poles helps users make safe, well-timed mobility decisions. Walking poles and cane-style hiking staffs provide mild to moderate balance assistance, sensory ground feedback, and partial joint unloading. They are not engineered to support full body weight or replace rigid medical-grade mobility equipment. Individuals recovering from severe lower-extremity fractures or total joint replacements requiring strict partial or non-weight-bearing status must use prescribed medical crutches or walkers. Relying on an adjustable outdoor pole for primary weight bearing creates severe fall hazards if a locking mechanism slips or an improper tip slides.
Recognizing when balance instability exceeds pole capabilities is vital for fall prevention. If you experience progressive balance degradation, frequent near-falls, leg weakness, or neurological tremors, transition to a wide-base quad cane or a four-wheeled rollator for bilateral support. Quad canes and medical walkers provide a self-standing, stable footprint that supports continuous downward loading without tipping. Always consult a licensed physical therapist or physician for a comprehensive gait evaluation before using walking poles as regular mobility aids. A qualified clinician can formally evaluate your gait mechanics, verify proper equipment sizing, and ensure that your chosen walking device supports your specific rehabilitation goals safely.







Write Your Review
No reviews yet. Be the first to share your experience!