


Gait instability and joint wear can turn simple daily strolls into hesitant, tiring efforts. Using dual handheld supports distributes body weight across the upper torso, easing pressure on the lower joints while encouraging an upright posture. Learning how to walk with walking poles for beginners allows active adults, seniors, and fitness walkers to establish a balanced cadence without straining the wrists or shoulders. Whether recovering from knee surgery or seeking greater stamina on neighborhood paths, adding supportive walking sticks transforms everyday strides into smooth, confident movement.
Beginners often wonder how to coordinate their arm swings with their footsteps or how to set the proper shaft height for optimal stability. Pairing consistent technique with comfortable gear, such as knee support trousers, helps protect vulnerable joints during longer outings. By focusing on upright alignment, gentle planting angles, and secure grip mechanics, new walkers can safely experience the joint-offloading advantages of modern poling.




Essential Technique and Safety Guide for Walking Poles
Mastering walking poles begins with understanding how bilateral support alters natural gait mechanics. Instead of leaning heavily onto a single cane, using two poles creates a wide, four-point stability base that offloads impact from vulnerable knees, hips, and ankles. New users often feel uncoordinated during their first few sessions, but basic movement patterns quickly become second nature once foundational mechanics are in place. Taking time to dial in height adjustments, handle orientation, and arm cadence ensures immediate comfort and dependable balance on any path.
Correct Height Sizing and Joint Angles
Setting the correct pole height is the most critical step before taking a single stride outdoors. When standing tall in standard walking footwear with relaxed shoulders, your forearms should form an angle close to ninety degrees relative to your upper arms. For general walking and fitness, this right-angle position keeps the wrists neutral while allowing full muscle engagement through the upper body. Sizing poles too high forces the shoulders to shrug upward, creating tension in the trapezius muscles and neck.
Telescoping poles generally offer quick length customization through external lever clamps or internal twist locks. Models like the TrailBuddy Trekking Poles use external flip locks that let walkers adjust the shaft length between twenty-four and fifty-four inches. When setting the sections, make sure both upper and lower adjustments are evenly spaced so the shaft maintains its structural balance. Users recovering from balance limitations or joint surgeries often prefer a slightly lower setting to keep their center of gravity stable and prevent the hands from rising above chest level.
Grip Dynamics and Handle Ergonomics
How you hold the pole directly dictates your wrist comfort and upper body control. Traditional hiking poles rely on woven wrist straps that loop underneath the palm, transferring body weight directly into the strap webbing rather than requiring a tight finger grasp. Conversely, specialized mobility designs like the Urban Poling ACTIVATOR Walking Poles for Balance feature strapless ergonomic CoreGrip handles. These wide-ledged handles support the thenar eminence of the palm, preventing the hand from sliding down while intentionally eliminating wrist straps to minimize fall entanglements.
Handle materials also play an influential role in overall hand comfort and moisture management. Natural cork handles, such as those found on TrailBuddy models, gradually mold to your hand contours while absorbing sweat during warm afternoon walks. Textured EVA foam and molded rubber handles offer reliable traction in cold weather or wet conditions, maintaining a secure feel without demanding excessive grip pressure. Maintaining a relaxed, loose grip is essential; squeezing the handles tightly quickly leads to forearm fatigue and hand cramps.
The Fundamentals of Natural Reciprocal Arm Swing
Human walking relies on a natural contralateral movement pattern where your opposite arm swings forward in coordination with your opposite leg. Walking with poles simply amplifies this reciprocal rhythm rather than replacing it with an artificial gait. As your left heel strikes the ground, your right arm swings forward to place the right pole on the surface adjacent to your stance. The left arm and right foot simultaneously mirror this movement on the opposite side of the body.
Beginners frequently struggle with overthinking this rhythm, which often results in pacing both poles forward together like a cross-country skier. If you find yourself falling out of rhythm, let the poles drag loosely beside your feet while you walk normally for twenty paces. Once your natural arm swing returns, gently lift the grips and allow the tips to touch down in sync with each alternating footstrike. This gentle coordination creates a smooth, continuous cadence that propels you forward without stuttering steps.
Proper Pole Angle and Planting Mechanics
The angle at which the pole meets the ground determines whether you receive forward propulsion or vertical balance stabilization. In athletic Nordic walking, the shafts point backward at roughly forty-five degrees, driving the walker forward as the arms push down and back against the ground. This angled placement actively recruits the latissimus dorsi, triceps, and abdominal muscles, burning additional energy while increasing walking speed on level pavements.
In contrast, individuals using poles for joint relief or balance recovery should adopt a more vertical planting style. Placing the pole tip slightly ahead of or beside the heel of the leading foot provides immediate vertical stability, absorbing downforce that would otherwise jar the knees and hips. Clinical walking designs like the Urban Poling ACTIVATOR encourage this vertical posture, transferring significant weight away from tender lower-extremity joints. Avoid planting the tips too far forward, as over-reaching creates an unnecessary trip hazard and strains the shoulder socket.
Stepping Up and Down Curbs and Moderate Inclines
Navigating neighborhood curbs and rolling terrain requires subtle adjustments in pole placement and body mechanics. When approaching an uphill grade, lean slightly forward from the ankles rather than bending at the waist. Shortening your poles by two to three inches helps maintain the proper ninety-degree forearm angle without forcing your hands above your chest. Alternatively, if your poles have extended foam grips, simply choke down on the handle to gain leverage on steeper sections.
Descending requires an opposite strategy focused entirely on impact absorption and balance control. Lengthening the poles by two to three inches allows you to plant the tips ahead of your descent without leaning forward awkwardly. Keep your knees slightly flexed to cushion each step, allowing the poles to share the braking forces that typically overload the quadriceps and patellar tendons. Wearing flexible walking pants allows for unhindered knee flexion when taking measured, controlled steps down steep inclines or high street curbs.
Matching Rubber Tips and Ferrules to Walking Surfaces
Walking poles come equipped with interchangeable tip attachments engineered for specific ground textures. Naked carbide metal tips excel on packed dirt trails, crushed gravel paths, and icy winter sidewalks, biting firmly into uneven surfaces to prevent slippage. Using bare metal tips on concrete sidewalks or asphalt streets, however, produces harsh vibrations, annoying clatter, and rapid metal erosion. Hard paved surfaces require protective rubber tips to dampen impact and ensure dependable friction.
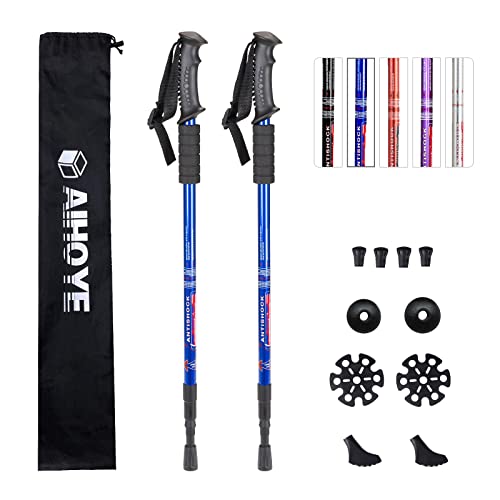
Angled rubber boot tips are ideal for brisk fitness walking, featuring directional treads that roll smoothly across pavement with each backward push. For stability-focused rehabilitation walking, wide bell-shaped rubber ferrules provide a broad, flat contact area that resists skidding in any direction. Sets like the Aihoye Trekking Poles include multiple attachments, including mud and snow baskets that prevent the shafts from sinking into soft turf. Always verify that rubber tips are pressed firmly onto the metal shafts before starting your walk so they do not dislodge mid-stride.
Correcting Common Beginner Form Errors
New poling enthusiasts often develop small compensatory habits that hinder their progress and cause avoidable fatigue. One frequent error is leaning heavily forward and staring fixatedly at the pavement directly in front of the toes. Looking downward rounds the thoracic spine, compresses the chest, and restricts natural lung expansion during aerobic exercise. Keep your chin level, direct your gaze fifteen to twenty feet ahead, and let your peripheral vision monitor ground hazards while maintaining an upright posture.
Another common mistake involves holding the arms too stiffly, locking the elbows and swinging the entire limb from the shoulder joint. This rigid posture strains the rotator cuff and prevents the natural shock-absorbing flexion of the elbow joint. Allow your elbows to bend and extend naturally through each stride, keeping your arm movements smooth and fluid. Furthermore, avoid planting the pole tips too widely away from the body; the shafts should move comfortably within your natural walking corridor just outside your hips.
Distinguishing Fitness Poling from Rehabilitation Support
It is important to recognize the distinct functional goals between cardiovascular fitness poling and post-surgical rehabilitation. Fitness walking, detailed in resources like the Complete Guide to Nordic Walking from Bloomsbury, emphasizes dynamic speed, caloric burn, and upper-body muscular conditioning. This style utilizes wrist straps, angled planting, and aggressive backward thrust to elevate heart rates and tone core muscles across flat or rolling paths.
Rehabilitation poling, on the other hand, prioritizes joint offloading, lateral stability, and fall reduction for individuals with chronic conditions. Devices certified for balance support, such as the ACTIVATOR poles, are designed specifically by occupational therapists for neurological conditions, post-stroke recovery, and joint replacement therapy. If you are managing severe vestibular balance deficits, significant lower-limb weakness, or strict non-weight-bearing restrictions, always consult a physical therapist or physician. A medical professional can evaluate your gait mechanics and determine whether dual poles, a single cane, or a two-handed rolling walker is the safest mobility aid for your current recovery stage.
Routine Pole Maintenance and Hardware Checks
Regular pre-walk equipment inspections are essential to ensure structural integrity and prevent unexpected shaft collapses. If your poles feature lever cam locks, check the tension thumb screw periodically to verify that the clamp closes with firm resistance. A loose lever clamp can allow telescoping sections to slide inward unexpectedly when bearing down on a step. For models with push-button detents or internal expanders, verify that all locking pins protrude fully through their adjustment holes before applying weight.
Rubber tips also require routine wear monitoring, as the hard carbide metal tips inside can eventually pierce through thin rubber bases. If you notice the metal spike peeking through the bottom tread, replace the rubber ferrule immediately to prevent dangerous slipping on smooth tile or polished asphalt. After walking through mud, sand, or rain, pull the telescoping sections apart, wipe the aluminum tubes clean with a dry cloth, and let them dry thoroughly. This simple routine prevents internal corrosion and keeps locking mechanisms operating smoothly season after season.
Building an Enjoyable and Sustainable Walking Routine
Developing confidence with walking poles takes gradual, consistent practice rather than rushing into long, demanding treks. Start with short ten- to fifteen-minute sessions on flat, predictable surfaces like paved community parks or level neighborhood sidewalks. These initial walks allow your upper body muscles, wrists, and coordination to adapt comfortably without triggering next-day fatigue. As your rhythm becomes second nature and your balance improves, you can progressively extend your distance and venture onto gentle park trails.
Incorporating dual poles into your everyday fitness routine offers an effective, low-impact way to maintain joint mobility and cardiovascular endurance. The rhythmic planting of the poles provides reassuring stability, transforming hesitation into fluid, purposeful strides. By prioritizing upright posture, choosing the right tip accessories, and maintaining your hardware, you can enjoy confident, supported walking wherever your daily path leads.







Write Your Review
No reviews yet. Be the first to share your experience!