


Steep downhill descents place continuous braking forces on knee joints, quadriceps, and lower back muscles during long trail days. Properly configured trekking gear allows hikers to transfer significant body weight into the upper body, but achieving these biomechanical benefits requires knowing how to adjust hiking poles for height accurately before taking a step. A pole set too long elevates shoulders and causes neck fatigue, while a pole set too short forces the spine into a forward slump. Pair your pole adjustments with gear like supportive knee hiking pants to maintain proper alignment and minimize joint strain across uneven alpine terrain.
Locking mechanisms, shaft materials, and grip contours all influence how effectively a walking stick holds its position under downward pressure. Whether you carry telescoping aluminum poles or folding carbon fiber models, establishing an ergonomic baseline protects your posture across changing trail gradients. Setting the correct shaft extension ensures dependable stability across slick mud, river crossings, and loose talus fields. This guide details the fundamental elbow angle rule, adjustments for ascents and descents, and locking tension verification to keep your gear secure.


Complete Biomechanical and Field Guide on How to Adjust Hiking Poles for Height
Setting trekking poles to the correct height is a fundamental skill that directly impacts balance, joint fatigue, and cardiovascular efficiency. When hiking poles are calibrated correctly, they act as mechanical extensions of your arms, redistributing trail forces across your skeletal system. Misadjusted poles, by contrast, force awkward body mechanics and increase the likelihood of trips or sudden lock collapses. This guide walks through every phase of sizing, terrain modification, locking hardware calibration, and practical field verification.
The 90-Degree Elbow Angle: Establishing Your Baseline Height
Flat-ground setup begins by establishing a neutral, anatomically sound resting position for your arms. Stand tall on a flat, level surface while wearing the trail running shoes or hiking boots you plan to use outdoors. Footwear stack height varies from minimal zero-drop soles to thick cushioned platforms, and even a half-inch difference alters your arm geometry. Hold the pole grips naturally with your shoulders relaxed and your upper arms resting vertically against your torso.
Adjust the pole shaft until your elbow forms an exact 90-degree right angle, placing your forearm completely parallel to the ground. In this position, the pole tip should rest firmly on the ground next to your foot without requiring you to drop your shoulder or raise your hand. If your elbow angle is acute and your hand sits higher than your elbow, the pole is too long and will place excessive strain on your rotator cuffs. If your hand drops below elbow height, the pole is too short and will encourage a slouched forward posture that fatigues your lower back.
Adjusting Two-Section and Three-Section Telescoping Poles
Three-section telescoping poles provide broad adjustment ranges, but they require balanced extension across multiple shaft segments. Most three-piece designs feature numbered measurement markings in centimeters or inches along both the middle and lower shafts. To preserve structural integrity and balanced swing weight, you should adjust both the middle and lower sections equally to reach your target height. For instance, extending both sections to the 120-centimeter mark creates a stronger pole than fully extending the bottom shaft while keeping the middle section collapsed.
Equal section extension distributes bending stress evenly across the aluminum or carbon fiber tubing. Telescoping poles like the Hiking Poles, Ultra-Light Telescopic Trekking and the Shxing Carbon Fiber Trekking Poles, 7.1 oz Each rely on overlapping shaft sections to withstand downward trail force. Never pull any telescoping section past the clearly marked stop line. Extending tubing beyond that safety threshold leaves insufficient overlap inside the clamp collar, making the pole vulnerable to bending or snapping under axial loads.
Sizing Tri-Fold and Folding Z-Poles Correctly
Folding Z-poles use internal tension cords to connect fixed-length lower segments, paired with an adjustable telescoping upper section. To prepare these poles for height adjustment, you must first snap the lower folding sections into their locked alignment. Pull the shaft segment directly beneath the grip downward until the spring-loaded metal pin clicks securely into place, locking the internal cord under tension. The COVACURE Hiking Poles Collapsible Aluminum Alloy includes an upgraded push-button release designed for smooth locking and unlocking even when wearing trail gloves.
Once the lower segments are locked, open the upper external lever lock to dial in your custom length. Folding models often come in distinct size ranges, such as the covacure Hiking Poles, 7075 Aluminum Tri-fold which covers a 100 to 120 centimeter range for shorter hikers and an alternate 115 to 135 centimeter span for taller individuals. Choose the base model that centers your flat-ground height within its adjustment window. This sizing buffer ensures you have ample room to adjust the shaft upward for descents and downward for climbs.
Uphill Terrain Adjustments: Shortening Poles for Cadence and Propulsion
Sustained uphill climbing changes your body position and brings the trail surface closer to your hands. When climbing steep switchbacks with poles set at flat-ground height, you are forced to raise your hands above your chest on every pole plant. This continuous high reach places repetitive strain on your deltoids and traps, accelerating upper body fatigue. Shortening both poles by 5 to 10 centimeters (approximately 2 to 4 inches) allows you to maintain a compact, powerful arm swing.
With shortened poles, your hands remain at a comfortable waist level while the tips plant firmly into the slope ahead. This position lets you drive down through your latissimus dorsi and triceps, engaging strong core muscles to propel your body upward. A shorter pole length also prevents you from planting the tip too far forward, which can cause the pole to slip out from under you. On moderate rolling climbs where stopping to adjust clamps is inconvenient, you can temporarily choke down on the grip instead.
Downhill Terrain Adjustments: Lengthening Poles for Knee Protection
Descending steep mountain trails subjects the knees, hips, and lower back to high repetitive braking impacts. To protect your joints, lengthen both poles by 5 to 10 centimeters beyond your flat-ground baseline before starting a major descent. Lengthened poles allow you to plant the tips ahead of your descent line while keeping your torso upright and centered over your feet. This setup lets your upper body absorb initial deceleration forces before your forward foot strikes the ground.
Transferring body weight through your arms and poles significantly reduces peak impact forces on the patellofemoral joints. When carrying a heavy load, pairing proper pole extension with an internal frame hiking backpack helps stabilize your center of mass on steep step-downs. Lengthening the poles also provides stable forward contact points across slick gravel, wet roots, and loose scree. Always verify that your locking clamps are completely secure before leaning heavy downhill braking weight onto the shafts.
Sidehill Traversing: Asymmetrical Length Modification
Traversing an off-camber slope or contouring around an alpine ridge presents a unique height challenge for each arm. The uphill side of the slope sits noticeably higher than your feet, while the downhill side drops away into open terrain. Maintaining equal pole lengths on a sustained traverse causes the uphill shoulder to hike upward awkwardly while the downhill arm reaches blindly for support. You can solve this problem by adjusting the two poles asymmetrically.
Shorten your uphill pole by several centimeters so you can plant it comfortably without elevating your arm. Lengthen your downhill pole by a matching amount to reach the falling ground without forcing your torso to lean outward over the drop-off. On undulating trails where the sidehill slope changes frequently, adjusting clamps every few minutes becomes impractical. Under these conditions, utilize extended lower foam grips, such as those featured on the VANTRAILY Carbon Fiber Trekking Poles Lightweight, by shifting your uphill hand down onto the foam sleeve while keeping the downhill hand on the primary grip.
Calibrating Cam Levers and Locking Tension
External cam lever locks are the industry standard for reliable field adjustment, but they require periodic tension tuning. A cam lock functions by squeezing a split collar around the inner shaft when the lever is snapped shut. Over miles of trail use, vibration and thermal fluctuations can cause the knurled thumb screw on the lever assembly to loosen gradually. If the clamping force drops, the pole section will slip downward under axial body weight, posing a serious fall hazard.
To calibrate clamp tension, flip the lever into the open position and rotate the knurled thumb screw clockwise in small quarter-turn increments. Close the lever and check the resistance; it should require firm palm pressure to snap completely shut against the shaft. Avoid over-tightening the screw with pliers or excessive force, as crushing the collar can crack composite housings or deform thin-walled tubing. In cold weather, metal hardware contracts slightly, which may require an extra quarter-turn of the tension screw to maintain positive clamping friction on frosty descents.
Wrist Strap Threading and Ergonomic Load Distribution
Adjusting pole height correctly only delivers full ergonomic benefits if you use the wrist straps properly. Many hikers make the mistake of slipping their hands downward through the top of the loop, which forces a tight grip and isolates strain in the wrist tendons. The correct technique requires feeding your hand upward from beneath the strap loop before grasping the handle. Once your hand passes through from below, bring your palm down directly over the webbing and wrap your fingers around the grip.
When threaded correctly, the wide strap webbing wraps smoothly across the base of your palm and the ulnar border of your wrist. This arrangement transfers downward weight directly into your skeletal system, allowing you to relax your hand grip completely on the backward swing. Relaxing your fingers prevents forearm cramping and palmar blisters during long trail sessions. Pairing this efficient upper-body rhythm with lightweight trail hiking pants keeps your entire stride fluid and natural across changing grades.
Shaft Materials: Evaluating Aluminum and Carbon Fiber Load Dynamics
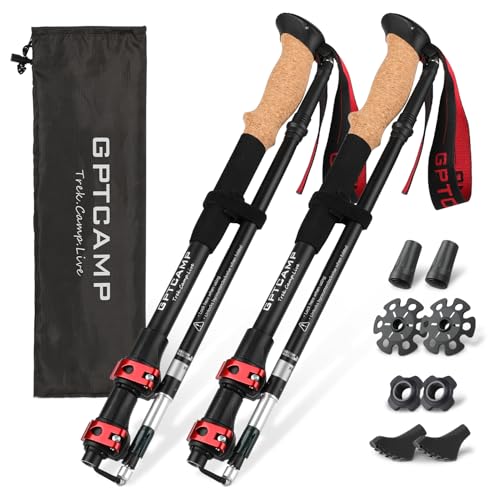
Understanding the mechanical limits of your shaft material helps prevent structural failures when operating at adjusted lengths. Aircraft-grade 7075 aluminum, utilized in models such as the GPTCAMP Collapsible Hiking Trekking Poles and Covacure Hiking Poles Collapsible, offers remarkable ductility and impact resistance. Under heavy downward loads or sudden stumbles, quality aluminum tubing flexes and bends rather than snapping instantly. This bending property gives hikers a chance to recover their balance without experiencing an abrupt loss of support.
Carbon fiber poles, such as the VANTRAILY Carbon Fiber Trekking Poles Lightweight, provide exceptional vibration damping and a noticeably lighter swing weight. Carbon fiber resists downward axial compression exceptionally well, but it remains vulnerable to lateral shear stress. If an extended carbon pole gets jammed between granite boulders while your forward momentum torques the upper shaft sideways, the carbon weave can fracture suddenly. When adjusting carbon fiber poles for height, always ensure you maintain adequate section overlap to protect the lower joints from excessive leverage forces.
Shelter Pitching: Trekking Poles as Structural Tent Supports
Many ultralight backpackers rely on adjustable hiking poles to pitch non-freestanding tarps and trekking-pole shelters. Pitching an A-frame or pyramid shelter requires setting your poles to specific heights, typically ranging between 115 and 130 centimeters. The printed measurement markings on telescoping and folding poles allow you to establish the exact apex height required for proper canopy tension. A pole set just two centimeters too short will leave tent walls sagging, while an over-extended pole can overstretch shelter seams.
Check whether your shelter requires a handle-up or tip-up orientation before adjusting pole sections for camp. Tents designed for handle-up setup feature reinforced apex pockets that cradle rounded cork or EVA grip tops securely. Shelters using tip-up configurations require sliding the carbide tip into a reinforced metal grommet or webbing loop. Ensure your pole locks are securely tensioned before staking out your guylines, because strong nighttime wind gusts place substantial vertical and lateral loads directly onto the pole shafts.
Pre-Trail Verification and Maintenance Routine
Before setting out on the trail, always perform a downward weight verification test on your adjusted poles. Stand on a flat surface, grasp the grips firmly with your hands in the straps, and lean your full upper-body weight downward onto the poles. If either section creeps downward or slips into the sleeve, open the cam lever and tighten the adjustment screw immediately. Performing this simple mechanical check before stepping onto technical terrain eliminates the risk of unexpected section collapse on steep descents.
After completing a muddy or rainy hike, disassemble your telescoping pole sections entirely and wipe the tubing clean with a dry cloth. Fine trail grit and silt can enter the joint collars, scratching the anodized finish and compromising the friction necessary for cam locks to hold. Trapped moisture inside aluminum tubes can also cause galvanic oxidation over time, resulting in seized joints that refuse to slide smoothly. Never apply oils, silicone sprays, or petroleum-based lubricants to telescoping shafts, as lubricants destroy the mechanical friction required for locks to hold under downward body weight.
Mastering pole height adjustment transforms trekking poles from simple walking sticks into essential stability tools. By dialing in the baseline 90-degree elbow angle on flat terrain, shortening shafts for climbs, and lengthening them for descents, you protect your joints and maximize your endurance. Take the time to verify clamp tension and practice proper strap threading before every hike to ensure dependable performance across every mile of backcountry terrain.








Write Your Review
No reviews yet. Be the first to share your experience!