


Navigating rolling winter terrain on snowshoes demands steady balance, upper-body rhythm, and dependable traction across variable snowpacks. When preparing for a cold-weather outing, many outdoor enthusiasts wonder: can you use hiking poles for snowshoeing without investing in a dedicated winter-only pole set? The short answer is yes, provided your gear is outfitted with broad powder baskets to prevent deep postholing and features secure locking hardware that resists slipping in sub-freezing conditions. Pairing reliable walking sticks with proper winter apparel like trail pants designed for knee comfort allows you to distribute braking loads across your entire body during steep powder descents.
Standard three-season trekking poles share the same core structural engineering as dedicated winter poles, relying on telescoping aluminum or carbon fiber shafts to deliver axial stability. The primary functional difference lies in basket diameter and clamp reliability when ambient temperatures drop below freezing. By swapping narrow summer mud baskets for wide powder baskets and ensuring your cam levers are properly tensioned, your favorite hiking poles can transition smoothly into dependable snowshoeing companions. Understanding how shaft materials handle lateral loads in heavy snow will keep your gear intact while you explore frosty backcountry trails.


Using Trekking Poles for Snowshoeing: The Complete Conversion and Field Guide
Trekking poles can serve as excellent tools for snowshoeing, providing the same essential balance, joint offloading, and rhythmic propulsion in deep snow as they do on summer trails. Most hikers do not need to purchase a separate set of winter-specific walking sticks if their existing poles meet a few functional criteria. The core mechanical requirements for winter use involve adding broad powder baskets, verifying clamp tension in sub-freezing temperatures, and adjusting pole length to compensate for snow penetration. With minor adjustments, your standard hiking sticks will deliver outstanding stability across rolling hills and deep powder alike.
The Critical Role of Powder Baskets for Winter Flotation
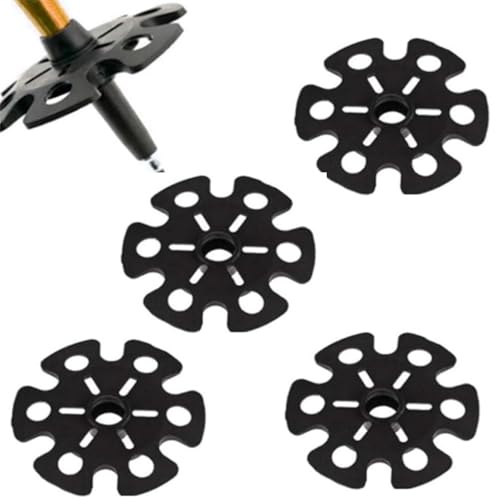
The single most important modification required when converting hiking poles for winter use is swapping small mud baskets for large powder snow baskets. Standard summer baskets typically measure between 40 and 50 millimeters in diameter, which provides enough surface area to stop poles from sinking into soft forest dirt. In unconsolidated winter snow, however, narrow summer baskets offer virtually zero resistance, allowing pole shafts to plunge deep into the snowpack. Broad winter snow baskets, such as the 85-millimeter to 86-millimeter replacement models from Qiutdisn, provide the necessary surface area to float near the top of the snowpack.
When a pole postholes several feet into deep snow, it forces the snowshoer into an awkward posture that rapidly fatigues the arms and shoulders. Struggling to pull a buried pole out of dense snow also increases the risk of bending or snapping the lower shaft. Models like the MSR DynaLock Explore 3-Section Alumunium come equipped with both summer and winter baskets, allowing seamless seasonal transitions right out of the box. If your existing poles only have compact mud rings, installing aftermarket snow baskets is an inexpensive upgrade that transforms your winter stability.
Checking basket attachment security is equally important before stepping onto the snowpack. Freezing temperatures can cause plastic threading to stiffen, which may lead to loose baskets backing off during a hike. Hikers should ensure that replacement baskets are threaded firmly past the retention lip on the lower ferrule. Carrying a spare basket in your winter pack prevents an unexpected struggle if a basket catches on a buried branch.
Aluminum vs. Carbon Fiber Shafts in Sub-Freezing Conditions
Shaft material selection plays a pivotal role in cold-weather durability and handling. Aircraft-grade 7075 aluminum, featured on the Mons Peak IX Tiger Paw 7075 Trekking Poles and Naturehike Collapsible Trekking Poles, provides exceptional ductility and resistance to sudden breakage. While aluminum is slightly heavier than composite materials, it tolerates lateral shear forces far better when a pole gets trapped beneath a snowshoe deck. In freezing environments, aluminum will typically bend under extreme stress rather than suffering an immediate, catastrophic snap.
Carbon fiber poles, including the Mons Peak IX Tiger Paw Carbon Fiber Trekking Poles and TheFitLife Carbon Fiber Trekking Poles, deliver outstanding vibration damping and featherweight swing weight. High-modulus carbon fiber remains structurally rigid under heavy downward loads, making it an excellent choice for long-distance snowshoers seeking to minimize arm fatigue. The structural vulnerability of carbon fiber arises from lateral impacts, such as accidental kicks from rigid snowshoe crampons. A sharp strike from a metal snowshoe frame can introduce micro-fractures that compromise overall shaft integrity.
Thermal conductivity is another practical distinction between metal and composite tubing. Aluminum conducts ambient cold rapidly, which can chill your hands through the shaft if your gloves brush against bare metal during adjustments. Carbon fiber acts as a natural insulator, maintaining a neutral surface temperature that is more forgiving to handle in bitter winter winds. For backcountry snowshoers carrying heavy winter survival gear, durable 7075 aluminum remains the safest choice for bending resilience, while recreational trail snowshoers can enjoy the lightweight swing of carbon fiber.
Locking Mechanisms and Thermal Contraction Issues
Sub-freezing temperatures cause pole materials to contract slightly, which poses a serious challenge for shaft locking mechanisms. External cam lever locks are vastly superior to internal twist locks for winter snowshoeing. Internal twist expanders rely on expanding plastic wedges inside the shaft, which often slip when condensation freezes into a slick glaze of internal ice. Furthermore, operating internal twist mechanisms with thick winter mitts is exceptionally difficult and frequently leads to stuck sections.
External lever systems, such as the DynaLock mechanism found on MSR poles or the snap-click compression lever locks on Mons Peak IX models, provide direct visual and tactile confirmation of clamping force. These mechanisms feature tool-free thumb screws or knurled adjustment nuts that allow quick tension calibration in the field. As cold air causes pole sleeves to shrink, hikers can quickly tighten the thumb screw a quarter turn to restore firm clamping resistance. This prevents the dangerous scenario of a pole collapsing unexpectedly under full body weight during a steep descent.
Maintaining clean, dry lock collars before beginning your excursion is an essential cold-weather habit. Any liquid moisture trapped beneath a lever clamp can freeze solid, making it difficult to open or close the latch on the trail. Hikers should inspect their cam locks prior to leaving the trailhead, verifying that the clamping action requires firm palm pressure to engage fully. If a lever feels loose, adjust the tension screw immediately before exposing the mechanism to sub-zero snowpack.
Adjusting Pole Height for Snowpack Penetration and Gradients
Sizing hiking poles for snowshoeing requires adjusting beyond the standard three-season 90-degree elbow benchmark. On dry summer trails, proper pole length places your elbow at an exact right angle when the tip rests on level ground. In winter conditions, even large powder baskets will sink two to four inches into soft snow before establishing firm support. Consequently, snowshoers should typically lengthen their poles by five to ten centimeters compared to their standard summer setup to compensate for this baseline sink.
Gradient changes on snow-covered slopes demand rapid adjustments to maintain an upright, efficient posture. When ascending steep winter slopes, snowshoes place your ankles at an angle that pulls your center of mass forward, requiring shorter poles to prevent shoulder hyperextension. Shortening each pole by five to ten centimeters allows you to plant the tips ahead of your boots and engage your upper body for climbing propulsion. Conversely, when descending through powdery snow, extending the poles longer than normal provides early braking contact before your snowshoes slide downward.
Sidehill traversing along off-camber snowdrifts introduces an asymmetrical challenge that can quickly unbalance a snowshoer. On steep sidehills, the uphill pole should be shortened while the downhill pole is lengthened to keep your shoulders level and your torso centered over your snowshoe bindings. Alternatively, using poles equipped with extended lower foam grips, like those on the MSR DynaLock Explore or TheFitLife Carbon Fiber poles, eliminates the need to adjust mechanical clamps on exposed ridges. You can simply slide your uphill hand down onto the lower foam choke sleeve while maintaining full length on the downhill side.
Grip Materials, Wrist Straps, and Winter Glove Compatibility
Handle ergonomics directly dictate how comfortable your poles feel when wearing bulky winter gloves or mittens. Natural cork grips, featured on the Mons Peak IX Tiger Paw models and TheFitLife poles, provide exceptional comfort and naturally conform to your hands over time. In freezing weather, cork provides moderate thermal insulation, preventing ambient chill from transferring directly into your palms. High-density EVA foam handles, such as those on the Naturehike Collapsible poles and MSR backcountry poles, offer even better cold-weather thermal resistance and do not absorb moisture from wet snow.
Winter snowshoers should avoid basic hard plastic or uninsulated rubber grips, as these materials turn stiff, slick, and cold in freezing temperatures. Furthermore, grip circumference should comfortably accommodate insulated winter gloves without causing hand fatigue or cramping. Contoured palm rests and textured dimpling on the grip head allow you to palm the top of the handle with your mittens when descending steep terrain. This palm-over-top technique provides a direct vertical braking platform that helps stabilize your snowshoes against unexpected forward slips.
Proper wrist strap usage during winter travel requires balancing joint support against backcountry fall safety. Feeding your gloved hand upward through the bottom of the strap loop allows your body weight to rest naturally across the wide nylon webbing, relieving forearm tension. On flat trails and rolling meadows, this traditional technique promotes an efficient, rhythmic poling motion that conserves energy. However, when navigating avalanche terrain, frozen stream crossings, or steep tree-lined chutes, you should remove your hands from the straps completely. If a snowshoe catches a hidden root, free hands prevent wrist sprains and allow you to arrest your slide safely.
Packability, Telescoping Profiles, and Backpack Transport
Winter backcountry excursions frequently involve mixed terrain where snowshoes and poles must be stowed on your pack during approaches or rocky sections. Three-section telescoping poles typically collapse down to roughly 24 inches, providing a rigid profile that lashes securely to external tool loops. The Mons Peak IX Tiger Paw Z-120 Trekking Poles utilize a folding Z-pole architecture that breaks down to a compact 14.75 inches, making them exceptionally easy to pack inside smaller winter daypacks. While folding poles offer unmatched packability, three-section telescoping designs generally provide superior extension ranges to adapt to deep snow depths.
When strapping poles to your pack, orienting the tips downward and securing the shafts beneath compression straps prevents the carbide points from puncturing fragile winter fabrics. Pairing your poles with a durable frame hiking backpack ensures you have rigid lash points capable of supporting winter gear without shifting off-balance. Heavy winter loads, including snowshoes, thermoses, and thermal layers, require a stable pack architecture that keeps heavy gear close to your spine. Having poles stowed securely allows your hands to remain free when scrambling over exposed rock steps or adjusting snowshoe bindings.
Protective rubber tip covers, like those included in the Qiutdisn accessory bundles, should be slipped over sharp carbide tips whenever poles are stowed on your backpack. Exposed metal tips can easily tear tent fabric, snag down jackets, or scratch companions hiking behind you. Once you step back onto deep snow, remove the rubber feet to expose the aggressive tungsten carbide tips, which bite securely into hard crust and hidden ice beneath the powder. Stowing rubber tips in an accessible pocket ensures they do not get lost in deep drifts during gear transitions.
Field Maintenance, De-Icing, and Post-Hike Gear Care
Cold-weather poling exposes equipment to severe moisture cycles as warm friction and body heat melt snow that subsequently refreezes into mechanical joints. Ice accumulation inside telescoping shaft sections can seize sliding tubes or cause cam locks to freeze shut during sub-zero outings. To clear trail ice, gently tap the pole segments against your snowshoe frame to dislodge frozen crust, avoiding violent strikes that could dent thin aluminum walls. Never use open flames or chemical de-icers to thaw frozen locks, as extreme heat and solvents can weaken composite resin and warp plastic clamp collars.
Post-trip drying and cleaning are crucial steps for preserving the lifespan of any trekking pole used in winter environments. After returning from a snowshoe excursion, pull all telescoping shaft sections completely apart to expose the inner tube surfaces to warm indoor air. Trapped moisture inside closed aluminum shafts causes galvanic oxidation over time, resulting in chalky white corrosion that seizes sections together. Wipe down the inner and outer tubing with a dry microfiber cloth and allow the disassembled sections to dry fully before reassembling.
Avoid applying petroleum-based lubricants, silicone sprays, or grease to the sliding shaft tubes or locking mechanisms. Lubricants attract fine trail grit, degrade the friction required for cam levers to hold, and turn gummy in freezing weather. If a lever clamp begins to feel gritty, rinse the hardware under warm tap water to flush away road salt, then allow it to dry completely. Checking the tightness of all mechanical fasteners and verifying thumb screw tension ensures your hiking poles remain dependable for many seasons of winter exploring.
Verifying your pole configuration before stepping onto snow-covered trails is the best way to ensure an enjoyable, safe winter outing. By outfitting your trekking sticks with wide powder baskets, dialing in lever clamp tension for sub-freezing temperatures, and mastering quick height adjustments on shifting terrain, your standard hiking poles will provide all the balance and joint support needed for snowshoeing. Taking the time to care for your shafts and clamps after each trip guarantees that the same pair of reliable poles will continue serving you faithfully through all four seasons.




Write Your Review
No reviews yet. Be the first to share your experience!