


Pitching a dependable weather shelter in treeless alpine valleys or exposed campsites demands an understanding of wind vectors, tarp tension, and vertical support. When a sudden rainstorm blows in across an open ridge, knowing how to set up a tarp with poles turns flat waterproof fabric into a rigid, storm-resistant sanctuary. High-tensile aviation aluminum and stainless steel poles provide the vertical elevation needed to shed heavy rain and create livable vestibule space. Pairing reliable uprights with lightweight trail pants and durable foul-weather gear ensures you stay dry while managing tension lines on uneven backcountry terrain.
Success in the field comes down to balancing axial downward load capacity with opposing lateral tension vectors. Selecting poles with dependable twist-lock mechanisms or robust push-button snap pins prevents sudden vertical collapse under wind-driven downpours. Using protective silicone or rubber tip caps shields vulnerable fabric from punctures while maintaining rock-solid grommet seating. Mastering these rigging fundamentals allows backpackers and campers to construct stormproof shelters regardless of what the trail throws their way.


Essential Principles for Rigging Tarps with Upright Poles
Setting up a rigid tarp shelter without relying on trees requires understanding mechanical leverage, opposing guyline vectors, and proper vertical support. By anchoring corners securely and utilizing adjustable upright poles, you create a dynamic tension system capable of withstanding shifting winds and heavy precipitation. A properly pitched tarp provides exceptional ventilation, customizable coverage, and minimal packed weight for backcountry travelers. Mastering this setup technique gives campers total freedom to create reliable weather protection across open beaches, rocky plateaus, and sparse alpine ridges.
Selecting Shelter Geometries for Changing Conditions
The ideal shelter geometry depends directly on prevailing weather conditions, terrain features, and personal space requirements. The classic A-frame configuration uses two primary upright poles at opposing ends of a central ridge line, creating steep sidewalls that shed torrential rainfall effortlessly. This symmetrical profile creates generous interior headroom and allows air to flow freely through both open ends, minimizing condensation during humid summer nights. When high winds threaten, lowering the pole heights brings the perimeter edges close to the ground, significantly reducing wind drag and protecting occupants from driving rain.
A lean-to setup offers rapid deployment and acts as a massive aerodynamic windbreak during single-direction storms. In this configuration, one edge of the tarp pins flush against the ground using sturdy stakes, while the front edge elevates on two telescoping poles angled slightly outward. This orientation directs wind gusts smoothly over the sloping fabric while reflecting ambient heat into the protected living area beneath. Lean-to pitches work exceptionally well for daytime cooking areas, midday shade shelters, or perimeter storm breaks along exposed campsites.
The porch awning mode elevates one or two corners of an existing tent fly or modular tarp to create an expansive covered entryway. Utilizing telescoping poles ranging from 80 inches to over 9 feet, campers can raise the front threshold high enough for comfortable stand-up clearance. This setup proves invaluable during prolonged rainstorms, allowing hikers to shed wet gear before entering their sleeping quarters. Maintaining a slight height differential between the front poles ensures that rainwater flows off to one side rather than collecting in heavy overhead pools.
Step-by-Step Erection: The Tension-First Method
Attempting to raise vertical poles before establishing foundational tension is the most common reason tarp setups fail in windy conditions. Begin by spreading the tarp flat on the chosen campsite and identifying the primary wind direction. Secure the windward corners or rear edge directly to the ground using heavy-duty stakes driven at an opposing angle. Establishing these rear ground anchors first creates a solid baseline that resists being swept away while you work on the elevated front sections.
Next, assemble your primary upright poles to the desired baseline height, ensuring all internal locking collars are firmly engaged. Insert the top metal tip of the first pole through the designated ridge grommet, ensuring the fabric grommet seats fully over the base of the spindle. Attach your primary ridge guyline to the pole tip or tie-out loop, extending the cord outward at an approximate 45-degree angle from the center line of the shelter. Walk backward while paying out line, drive a heavy ground stake, and pull the line taut using an adjustable friction hitch or line tensioner.
Repeat this process on the opposing side by elevating the secondary ridge pole and setting its counterbalancing guyline. As the second upright raises into position, the entire central ridge of the tarp will suspend under tension between the two vertical supports. Minor adjustments to cord tension and pole angles at this stage will align the central axis and eliminate sagging fabric. Once the main ridge stands stable under its own guyline tension, proceed around the perimeter to secure the remaining side tie-outs.
Guyline Geometry and Ground Anchor Physics
An upright pole cannot stand independently; its structural integrity depends entirely on opposing guyline tension pulling against solid ground stakes. For maximum stability, each load-bearing pole tip should utilize two distinct guylines angled roughly 90 degrees apart from each other, forming a triangular support footprint. This dual-line rigging counteracts lateral sway from shifting crosswinds that would otherwise topple a single-line setup. Pulling the guylines tight creates an opposing downward force vector that seats the base of the pole firmly into the ground.
Ground stake angle plays an equally vital role in preventing catastrophic shelter failure under sustained gusts. Always drive stakes into the earth at an angle of roughly 45 degrees pointing away from the direction of the tarp cord pull. Driving a stake vertically into the ground makes it prone to pulling free like a loose tooth when heavy tension applies. In loose sand, gravel, or saturated forest loam, anchor stakes by piling heavy boulders across their heads to prevent sudden slippage.
Investing in high-visibility reflective cordage prevents tripping accidents around the expansive guyline perimeter after dark. Brightly colored guylines combined with glow-in-the-dark pole accessories, such as those found on select AVOFOREST models, make navigation around the campsite safe and effortless. When organizing your backcountry gear in an internal frame hiking backpack, keep guylines pre-rigged to tarp corners with quick-release knots. This preparation allows for rapid pitching when sudden storms force an emergency shelter setup on exposed mountain passes.
Telescoping Pole Mechanics and Locking Security
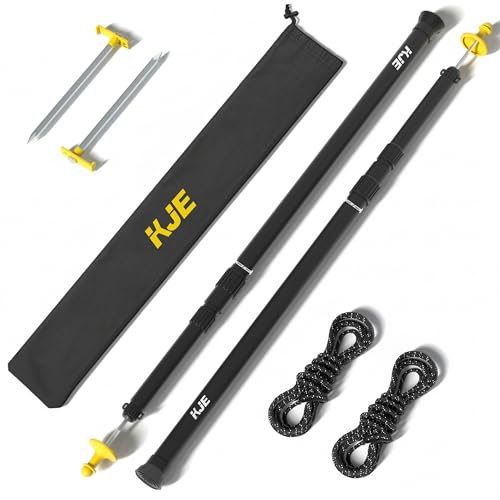
Modern tarp poles utilize sophisticated telescoping designs crafted from aviation-grade aluminum alloys or reinforced stainless steel. Telescoping sections allow campers to pack long poles down to compact sizes of around 30 to 37 inches for effortless transport. When extending multi-section poles, always begin expanding from the thickest base section before extending thinner upper segments. Thicker lower sections provide superior structural rigidity and resist lateral deflection far better when subjected to buffeting backcountry winds.
Locking mechanisms generally fall into two categories: internal twist-lock expanders and external push-button snap collars. Models from Green Elephant, QonicFly, and KJE feature advanced twist-and-lock designs that compress internal bushings against the inner shaft walls to secure the height. To ensure maximum holding strength, never extend any telescoping segment past its designated stop indicator. Leaving several inches of internal tube overlap inside each joint significantly strengthens the pole and prevents buckling under heavy axial loads.
In contrast, systems like the SANLIKE stainless steel poles rely on push-button buckle locks that click securely into pre-drilled adjustment holes. Push-button mechanisms offer positive mechanical stops that cannot slip downward under vertical weight, making them exceptionally reliable in cold or wet conditions where friction locks might slip. Twist-lock systems provide continuous micro-adjustability, allowing you to dial in the exact millimeter of tension required to keep the tarp ridge drum-tight. Choosing the right mechanism depends on whether you prioritize absolute slip resistance or precise height customization.
Preventing Fabric Abrasion and Center-Lift Failures
Sharp metal pole tips can easily punch through silnylon or polyurethane-coated polyester tarps if positioned improperly. While heavy brass grommets handle pole tips well at reinforced perimeter corners, central pitch points require special protective measures. Always utilize removable silicone or rubber tip covers, such as the protective caps included with Green Elephant and AVOFOREST poles. These broad-diameter covers distribute pressure over a wider surface area, preventing punctures when supporting the underside of a tarp canopy.
Some heavy-duty poles feature specialized bulbous lightning protection caps that double as slip-resistant friction pads against smooth fabric. These oversized rubber fittings create a non-slip contact patch that prevents the pole tip from skittering across slick nylon under buffeting winds. When pitching a tarp without center grommets, you can wrap a smooth river stone inside the fabric from beneath and tie a clove hitch around the resulting knot. Resting your blunt pole cap against this reinforced bundle creates a secure center-lift point without risking costly fabric tears.
The base of the pole demands equal attention to prevent sinking into soft turf, mud, or loose beach sand. High-performance poles feature textured, non-slip end caps designed to grip rock slabs and wet grass firmly. If camping on deep sand or marshy terrain, place a flat rock, piece of bark, or broad plastic plate underneath the pole base to act as a snowshoe-style spreader. This simple step prevents the pole from sinking under guyline tension, which would otherwise introduce slack across the entire shelter canopy.
Weather Management: Managing Rain Runoff and High Winds
Water accumulation is the greatest threat to any tarp shelter, as pooled water quickly adds dozens of pounds of dead weight that can snap poles and pull stakes. To guarantee continuous runoff, establish an intentional slope of at least 15 to 20 degrees across every planar surface of the canopy. Never pitch a tarp completely flat overhead, no matter how calm the skies appear when making camp. Lowering the leeward poles creates a natural drainage gradient that channels water harmlessly away from your living and sleeping quarters.
Wind management requires a proactive approach to aerodynamic deflection rather than brute-force resistance. In gusty conditions, angle your upright poles slightly outward away from the center of the tarp, rather than positioning them strictly perpendicular to the ground. Angling poles outward places them in direct opposition to the inward pull of the canopy, utilizing guyline tension to lock the pole base firmly into place. Lowering the overall pitch height by several inches reduces the shelter wind profile and minimizes lateral shear stress against the pole shafts.
Backpackers carrying budget-friendly daypacks or ultralight gear must monitor fabric stretch throughout the night. Nylon tarps absorb moisture from rain and ambient humidity, causing the fibers to relax and form saggy pockets within hours of setup. Inspect your lines before turning in and tighten all friction adjusters to restore taught canopy planes. Tarp poles with smooth twist locks allow you to add an inch of extension from beneath the shelter, instantly restoring fabric tension without requiring you to venture outside in the rain.
Post-Camp Tear Down and Long-Term Pole Care
Dismantling a tarp shelter in an orderly sequence prevents bent pole shafts, tangled guylines, and damaged fabric. Begin by loosening perimeter guyline tensioners before dropping the central ridge poles, preventing the fabric from collapsing abruptly onto wet ground. Wipe down each telescoping pole section with a dry cloth as you collapse it to remove grit, mud, and moisture. Allowing gritty sand particles to remain inside telescoping collars can scratch the anodized aluminum and cause locking mechanisms to seize prematurely.
After returning from a wet camping trip, fully extend all pole segments at home and allow them to air-dry completely before long-term storage. Trapped moisture inside hollow aluminum or stainless steel tubing can cause galvanic corrosion, white oxidation powder, and seized internal expanders. Check all rubber tip caps and ground feet for embedded debris or micro-cracks that could compromise their puncture-resistant properties. Storing your clean, dry poles in their ventilated carry bags ensures they remain fully functional and ready for your next wilderness expedition.
Reviewing your anchoring components periodically ensures reliable shelter performance season after season. Replace bent aluminum stakes and inspect guyline cords for fraying or weakened core strands around friction knots. Testing your telescoping locks periodically by applying firm downward body weight onto each extended pole verifies that locking collars maintain adequate clamping friction. By practicing proper pitching technique and maintaining your hardware diligently, you ensure your pole-supported tarp shelter remains a stormproof backcountry haven for years to come.





Write Your Review
No reviews yet. Be the first to share your experience!