


Pitching a reliable weather shelter in the backcountry often comes down to the structural integrity of your upright supports. While trees and natural anchors provide great tie-off points, open campsites demand dedicated vertical stability to shed moisture and manage wind gusts. Understanding how to use a tarp pole transforms an ordinary rainfly or canopy into a rigid, storm-ready fortress that protects your gear and living space. When you pack your gear alongside reliable trail backpacks, carrying dedicated poles ensures you can pitch camp in any terrain without searching for overhead branches.
Modern poles utilize telescoping aluminum or sturdy steel tubing designed to bear vertical weight without bending under heavy guyline pull. Using them properly requires an understanding of angle alignment, locking friction, and fabric protection caps that prevent fabric tears. Whether configuring a high-clearance dining fly or an aerodynamic ridge shelter, dialing in your vertical poles keeps your camp dry and secure.




Mastering Tarp Pole Mechanics, Setup Geometry, and Field Stability
Pitching an outdoor shelter with standalone poles requires more than simply propping up canvas or nylon. To successfully anchor an awning or rainfly, you must balance downward axial forces against outward lateral line tension. Mastering how to use a tarp pole ensures that your shelter remains rigid during heavy rain and resists shifting in sudden winds. Setting up your shelter correctly from the beginning saves time and prevents middle-of-the-night collapses when weather turns foul.
Understanding Tarp Pole Construction and Load Dynamics
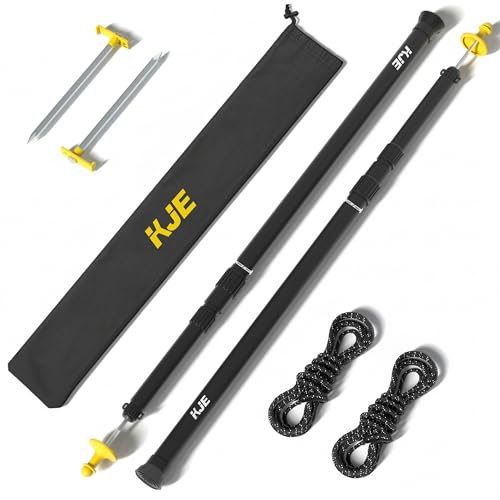
Tarp poles function as primary vertical load-bearing columns in open-air shelters. Unlike flexible dome tent poles designed to bow into arches, tarp poles must remain straight and rigid under continuous tension. Most heavy-duty designs utilize extruded aluminum alloy, such as 6063 aluminum or aviation-grade tubing, which balances low carry weight with strong axial compression strength. Thicker profiles with an outer diameter of 1.26 inches (32 mm), such as those found on AVOFOREST Heavy Duty poles or KJE adjustable models, provide exceptional resistance against lateral deflection when wind buffets a large canopy.
For ultralight setups, narrower shafts measuring 0.75 inches or multi-section steel poles provide reliable utility for smaller tarps. A single heavy-duty aluminum pole can bear up to 50 or 60 pounds of direct downward vertical force without slipping when properly locked. Steel models offer dependable durability and rigidity, though their weight makes them better suited for vehicle-supported camping. Selecting the appropriate tube thickness and material determines whether your shelter holds firm or bows under adverse trail conditions.
Operating Telescoping Locks and Maintaining Overlap
Adjustable telescoping poles rely on secure internal or external clamping systems to hold their height. Popular options from REDCAMP and GREEN ELEPHANT utilize internal twist-lock mechanisms that expand an internal friction collar against the inner tube wall when rotated clockwise. To engage an internal twist lock, grasp the upper section firmly, pull the lower section to your desired height, and twist until you feel solid mechanical resistance. Over-tightening can crack plastic expander plugs, so hand-tightening until firm is the best practice.
Advanced systems add a secondary anti-collapse lock collar to safeguard against vertical collapse during heavy gusts. When extending multi-section poles, never pull any individual tube past its indicator mark or maximum length limit. Leaving several inches of tube overlap inside the adjacent section reinforces the joint against bending leverage. When you coordinate your shelter setup with lightweight outdoor apparel for mobile camp tasks, taking a moment to inspect your pole joints prevents sudden structural failures later.
Grommet Integration and Tarp Fabric Protection
The tip of a tarp pole is engineered to interface directly with shelter corners, center peaks, and perimeter webbing. Stainless steel or aluminum tip pins slide cleanly through standard brass or aluminum tarp grommets to anchor corners securely. Once the pin protrudes through the grommet, the guyline loop is hooked over the pin to lock the fabric firmly in place between the pole collar and cord. This layered connection prevents the tarp from slipping off the upright column during windy gusts.
When elevating the center of a tarp where no grommets exist, an unprotected metal pin will punch straight through silicone-coated nylon or polyester fabric. To support center peaks safely, slide protective silicon or rubber tip covers over the top pin. Many models, such as AVOFOREST and KJE poles, feature wide lightning protection caps or glow-in-the-dark rubber hoods measuring nearly two inches wide. These broad caps distribute downward pressure across several square inches of fabric, eliminating puncture risks while making the pole visible at night.
Securing Pole Bases on Diverse Trail Surfaces
A tarp pole is only as dependable as the ground beneath its base foot. On hard-packed dirt, slick river stones, or damp grass, an unanchored pole base can easily kick out sideways when lateral winds hit the canopy. Most quality poles include textured rubber feet or non-slip composite caps designed to grip coarse ground. However, high-tension pitches benefit from secondary mechanical base restraints to guarantee stability.
Base fixing anchors, such as SquEqu pole holder clasps, wrap around the bottom of the pole tube and pin directly to ground stakes. This clasp locks the foot of the pole to a fixed spot, preventing the base from shifting even if the ground turns to mud during torrential downpours. In loose sand or rocky terrain where stakes pull free, placing the pole base inside a shallow divot or encircling it with heavy rocks prevents accidental kick-out. Taking the extra step to anchor the foot creates a dependable foundation that withstands shifting wind vectors.
Guyline Angles and Counter-Tension Fundamentals
A tarp pole cannot stand independently; it requires balanced opposing forces generated by tensioned guylines. To secure a primary ridge pole, run two separate guylines outward at approximately a 45-degree angle from the pole axis, forming a stable tripod with the ground. Driving your stakes into the ground at a 45-degree angle pointing away from the shelter maximizes resistance against upward pull. Once the stakes are seated, tension the lines using plastic or aluminum cord adjusters until the pole stands upright with slight backward lean.
Counter-tension is what keeps the entire structure rigid. The outward pull of the guylines must balance the inward pull of the tarp fabric perfectly. If you are packing gear in budget trekking packs, carrying reflective cordage with built-in tensioners makes night adjustments simple and prevents tripping hazards around your shelter perimeter. Pulling lines drum-tight stabilizes the upright pole and prevents wind from generating slack that could dislodge the tip pin from its grommet.
Adjusting Pole Heights for Drainage and Storm Management
Canopy pitch angles must be actively managed to prevent rainwater from pooling on top of the fabric. Pooling water creates immense downward weight that can bend metal poles, rip seams, or collapse entire shelter frames. When deploying adjustable poles ranging from 28 inches up to over 8 feet, always set one side or corner noticeably lower than the center or front opening. This elevation drop encourages immediate runoff, directing sheets of water safely away from your sleeping quarters and gear storage areas.
When storm winds increase, lower your telescoping poles to reduce the overall frontal surface area of the shelter. Dropping the pole height brings the canopy closer to the ground, allowing turbulent wind to spill over the top rather than lifting the shelter from underneath. Heavy-duty aluminum poles can withstand winds up to 40 miles per hour when guyed out firmly and pitched low. Regularly checking line tension during sustained rain ensures your shelter maintains its optimal drainage pitch without sagging.
Troubleshooting Lock Slippage and Mechanical Failures
Telescoping pole failure is almost always caused by improper lock engagement or severe lateral shear stress. If an internal twist-lock pole slips downward under tension, grit or trail dust may be coating the inner expansion wedge. To resolve this issue, pull the sections completely apart, wipe away loose dirt with a clean dry cloth, and reassemble the tube before re-tightening. Never use oil, grease, or petroleum lubricants inside telescoping shafts, as lubricants destroy the friction needed for the clamp to hold.
Another frequent mistake is leaning poles inward toward the center of the shelter. Tilting a pole toward the fabric creates slack and encourages vertical collapse as soon as wind gusts press against the wall. Always angle the pole base slightly inward so the top tilts outward, or keep the pole perfectly vertical relative to the ground. This orientation transfers fabric pull straight down through the axis of the pole, maximizing structural load capacity.
Disassembly, Cleaning, and Long-Term Maintenance
Proper field maintenance prevents aluminum oxidation and extends the working life of your outdoor shelter hardware. After camping in wet or humid conditions, always break down your telescoping poles completely before long-term storage. Trapped moisture inside closed metal tubes creates white aluminum oxide corrosion, which can cause sections to bind, stick, or seize permanently. Allowing each tube segment to air-dry thoroughly in a warm, dry room prevents corrosion from damaging internal locking mechanisms.
Inspect your rubber tip covers, lightning caps, and ground feet regularly for cracks or deep cuts caused by rough ground contact. Replacing worn rubber caps ensures your sharp metal tip pins never rub directly against expensive canopy fabrics. Once all sections are clean and dry, collapse the poles to their minimum packed size, typically between 24 and 36 inches, and store them inside a breathable woven carrying bag. By caring for your hardware between trips, your poles will remain dependable and ready for any backcountry weather challenge.
Essential Field Checklist for Pitching Tarp Poles
Before settling into camp for the night, run through a quick structural safety check to confirm your shelter is storm-ready. Ensure all telescoping locks are firmly twisted or clamped into place, and verify that adequate internal tube overlap remains across all section joints. Check that protective silicon or rubber caps are securely seated over any tip that touches raw canopy fabric. Test each guyline to confirm firm tension, verifying that stakes are seated deeply at opposing angles.
Finally, inspect the pole feet to ensure they are resting on solid ground or anchored with dedicated base clasps. A quick walk around your shelter perimeter allows you to adjust drainage angles and tighten loose cords before nightfall. Taking these deliberate steps ensures your tarp shelter delivers dependable overhead protection, giving you peace of mind throughout your outdoor adventure. Consistent setup habits will make pitching quick, intuitive, and durable in any camping environment.





Write Your Review
No reviews yet. Be the first to share your experience!