


Steep alpine descents place intense cumulative stress on knees, quadriceps, and ankle joints. Proper gear calibration makes all the difference between smooth trail stability and dangerous joint fatigue. Understanding how to adjust leki trekking poles ensures your equipment holds firm against your body weight rather than collapsing when you need it most. Whether you are climbing jagged mountain passes or crossing swift streams, properly configured poles deliver the balance required for difficult terrain.
Many hikers struggle with slipping shaft sections or uncomfortable wrist angles because they rely on guesswork rather than systematic adjustment. Adjusting your poles correctly improves posture, minimizes shoulder fatigue, and distributes your pack load evenly across your entire body. When organizing equipment from a comprehensive wilderness backpacking checklist, dialing in your locking mechanisms beforehand prevents trail mishaps. Taking a few moments to understand lever tension, twist collars, and ergonomic strap seating ensures reliable support on every mile.



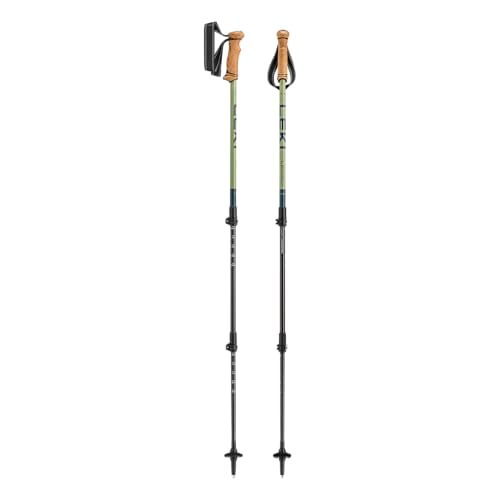


Essential Techniques for Adjusting LEKI Trekking Poles
Adjusting your hiking poles accurately transforms them from simple walking sticks into high-performance stability tools. A correct setup aligns your upper body mechanics, protects lower joints on steep descents, and prevents hazardous shaft slippage under full trail weight. Learning the mechanical nuances of your specific locking hardware ensures long-term reliability and effortless field adjustments across changing topography.
Determining Proper Baseline Pole Height for Level Terrain
Finding your correct baseline height starts by standing naturally on flat ground in your normal hiking footwear. Bend your elbow to form a clean ninety-degree right angle with your forearm parallel to the ground. Your hand should rest comfortably on the handle while the tip contacts the ground directly beside your foot. This standard ninety-degree elbow angle allows your arm muscles to absorb trail impact efficiently without overextending your shoulder joints.
Most modern three-section poles feature printed centimeter markings along the middle and lower shaft sections. When setting your baseline height, you should adjust both the middle and lower sections equally rather than extending one section fully and leaving the other collapsed. Distributing the length evenly between both telescoping sections keeps the pole balanced, preserves structural rigidity, and prevents undue stress on a single joint. If your baseline measurement sits at one hundred and twenty centimeters, set both the lower and middle sections to that exact number.
Adjusting Speed Lock Plus External Cam Lever Systems
The LEKI Speed Lock Plus mechanism is an external cam lever designed for rapid operation even when wearing bulky gloves. To adjust models like the LEKI Khumbu Lite or LEKI Legacy Lite, flip open the textured plastic lever until it swings completely free from the shaft. Once the cam lever is open, slide the inner aluminum shaft smoothly to your desired length indicator. After aligning the measurement mark, press the lever firmly back against the outer shaft collar until it snaps flush into place.
You should always feel firm mechanical resistance during the final third of the lever closing stroke. If the lever closes effortlessly without noticeable tension, the internal clamping force is insufficient to support your weight on the trail. Conversely, if closing the lever requires painful force that bends the plastic lever, the clamp is set too tight and risks stripping the hardware. A properly adjusted Speed Lock lever snaps shut securely, leaving no gap between the lever body and the shaft housing.
Calibrating Cam Lever Clamping Force and Eliminating Slippage
External cam locks rely entirely on friction generated by the outer clamp collar pressing against the inner shaft tube. Over repeated trail days, vibrations and thermal changes can loosen the factory tension, causing telescoping shafts to creep downward unexpectedly. To recalibrate clamping tension, open the cam lever fully and locate the knurled adjustment thumb screw positioned opposite the hinge. Turn the thumb screw clockwise in small quarter-turn increments to increase the clamping pressure on the shaft.
Never attempt to turn the adjustment dial while the cam lever is locked down, as doing so can damage the delicate threads. After rotating the thumb screw a quarter turn, close the lever and test the locking firmness with your hand. You can verify proper holding force by placing the pole tip on the ground and leaning your upper body weight directly onto the grip. If the shaft slides downward even slightly, open the lever again and tighten the dial another quarter turn until the connection remains completely rigid.
Operating Classic Super Lock Internal Twist Mechanisms
Some traditional LEKI models, such as the LEKI Voyager, utilize the internal Super Lock system instead of external levers. This internal expander mechanism relies on an expanding plastic plug that grips the inner tube walls when rotated. To adjust a twist lock pole, hold the upper shaft firmly with one hand while gripping the lower section with the other. Twist the lower shaft counter-clockwise to release the internal wedge, slide the section to your target measurement, and twist clockwise until tight.
Avoid over-tightening internal twist locks with excessive muscle force, as this can wedge the internal expansion nut permanently or crack the plastic expander sleeve. A moderate hand-tight twist is sufficient to engage the expander securely against the inner aluminum walls. If a twist section spins freely without catching, the expander plug may have collected dust or become detached. In that situation, pull the shaft out completely, wipe the expander clean, slightly expand the plug by hand, and reinsert it gently into the upper shaft before twisting.
Deploying and Securing Push-Button Folding Poles
Dedicated trail running and fastpacking models, such as the LEKI Ultratrail FX.One, utilize a folding Z-pole architecture rather than telescoping cam locks. These poles collapse into compact sections connected by an internal tension cord, making them remarkably simple to store. To assemble a folding model, grasp the handle grip firmly with one hand and allow the hanging lower shaft sections to swing straight down. Pull the upper telescoping shaft downward away from the grip until the spring-loaded brass push-button clicks firmly into its locking port.
Once that push-button locks into place, the internal cord tension holds all composite carbon sections rigid and ready for aggressive trail running. Fixed-length folding poles do not feature telescoping length adjustments, meaning you must choose your exact pole size prior to purchase. To fold the poles away, depress the exposed push-button with your thumb while pushing the shaft back toward the grip, releasing the cord tension. Folding poles store effortlessly on trail running vests or when attaching bulky items to a backpack during transit.
Modifying Pole Length for Uphill Ascents and Downhill Descents
Maintaining the exact same baseline length across steep mountain terrain forces your upper body into awkward, fatiguing postures. When grinding up steep switchbacks, poles set at your standard height will force your hands above your chest, exhausting your shoulders. Shorten both poles by five to ten centimeters before sustained climbs so your elbows remain near that ideal ninety-degree angle as the trail rises. This modification allows your triceps and lats to assist your legs directly without straining your neck.
Conversely, descending steep, rocky paths requires lengthening your poles by five to ten centimeters beyond your baseline flat-ground setting. Longer poles allow you to plant the tips further ahead on downhill steps before your body drops downward. This early contact absorbs impact energy that would otherwise hammer your knee joints, patellar tendons, and lower back. Hikers navigating technical brush often pair proper pole sizing with hiking in protective trail wear to stay secure and shielded from trailside debris.
Utilizing Aergon Grip Extensions on Off-Camber Traverses
Continuous sidehill traversing along mountain slopes presents an asymmetrical challenge where one pole feels too long and the other feels too short. Constantly stopping to readjust cam locks on undulating switchbacks slows your pace and interrupts your hiking rhythm. Many LEKI models, such as the LEKI Makalu Cork Lite, feature an extended foam grip sleeve that extends several inches below the primary handle. This choke-up zone allows you to drop your hand onto the lower foam section on the uphill side without opening any locking levers.
Your downhill hand remains comfortably on the primary upper grip, maintaining full stability and balance across steep slopes. The ergonomic Aergon Air grip head also features a rounded, edgeless top surface that fits smoothly into the palm of your hand. When tackling steep descents or rolling drops, palming the top of the grip provides outstanding downward control. This versatile hand placement relieves wrist tension and gives you flexible support options without requiring constant hardware adjustments.
Sizing and Adjusting LEKI Wrist Straps for Maximum Support
Trekking pole wrist straps are structural weight-bearing supports rather than simple safety tethers to prevent dropped poles. To use your straps correctly, slip your hand up through the bottom of the loop, then grasp the handle so the webbing rests flat across the back of your wrist. When adjusted properly, the strap cradles your wrist and bears your downward body weight, allowing your fingers to maintain a relaxed, loose grip. Gripping the handle tightly without strap support causes rapid forearm fatigue and painful friction blisters.
To adjust the loop circumference on LEKI Aergon grips, pull the strap upward at a sharp angle to release the internal locking wedge inside the grip cap. Slide the strap webbing through the mechanism until the loop rests snugly against your wrist while holding the handle, then pull downward firmly to reseat the wedge. For trail runners using the Trail Trigger Shark system, the breathable mesh glove clicks directly into the grip head and releases instantly with a top push-button. Ensuring your straps fit properly protects your thumbs from hyperextension during sudden slips on loose scree.
Observing Extension Stop Limits and Avoiding Shaft Failure
Every telescoping pole features printed maximum extension marks, often labeled with a distinct stop line. Extending any section past this limit reduces the overlap between telescoping tubes to a dangerously narrow margin. When insufficient overlap exists inside the joint, applying downward or lateral force places severe bending leverage directly on the outer tube collar. This excessive leverage can warp aluminum tubes or cause sudden, catastrophic failure when navigating boulder fields or rocky steps.
If you are a tall hiker needing maximum extension, ensure you balance the length between both the lower and middle shaft sections evenly before reaching the stop marks. Never pull only the lower section to its absolute limit while keeping the middle section short, as this concentrates trail vibrations and increases shaft deflection. Keeping both sections at equivalent lengths maintains optimal shaft rigidity and distributes vertical loads across both locking mechanisms. Checking your measurement numbers before closing your cam levers ensures the pole maintains maximum structural integrity throughout your trek.
Routine Shaft Cleaning and Field Hardware Inspection
Proper adjustment performance depends heavily on keeping the mating surfaces of your pole shafts completely clean and free of trail debris. Fine silt, mud, and trail dust can act as a dry lubricant inside telescoping joints, causing even tightly clamped levers to slide under weight. After hiking in wet or muddy conditions, pull all shaft sections completely apart and wipe them down with a dry microfiber cloth. Never apply oil, grease, silicone spray, or WD-40 to trekking pole shafts, as lubricants destroy the friction required for cam and twist locks to hold.
Periodically inspect the plastic clamp collars and metal pivot pins on your Speed Lock assemblies for stress cracks or corrosion. If you frequently travel over asphalt, rocky slabs, or paved approaches, install LEKI Rubber Walking Tips over the carbide flex tips to dampen vibrations and prevent tip wear. Remove the rubber pads once you reach loose soil or mud so the sharp carbide tips can bite securely into the trail surface. Keeping your locking hardware clean and calibrated guarantees your poles perform reliably through challenging alpine expeditions.
Taking the time to master your pole adjustments pays immediate dividends in balance, endurance, and joint protection on every hike. Regular inspection of your cam tension, proper wrist strap seating, and prompt trail cleaning ensure your equipment remains dependable under demanding backcountry conditions. Dial in your setup at home, verify holding power under load, and head out with complete confidence in your mountain stability.







Write Your Review
No reviews yet. Be the first to share your experience!