


Navigating steep mountain descents with a heavy backpack places substantial impact forces across your knees and ankles. Trekking poles provide essential stability by absorbing trail shock and creating extra points of contact on loose scree or muddy slopes. When a shaft suddenly collapses under your body weight, the resulting loss of balance can cause severe falls. Knowing exactly how to lock trekking pole shafts securely ensures your gear remains a dependable stabilizer rather than a trail liability.
Telescoping hiking poles rely on external cam lever locks or internal expanders to maintain their adjusted height under downward pressure. Whether you are assembling poles for an afternoon ridge hike or dialing in your multi-day backpacking trip checklist, tensioning these clamp mechanisms correctly is vital for field safety. Understanding the mechanical differences between quick flip levers and twist locks helps hikers eliminate shaft slippage before tackling technical switchbacks.




Mastering Trekking Pole Locking Mechanisms and Shaft Adjustments
Trekking poles function as structural extensions of your arms, transferring impact forces away from fatigued joints and steadying your balance across uneven ground. For any walking stick to support your body safely, its locking mechanism must reliably hold telescoping sections in place under dynamic downward force. A slipping clamp compromises your hiking cadence and creates an immediate tripping hazard on steep terrain. Learning how each locking mechanism functions allows you to set pole height efficiently, dial in proper clamping tension, and maintain equipment reliability across rugged trails.
Mechanical Principles of External Cam Lever Locks
External cam lever locks, commonly known as quick flip locks, utilize an outer collar mechanism that compresses the larger pole tube around the nested inner tube. When you close the lever, an eccentric cam lobe forces the collar tighter, generating uniform friction across the circumference of the shaft. Products like the Cascade Mountain Tech Trekking Poles use this external lever design to allow rapid adjustments in dynamic mountain conditions. The mechanical simplicity of an exterior lever makes it easy to inspect your locking status visually at a single glance.
External locks perform exceptionally well in wet, muddy, or sub-freezing alpine environments where moisture can compromise internal mechanisms. Unlike internal wedges, lever clamps keep the mechanical clamping hardware fully visible on the outside of the shaft where trail grit can be quickly wiped away. Hikers can also operate these broad lever tabs easily while wearing bulky winter gloves or rain mitts. Because the clamp collar wraps directly around standard pipe diameters such as 14mm, 16mm, or 18mm sections, the resulting grip remains dependable across rocky trails.
Step-by-Step Procedure for Locking External Lever Poles
Locking an external lever pole begins by flipping open the cam lever clamp completely until it swings away from the pole shaft. Releasing this clamp loosens the tension collar, allowing the inner telescoping section to slide freely up and down inside the outer tube. Most three-section hiking poles feature both a middle and lower adjustment section with printed measurement markings. Slide the desired shaft section outward until you reach the initial height marking that matches your stature or trail conditions.
Always distribute length extensions evenly across both the lower and middle shaft sections rather than pulling a single section to its extreme limit. Extending both sections in equal proportion maximizes structural rigidity and minimizes unwanted shaft flex under downward impact. Once you position the sections, firmly push the cam lever back against the collar until it snaps flat. You should feel noticeable mechanical resistance during the final third of the lever travel, confirming a secure hold.
Calibrating Cam Lock Clamp Tension and Thumbscrew Torque
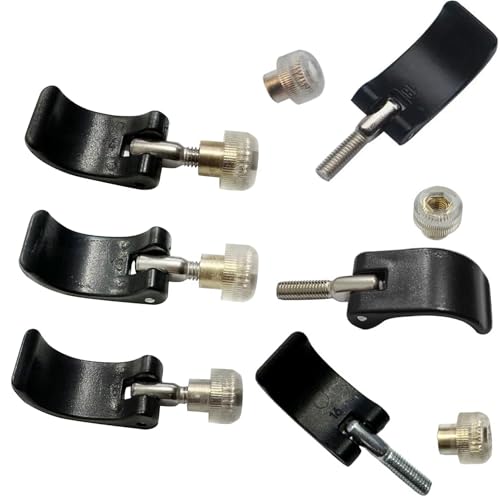
Maintaining the correct clamping tension requires periodic adjustment of the small knurled thumbscrew or tension nut located opposite the lever arm. Temperature fluctuations, mechanical settling, and normal trail vibration can gradually loosen this threaded fastener over extended miles. To calibrate the tension, open the cam lever halfway so the collar is uncompressed. Turn the thumbscrew clockwise by a quarter turn to tighten the clamp, or counter-clockwise if the lever feels too stiff to close comfortably.
Replacement hardware sets, such as the IIUIKOO Trekking Pole Lock Replacement Clips or GOOHOCHY Trekking Pole External Lock Clip Nylon, supply replacement screws and durable nuts to keep tension adjustable in the field. When adjusting these fasteners, always make small incremental turns rather than aggressive full rotations. Applying excessive torque can crack composite collars or crush thin-walled aluminum tubing. Finding the balanced sweet spot between effortless lever closure and unyielding vertical hold ensures long-term trail security.
Executing Downward Load Verification Before the Trail
Verifying the integrity of your pole locks before setting foot on technical terrain prevents dangerous falls. Place both pole tips onto firm, level ground directly in front of your hiking boots. Grip the handles normally with your hands, keeping your elbows bent at roughly ninety degrees. Slowly lean your upper body forward, placing substantial downward weight onto the grips while watching the joint collars closely.
If either shaft section slips downward even a few millimeters, immediately unlock the lever and tighten the tension screw by another quarter turn. Do not trust a slipping pole on technical trail sections where sudden collapse could pitch you forward into boulders. Perform this weight-bearing test whenever you adjust pole height during a hike or after unpacking your gear at the trailhead. Taking five seconds to verify lock stability ensures total confidence when planting your poles on steep rocky drops.
Sizing Poles by Elbow Angle for Varied Trail Incline
Setting the correct pole height optimizes upper-body propulsion and reduces joint stress across your hips and knees. On flat trail surfaces, stand naturally with your hiking boots on and hold the pole grips. Adjust the shaft length until your forearms rest parallel to the ground, creating a crisp ninety-degree angle at the elbow joint. This neutral baseline position allows your arms to swing naturally while transferring walking effort smoothly between the trail and your core.
Steep ascents and descents require deliberate length adjustments to maintain balance and protect joint health. Shorten both poles by five to ten centimeters when climbing to avoid hyperextending your shoulders, or utilize lower choke-up sections like the extended EVA down grip on Cascade Mountain Tech Trekking Poles. Conversely, lengthen each pole by five to ten centimeters on steep descents so the tips contact the downhill ground earlier in your stride. When hiking in protective trail pants through overgrown brush, properly sized poles also help you probe hidden drops and stabilize foot placement through unseen terrain hazards.
Operating Internal Twist and Expander Wedge Systems
Internal twist lock poles rely on an internal expansion plug and threaded cone hidden inside each telescoping section. To lock an internal twist pole, hold the upper shaft firmly with one hand while rotating the lower shaft clockwise with your other hand. As you turn the tube, the internal threaded cone advances into a split plastic expander plug, wedging it outward against the interior pipe walls. Tighten the sections until you feel firm rotational resistance that prevents further spinning.
Unlocking an internal twist pole requires rotating the lower section counter-clockwise until the expander releases its grip. However, fine trail dust, grit, or moisture inside the shaft can cause the internal expander plug to spin freely without engaging the threads. If an expander plug fails to bite, pull the lower section completely out of the upper tube to inspect the mechanism. Wipe away dried silt from the plastic expander and inner aluminum wall using a clean, dry cloth before reassembling the pole.
Folding Push-Button Shafts and Tension Cord Mechanics
Folding trekking poles, often called Z-poles, use a completely different locking principle than telescoping designs. Instead of nested tubes sliding inside one another, folding poles feature separate segments joined by an internal coated tension cord. To lock a folding pole, hold the handle segment and let the lower loose segments hang freely toward the ground. Pull the upper telescoping collar downward away from the grip until the internal cord tensions the shaft sections tightly into their aluminum ferrule joints.
Continue pulling the upper collar until a spring-loaded metal push-button clicks outward through a pre-drilled locking hole in the shaft. This audible mechanical click indicates that the entire pole structure is locked into a rigid, load-bearing configuration. To collapse the pole for transport, depress the exposed push-button with your thumb while sliding the upper sleeve back into the handle. Folding systems offer exceptional deployment speed for fastpackers and trail runners, though many fixed-length models sacrifice telescoping height adjustability.
Troubleshooting Slipping Shafts and Clamp Malfunctions
When a trekking pole repeatedly slips under load despite tightening the lever, microscopic contamination is often the primary culprit. Sunscreen residue, hand oils, and fine mineral dust can coat the anodized aluminum tubing, drastically reducing surface friction against the clamp collar. Disassemble the slipping sections completely and clean both the exterior tube and the inside of the clamp collar with isopropyl alcohol or mild soapy water. Let all components dry completely before reassembly, and never apply grease, WD-40, or oil lubricants to trekking pole shafts.
Cold alpine weather can also cause unexpected lock slippage due to differential thermal contraction between metal tubes and plastic hardware. As ambient temperatures drop below freezing, aluminum shafts and composite collars contract at different rates, loosening the pre-set clamping tension. Check your lever tension frequently during winter snowshoeing or high-elevation ridge walks, tightening thumbscrews as needed to counter cold-induced loosening. If a collar body exhibits hairline cracks along the hinge or screw pocket, replace the damaged hardware immediately to prevent sudden failure on the trail.
Replacing Damaged Clamp Hardware and Sizing Collars
Replacing a broken external lock requires identifying the precise outside diameter of the specific pole tube section you need to clamp. Most three-section telescoping trekking poles utilize stepped tubing with standardized diameters of 18mm on the upper section, 16mm on the middle section, and 14mm on the lower section. Multi-size replacement sets, such as the TWZKXC 9 Pack Trikking Poles Clamp Replacement External or the Nanchroadly 3 Pcs Hiking Poles Lock, include collars designed specifically for these stepped dimensions. Using the wrong collar diameter prevents proper seating and causes loose clamping or split plastic.
To install a replacement clamp, remove the retaining screw or slide the old cracked collar off the top edge of the lower tube. Clean any accumulated trail grit or adhesive residue from the tube mating surface before seating the new replacement collar in place. Slide the new clamp, such as a SquEqu 2 Pack Hiking Pole External Lock Parts collar, firmly onto the shaft until it seats squarely against the tube lip. Thread the included screw and barrel nut through the clamp body, adjusting the nut until the lever provides positive clamping action.
Securing and Bundling Poles for Pack Storage
Storing your trekking poles securely when traversing hands-on scrambling sections or packing for trail transit prevents damaged hardware and snagged gear. Fully unlock all cam levers and collapse each shaft section down to its shortest packed length before locking the levers closed. Keeping levers firmly clamped during storage protects the protruding tabs from catching on brush or snapping inside luggage. Collapsing telescoping poles down to compact lengths, such as the 26-inch collapsed profile of Cascade Mountain Tech models, allows tidy side-pocket pack storage.
Dual pole connectors, such as the AbbiyyZ Trekking Pole Clips – 4Pcs Double Rod Buckle, keep your poles joined together in a neat, rigid pair while strapped to your pack. These figure-8 style plastic clips snap firmly over shaft diameters ranging from 14mm to 18mm, preventing rattling and tip clatter during transit. When securing gear to pack attachment points, bundling your poles together keeps sharp carbide tips controlled and prevents the shafts from shifting loose across rugged terrain.
Routine Field Maintenance and Preventive Lock Care
Routine care keeps trekking pole locks functioning smoothly and extends the working lifespan of aluminum shafts and composite clamps. After hiking in heavy rain, mud, or stream crossings, always disassemble the telescoping sections completely once you return home. Allow the separate aluminum or carbon tubes to air-dry thoroughly before reassembling them, preventing internal oxidation and galvanic corrosion. Storing damp poles locked tightly together can cause aluminum tubing to seize or corrode, making future adjustments exceedingly difficult.
Inspect the external lock hardware periodically for stripped screw threads, loose barrel nuts, or worn lever pivot pins. Keep a compact replacement clamp or spare thumbscrews in your backcountry repair kit when embarking on multi-day wilderness treks. Carrying modular spare clips, such as the DraCra 6 Pack Trikking Poles Clamp Replacement hardware, provides instant insurance against accidental clamp breakage miles from the nearest trailhead. Simple proactive cleaning and occasional hardware tightening keep your trekking poles functioning as reliable, trail-ready stabilizers season after season.
Mastering how to lock trekking pole clamps transforms your poles into dependable safety tools that safeguard your balance across demanding mountain terrain. Taking a few moments to verify thumbscrew torque, clean bare shafts, and test vertical load bearing before every hike eliminates unexpected slippage. With properly calibrated lever clamps and appropriate height adjustments dialed in for the grade ahead, you can step forward with total confidence on any trail.








Write Your Review
No reviews yet. Be the first to share your experience!