


Steep downhill switchbacks and uneven talus fields can exert immense mechanical force on knee joints and quadriceps. Deploying trekking poles transforms your hiking cadence by shifting cumulative downward impact into the upper body and stabilizing every stride. Understanding how to use leki trekking poles correctly ensures that your gear holds firm without slipping or causing hand fatigue over high-mileage trail days. Integrating poles into your standard wilderness backpacking checklist creates an active defense against trail fatigue, whether you carry a light daypack or a loaded expedition rucksack.
Modern pole systems feature distinct locking hardware, varied grip materials, and specialized shaft alloys engineered for specific mountain conditions. From robust aluminum telescoping models to featherweight folding carbon shafts, each setup demands precise anatomical adjustment to deliver maximum joint relief. Using improper strap techniques or setting incorrect section lengths undermines the stability benefits and risks sudden clamp slippage. Mastering the essential mechanical adjustments, trail biomechanics, and field maintenance outlined here will ensure you get reliable performance and comfort from your poles on every outing.


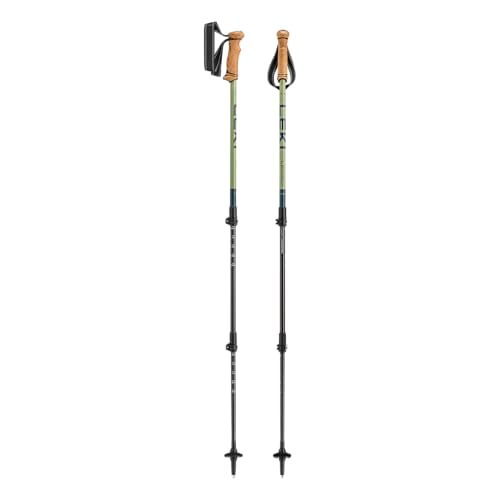


Complete Field Manual for Setting Up and Using LEKI Trekking Poles
Dialing in the correct mechanics of your trekking poles transforms awkward pole planting into a fluid, energy-saving rhythm on rugged terrain. Achieving optimal joint protection and balance requires matching your pole configuration to body geometry, trail pitch, and specific locking hardware. Whether you hike with telescoping aluminum shafts or ultralight folding carbon poles, proper mechanical engagement prevents unexpected failures on remote backcountry terrain. Here is the complete step-by-step methodology for setting up, adjusting, and operating your gear with total trail confidence.
Anatomical Sizing and the Baseline 90-Degree Elbow Angle
Establishing the correct baseline height begins on level ground while wearing your standard trail footwear. Stand upright with your shoulders relaxed, holding the grip naturally while letting your upper arm hang along your torso. Adjust the pole length until your forearm forms an exact 90-degree right angle with your upper arm at the elbow joint. This neutral forearm orientation creates the strongest biomechanical lever, allowing your triceps and back muscles to absorb downward shock and transfer pack weight efficiently away from your lower joints.
Telescoping poles typically feature two adjustable sections with laser-etched centimeter measurements along the upper and lower aluminum or carbon shafts. On three-section models like the LEKI Makalu Cork Lite or LEKI Legacy Lite, you should extend both the middle and lower sections equally to reach your target height. Distributing the extension evenly across both sections maximizes overall shaft stiffness and prevents localized bending stresses on the lower tubing. Never extend any shaft section past the printed maximum limit or stop line, as doing so compromises structural overlap inside the joint and invites severe shaft failure under body weight.
Operating LEKI Speed Lock Plus External Cam Levers
The Speed Lock Plus mechanism is an external cam lever designed for rapid length adjustment and powerful clamping force in all trail conditions. To adjust pole length, flip the lever completely open away from the shaft until it swings clear of the outer collar housing. Slide the inner shaft section to your measured centimeter marker, ensuring the printed numbering remains aligned with the locking collar index line. Snap the lever firmly back against the outer shaft tube until it sits flush against the collar housing.
A properly tensioned Speed Lock Plus lever requires deliberate thumb pressure to snap shut and should never swing closed loosely. If the lever closes with minimal resistance or requires two hands and excessive force, the clamp tension needs immediate calibration. Calibrating the holding force is straightforward because the external knurled thumbscrew allows precise field adjustments without requiring screwdrivers or specialized tools. Regular inspection of the cam lever closure ensures the clamping collar grips the anodized aluminum tubing firmly during heavy downward impacts on rocky descents.
Adjusting Internal Super Lock Twist Mechanisms
Models featuring the internal Super Lock system, such as the LEKI Voyager, rely on an expanding internal plug rather than an external cam clamp. To release the locking mechanism, grip the upper shaft with one hand and turn the lower shaft counter-clockwise to loosen the internal expander. Once loose, slide the telescoping section smoothly to your desired length while monitoring the printed measurement markings. Rotate the lower shaft clockwise until the internal expander catches against the inner shaft wall, then tighten firmly until the joint resists further twisting.
Internal twist locks deliver a sleek, snag-free exterior profile that prevents branches, brush, and pack straps from catching on lever hardware. However, trail silt, moisture, and fine dust can sometimes enter the disassembled tube and cause the internal expander to spin without catching. If an internal lock refuses to tighten, withdraw the lower section completely and wipe the shaft and expanding plug clean with a dry cloth. Reinsert the section past the expansion threads and twist clockwise with slight outward tension to re-engage the internal threads securely.
Deploying Push-Button Folding Carbon Models
Ultralight folding designs like the LEKI Ultratrail FX.One utilize an internal tension cord combined with a push-button locking system. To assemble the pole, release the securing strap and let the three lower shaft sections drop down toward the ground. Hold the upper grip section firmly while pulling the shaft section directly below the grip downward until the internal push button pops through its dedicated indexing hole. You will hear an audible click when the mechanical lock engages, confirming that tension is applied across all joints.
Folding poles offer exceptional packability by collapsing into short segments that fit easily inside daypacks or running vests. Disassembling these poles requires pressing the spring-loaded metal button inward while gently pushing the shaft sections together to relieve cord tension. Once released, fold the carbon sections alongside each other and secure them with the integrated velcro closure or elastic keeper. Inspect the joint ferrules periodically for trail grit to maintain smooth assembly and prevent premature wear on the internal tensioning cord.
Correct Wrist Strap Threading and Biomechanical Support
Proper wrist strap technique is essential for offloading grip fatigue and transferring pack weight into your skeletal structure. Many hikers make the mistake of inserting their hand downward through the top of the loop, which forces the fingers to grip the handle tightly. Instead, bring your hand up from underneath the strap loop, then pull downward until the webbing cradles the base of your palm. Rest your hand against the loop webbing and lightly wrap your fingers around the grip without squeezing.
Threading the strap correctly allows the wide fabric ribbon to support your downward weight without requiring a constant death grip on the handle. To adjust the strap circumference, pull upward on the top adjustment strap to unlock the internal wedge inside the grip cap. Slide the webbing through the buckle mechanism to lengthen or shorten the loop until your palm rests naturally at the top of the handle. Push the locking wedge back down into the grip head until it clicks firmly into place to secure your setting.
Utilizing the Trail Trigger Shark Quick-Release System
Trail runners and fastpackers using models like the LEKI Ultratrail FX.One benefit from the specialized Trail Trigger Shark grip and mesh harness. This design replaces traditional open webbing loops with a glove-like mesh strap that secures around your hand via an adjustable hook-and-loop wrap. A small, high-strength loop sits between your thumb and index finger, designed to interface directly with the spring-loaded clasp on the grip head. This integrated harness provides direct power transfer into the pole during high-cadence running strides on technical terrain.
Connecting the harness is instantaneous; simply click the cord loop downward into the notch at the top of the grip until the release button clicks. When you need to free your hands to grab water, check navigation, or scramble over rocky ledges, press the release button on top of the grip with your thumb. The strap remains securely attached to your hand while detaching completely from the pole shaft in a fraction of a second. This efficiency allows rapid transitions between steep ascents where poles provide propulsion and flat sections where stowing them is faster.
Length Adjustments for Steep Ascents and Alpine Descents
Maintaining proper pole height requires adapting your setup as the angle of the trail changes throughout a hike. When climbing sustained steep inclines, shorten both poles by 5 to 10 centimeters depending on the severity of the slope. Shortening the shafts prevents you from reaching upward, keeping your elbows near that ideal 90-degree angle and maintaining powerful forward thrust. Models with extended foam grip sleeves, such as the LEKI Makalu Cork Lite, allow you to choke down on the handle during brief uphill steps without readjusting the mechanical locks.
Steep downhill descents demand the opposite adjustment to prevent excessive forward leaning and lower-back strain. Lengthen both poles by 5 to 10 centimeters so the carbide tips make contact with the trail before your leading foot drops. Plant the tips slightly ahead of your body and let your arms absorb initial braking forces, taking significant stress off your knees and quadriceps. Pair this downhill technique with sensible trail clothing choices to protect your legs from brush, thorns, and loose rocks displaced along steep switchbacks.
Troubleshooting Clamp Slippage and Calibrating Lever Tension
If a telescoping section slowly creeps shorter under your weight, the external cam clamp has lost sufficient friction against the shaft. To restore proper clamping force, flip the lever open to the unlocked position and locate the textured thumbscrew opposite the lever pivot. Turn the thumbscrew clockwise by a quarter turn using your fingers to increase the clamping pressure on the collar sleeve. Close the lever firmly and verify that it requires positive thumb pressure to snap flush against the pole body.
Before stepping onto steep mountain terrain, always perform a downward load verification check while standing on flat ground. Grip both handles securely and place your full upper-body weight straight down onto the shafts to test their vertical holding power. If either section slips downward even a millimeter, unlock the lever and tighten the thumbscrew another quarter turn before re-testing. Avoid overtightening the screw excessively, as forcing the lever closed with excessive leverage can crack the composite collar housing.
Tips, Baskets, and Hardware Selection Across Varied Surfaces
LEKI poles feature durable carbide flex tips designed to bite aggressively into rock, dirt, mud, and exposed root networks. The slight natural flex engineered into the tip housing absorbs minor lateral impacts if the point catches momentarily in a rock crevice. When walking on asphalt, concrete, or sensitive paved trails, press the LEKI Rubber Walking Tip over the carbide point to prevent loud clicking and protect the tip from excessive wear. Rubber tips also increase traction across smooth rock slabs where bare metal tips might otherwise slip under pressure.
Interchangeable baskets prevent your poles from sinking too deeply into soft ground and destabilizing your stride. Small trekking baskets work well for packed dirt, gravel paths, and light mud without catching on low-lying shrubs or rocks. If you encounter deep alpine mud or winter snowpack, replace them with wider powder baskets to gain essential surface flotation. Proper basket selection and pole placement provide steady stability when navigating off-camber terrain with heavy loads, much like properly attaching outdoor equipment to backpack straps balances weight across your hips and shoulders.
Field Cleaning and Long-Term Shaft Preservation
Moisture, trail dust, and grit will inevitably accumulate inside telescoping shaft joints after long days on wet or dusty trails. After returning from a hike, pull all telescoping sections apart completely and wipe the interior and exterior tubing with a clean, dry microfiber cloth. Allow the disassembled sections to air dry completely before reassembling them, which prevents oxidation and galvanic corrosion from seizing the aluminum tubes. Never apply lubricants, grease, or WD-40 to the shafts, as oil ruins the friction needed for the locking mechanisms to hold weight.
Caring for your grips extends their lifespan and preserves their moisture-wicking and ergonomic properties. Natural cork handles, found on models like the LEKI Makalu Cork Lite, conform to your hand over time and resist sweat buildup effectively. Clean cork or EVA foam grips by wiping them down with mild soap, lukewarm water, and a soft cloth, then letting them air dry away from direct heat. Regular inspection of your shafts for hairline cracks or deep gouges ensures your poles remain dependable on every backcountry journey.







Write Your Review
No reviews yet. Be the first to share your experience!