


Walking with an ill-fitting mobility aid can quietly sabotage your posture, strain your wrist, and increase the risk of unexpected balance loss. Learning how to size a walking cane ensures that your body weight transfers smoothly through the cane shaft instead of jamming into your shoulder or lower back. When a cane sits at the correct height, it offloads between fifteen and twenty-five percent of body weight from a vulnerable hip, knee, or ankle joint. Pairing proper cane setup with knee joint support options helps maintain a rhythmic, confident stride during daily recovery or routine neighborhood walks.
Many adults mistakenly guess their cane height by standing next to an unadjusted shaft or relying strictly on overall body height charts. Proper measurement requires assessing the distance between the floor and the user wrist crease while wearing standard walking footwear. Maintaining a gentle fifteen to twenty-degree bend in the elbow creates natural mechanical leverage and dampens ground impact. Taking a few moments to establish accurate sizing prevents compensatory limping, spares fatigued forearm muscles, and delivers dependable stability on every step.


The Complete Biomechanical Guide to Sizing and Using a Walking Cane
A walking cane serves as a structural extension of your body, transferring downward forces away from compromised lower joints and restoring natural stability. Establishing the correct handle height determines whether the device stabilizes your gait or introduces compensatory strain across your shoulders, spine, and wrist. Taking the time to understand the anatomical principles behind how to size a walking cane provides immediate relief and prevents walking fatigue. The following detailed guidelines outline how to measure, adjust, and verify your mobility aid for optimal support.
Biomechanical Principles of Cane Height and Joint Offloading
Every step you take sends ground reaction forces upward through the ankle, knee, and hip joints. When a walking cane is adjusted to the correct anatomical height, it redirects between fifteen and twenty-five percent of that vertical load through the arm and cane shaft. This load redistribution relieves inflamed cartilage, shields recovering surgical sites, and provides a stable tripod base during single-leg stance. Without accurate vertical alignment, the mechanical leverage needed to unweight the affected limb decreases significantly.
An improper fit also distorts natural spinal posture and alters walking cadence. If the handle rests even two inches too high, the shoulder on that side hikes upward, causing chronic tension in the trapezius and cervical muscles. Conversely, a cane set too low forces the user to stoop forward, placing compensatory stress on the lumbar spine and increasing trip hazards. Proper height alignment creates a fluid, reciprocal walking motion that reduces total energy expenditure during daily mobility.
Anatomical Landmarks: Aligning with the Wrist Crease and Greater Trochanter
Accurate cane measurement relies on reliable skeletal landmarks rather than general height estimates. The primary reference point used by mobility specialists is the distal wrist crease, located on the palm side of the hand just above the joint. When standing naturally with your arms hanging loosely at your sides, the top of the cane handle should align directly with this wrist crease. Aligning the handle to this anatomical line ensures that your hand meets the grip at a mechanically advantageous angle.
Another reliable anatomical marker is the greater trochanter, which is the bony prominence on the outer side of the upper thigh bone. You can locate this landmark by shifting your weight from side to side and feeling for the prominent bone moving beneath the hip. In a properly proportioned body, the top of the cane grip aligns closely with the height of the greater trochanter. Using both the wrist crease and the hip bone as cross-references guarantees an exact measurement before locking in telescoping pins.
Step-by-Step Measurement Procedure Wearing Everyday Footwear
Executing an accurate measurement requires replicating the exact conditions under which you walk every day. Put on the specific walking shoes, sneakers, or orthopedic footwear that you wear most frequently, as sole thickness and heel lift alter floor-to-wrist distance by up to an inch. Stand upright on a level, hard surface with your feet roughly shoulder-width apart to create a stable base of support. Relax your shoulders completely, allowing both arms to dangle naturally at your sides without tension or deliberate reach.
Have a helper use a rigid tape measure to determine the distance from the floor up to the skin crease on your wrist. If you must measure without assistance, stand next to an adjustable cane or wall and mark the level of your wrist crease using a piece of painter tape. Manufacturer sizing instructions, such as those provided with the supregear Folding Cane, 5-Level Adjustable Height, emphasize this floor-to-wrist measurement to guide users within their 33 to 37 inch adjustment range. Record the measurement to the nearest half inch to compare against manufacturer shaft specifications.
Verifying Elbow Flexion and the Fifteen to Twenty Degree Rule
Once the cane is positioned beside your foot, the mechanical test of a proper fit is the angle of your elbow joint. When your hand rests comfortably on the grip, your elbow should maintain a natural flexion between fifteen and twenty degrees. This slight bend acts as a biological shock absorber, allowing your arm muscles to dampen impact forces during ground contact. A completely straight arm locks the elbow joint, transmitting jarring vibrations directly into your shoulder and neck.
Excessive elbow flexion reveals an equally serious mechanical problem. If your elbow bends beyond thirty degrees while grasping the cane, the shaft is too long, which forces your arm to push upward rather than bearing down effectively. You can verify this angle in a full-length mirror or have a family member evaluate your profile view. Maintaining the fifteen to twenty degree window ensures that your biceps, triceps, and forearm muscles work in balanced harmony without premature fatigue.
Adjusting Telescoping Push-Button Pins and Tightening Silencing Rings
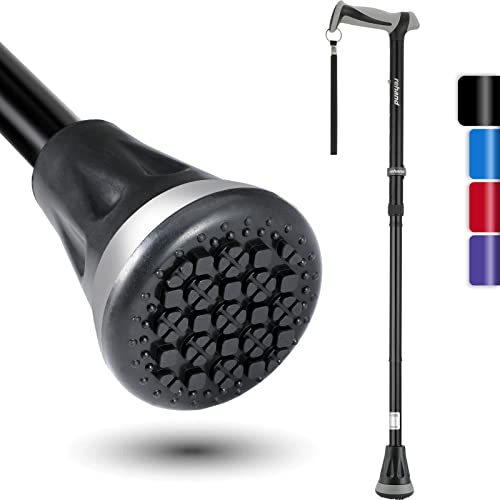
Modern aluminum mobility canes rely on internal push-button detent pins that lock into pre-drilled adjustment holes along the shaft. Canes like the REHAND Walking Cane for Men & Women – Foldable provide eight distinct height settings in one-inch increments, accommodating users between five feet and six feet five inches. To change the height, depress the spring-loaded brass pin firmly while sliding the lower shaft segment until the pin snaps completely through the desired hole. Always listen for an audible click and visually inspect the pin to ensure it extends fully through the hole opening.
Many quality walking canes include a threaded locking collar or silencer nut located just above the adjustment segment. After snapping the pin securely into place, twist this knurled collar firmly until it cinches down against the outer shaft. This compression collar eliminates mechanical play between the telescoping tubes, stopping annoying clicking noises and preventing shaft wobble under body weight. Failure to tighten this collar can lead to joint instability and gradual pin wear over months of daily use.
Proper Cane Placement and Reciprocal Gait Mechanics
A frequent error among new cane users is holding the aid on the same side as the weak, painful, or recovering leg. Biomechanical gait efficiency requires holding the walking cane in the hand opposite the affected limb. If your right knee is injured or recovering from surgery, hold the cane in your left hand. This contralateral positioning preserves natural reciprocal arm swing, where the opposite arm swings forward with each stepping leg to balance rotational forces across the pelvis.
When you take a step, advance the walking cane and the affected leg forward simultaneously, planting both on the ground together. As you step forward with your stronger leg, press down through the cane handle to offload weight from the compromised side. Pairing this balanced gait pattern with comfortable, flexible mobility apparel ensures unrestricted hip and knee motion during outdoor rehabilitation walks. Holding the cane on the injured side disrupts this kinetic chain, causing an unnatural waddle that increases stress on the lower back.
Stair Climbing Technique and Step Clearance Sequence
Negotiating stairs requires strict adherence to a specific stepping sequence to prevent falls and protect healing joints. Mobility specialists teach the simple clinical memory rule: up with the good, down with the bad. When ascending a staircase, step up onto the first riser using your unaffected, stronger leg while bearing weight through the cane on the lower step. Once your strong leg is securely planted, bring the cane and your weaker leg up to meet it on the same tread step.
When descending stairs, reverse the sequence by lowering the cane and your affected leg down to the step below first. Lowering the cane and weaker leg first allows your strong leg to bend and control your descending body weight safely from above. If a sturdy handrail is available, grasp the handrail with one hand and carry the cane in your other hand for added security. Never place a broad quad base or articulating pivot foot partially over the edge of a stair tread, as an unstable base creates a severe tipping hazard.
Base Configurations: Single-Point, Pivot-Foot, and Quad Platforms
The type of base attached to your cane shaft fundamentally alters how handle height interacts with surface traction. Standard single-point rubber tips offer maximum agility, lightweight swing weight, and smooth movement through crowded spaces. However, they require the user to maintain an upright vertical shaft angle to keep the rubber ferrule flush with the floor. If a single-point tip is sized incorrectly, the edge of the rubber lifts away from the floor during weight transfer, drastically diminishing grip traction on smooth tile.
Quad canes and articulating multi-prong pivot bases deliver enhanced stability and self-standing convenience on level ground. Canes like the KINGGEAR Self Standing Walking Cane Quad Base incorporate a four-point rubber platform with a 4.3 inch wide base, supporting up to 300 lbs while standing upright independently. Similarly, the REHAND Walking Cane – Foldable, Adjustable features an all-terrain shock-absorbing pivot base that mimics natural ankle flexion. These multi-point designs prevent frustrating bending to retrieve dropped sticks, but their base height must be included when calculating overall shaft sizing.
Handle Ergonomics and Palm Pressure Distribution
Handle geometry directly influences how downward force distributes across the palm, wrist, and median nerve pathways. Traditional crook or tourist handles force body weight slightly behind the central shaft, requiring substantial grip strength and wrist control. In contrast, offset handle designs, such as the curved neck on the KINGGEAR model, position the grip directly over the vertical shaft axis. This structural alignment drives downward pressure straight through the cane ferrule, reducing wrist strain for individuals with arthritis.
For individuals managing carpal tunnel syndrome, osteoarthritis, or diminished hand grip, contoured anatomical grips offer superior comfort. The ergonomic handles on the REHAND models feature wider, longer TPR contact areas designed to distribute body weight evenly across the thenar eminence of the palm. Ergonomic T-handle designs, such as the contoured grip found on the Comfkey Folding Lightweight Walking Stick, also help minimize localized pressure points. Choosing an ergonomic grip profile ensures that you can comfortably bear weight without developing blisters, numbness, or palm fatigue.
Warning Signs of an Improper Fit and Mobility Device Upgrades
Recognizing the physical warning signs of a poorly adjusted cane allows you to correct sizing before chronic musculoskeletal pain develops. If your cane is set too high, you will notice your shoulder elevating toward your ear every time you plant the stick. This posture frequently leads to persistent soreness in the neck, upper back, and forearm muscles. When a cane is sized too short, the most obvious indicator is a pronounced forward lean and a rounded lower back, signaling an immediate need to raise the telescoping shaft.
Standard lightweight aluminum models, like the REHAND Adjustable Walking Cane for Seniors Adults, provide ten height settings between 40 and 49 inches and support up to 350 lbs. Other specialized options, such as the TIRAROME Walking Cane for Men & Women, feature aircraft-grade aluminum supporting up to 250 lbs alongside an auxiliary standing handle and LED path light. However, if you experience progressive balance loss, severe bilateral leg weakness, or unprovoked falls, a single cane is no longer sufficient. Under those conditions, consult a licensed physical therapist or physician to evaluate transitioning to a bilateral rolling walker.




Write Your Review
No reviews yet. Be the first to share your experience!