


Proper hiking posture begins at the arms, where walking sticks transfer downward body weight away from tired joints. Setting the correct shaft extension establishes a steady rhythm across rocky ground and prevents arm fatigue before mile five. Learning how to adjust trekking pole height accurately ensures that your forearms absorb trail shock instead of your knees during long mountain descents. A poorly sized pole forces awkward shoulder reach or cramps your elbows, quickly turning a helpful tool into dead weight.
Locking collars and telescoping shafts require careful calibration before tackling steep switchbacks or loose dirt paths. When paired with knee-focused trail clothing, properly measured walking sticks significantly lessen physical strain across unpredictable mountain routes. Taking a few moments to verify clamp tension and elbow angles transforms flimsy-feeling poles into dependable points of stability across backcountry terrain. Whether navigating rolling hills or alpine scree, dialed gear keeps your balance centered and your pace consistent.


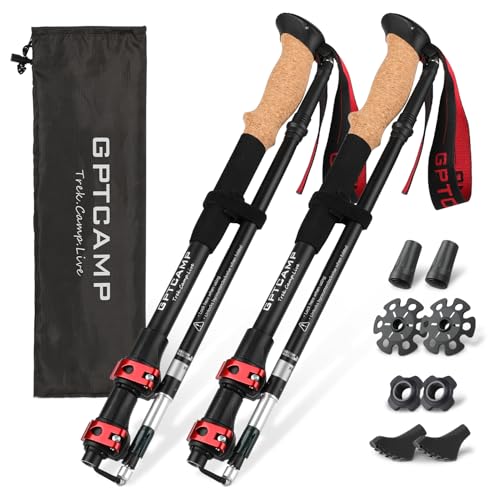


Mastering Trekking Pole Height Adjustments and Trail Mechanics
Dialing in pole length requires understanding how arm angles directly influence upper body leverage and joint stress. Walking sticks function as extensions of your skeletal structure, transferring downward forces away from your lower extremities into your core and shoulders. Adjusting each shaft to match your exact anatomy and changing slope gradients maximizes trail efficiency while preventing balance errors. Setting up your poles properly takes only a couple of minutes once you understand the basic mechanics behind telescoping sections and clamp systems.
The Ninety-Degree Baseline for Level Trail Walking
The fundamental starting point for setting pole height is establishing a precise ninety-degree elbow angle while standing upright. You should wear your standard trail shoes on a flat, even surface when taking this initial measurement. Place the tips of your trekking poles straight down onto the ground near your feet while resting your hands naturally on the handle grips. Your forearms should sit completely parallel to the ground, forming a clean right angle at the elbow joint without raising your shoulders.
If your elbow bends into an acute angle with your hand raised high, the shaft is too long and will strain your bicep and shoulder muscles. Conversely, an obtuse angle that points your hand toward the dirt forces you to lean forward, compromising your spinal alignment. Many adjustable models, such as the GPTCAMP Collapsible Hiking Trekking Poles, offer length ranges from 31 to 51 inches to accommodate hikers from four feet four inches up to six feet five inches tall. Finding that neutral ninety-degree position creates the ideal balance of forward propulsion, shock absorption, and upper-body comfort on flat terrain.
Shortening Pole Shafts for Steep Ascents
Climbing steep mountain trails shifts the ground closer to your body with every uphill stride. Leaving your poles at their level-ground baseline during steep climbs forces your hands above your heart, causing premature arm exhaustion and shoulder strain. Shortening both shafts by five to ten centimeters, or roughly two to four inches, restores the proper leverage needed to push your body weight uphill. This adjustment allows you to plant the tips securely ahead of you while maintaining a natural downward driving motion with your forearms.
On rolling terrain where slopes change continuously, constantly unlocking and resizing shafts can interrupt your hiking rhythm. Some poles solve this issue by offering extended grip sleeves positioned directly beneath the main handle, such as the Shxing Carbon Fiber Trekking Poles, 7.1 oz Each. Choking down onto this secondary closed-cell foam section lets you climb short bursts without modifying your mechanical lock settings. When faced with prolonged mountain passes or steep ridge climbs, taking thirty seconds to physically shorten the shafts remains the most ergonomic choice.
Lengthening Shafts for Steep Mountain Descents
Downhill hiking subjects your knees, quadriceps, and lower back to punishing cumulative impacts. The ground falls away beneath your feet on descents, requiring you to reach further down the slope to establish secure points of contact. Lengthening each pole by five to ten centimeters allows the tips to strike the trail ahead of your lead foot before your heel lands. This extra length lets your arms absorb a measurable portion of your downward momentum, significantly reducing the braking forces that batter your patellar tendons.
A lengthened pole also keeps your torso upright and prevents you from pitching forward over loose rocks and slick mud. If your poles remain too short while descending, you will naturally hunch your shoulders and overreach, pulling your center of mass dangerously off balance. Heavy pack loads exacerbate this problem, making sturdy support essential when carrying gear in a rigid frame trail backpack over technical alpine descents. Taking the time to lengthen your poles before beginning a long drop protects your knees and enhances descent control.
Adjusting Poles for Sidehill Traverses
Traversing across an open hillside creates asymmetrical footing, where the uphill slope rises close to your body while the downhill side drops away. Walking across these sustained sidehills with equally sized poles forces your uphill arm high into the air while your downhill arm reaches awkwardly downward. You can compensate for this slope angle by shortening your uphill pole and lengthening your downhill pole by several centimeters. This asymmetrical configuration allows both arms to remain close to their natural ninety-degree positions while supporting your weight across the slope.
If the trail switchbacks frequently across the face of the mountain, asymmetrical adjustments become tedious because your uphill and downhill arms swap sides at every turn. Hikers handling switchbacks often leave both poles set to a neutral height and simply choke down on the uphill grip while palming the top knob of the downhill handle. Models equipped with ergonomic, multi-position handles and extended EVA foam lower sleeves excel in these constantly shifting hillside environments. When you finally exit the switchbacks onto a sustained traverse, setting custom lengths for each side delivers the highest level of joint relief.
External Lever Locks versus Tri-Fold Push-Button Systems
Trekking pole locking mechanisms dictate how easily you can alter shaft height and how securely that adjustment holds under body weight. External lever locks, such as the quick-lock hardware found on the Retrospec Solstice Trekking Poles for Hiking, clamp an outer sleeve around an inner aluminum or carbon shaft. These cam-style levers are simple to operate with thick gloves and provide visible confirmation that the clamping collar is fully closed and locked. Because external locks rely on mechanical friction, they require regular calibration to prevent the telescoping sections from creeping under heavy downward pressure.
Folding tri-fold poles take a completely different architectural approach by utilizing internal tension cords and push-button locking pins. Designs like the Covacure Trekking Poles Collapsible snap together into fixed lower segments while using a single top telescoping section to provide height adjustment. These tri-fold models provide twenty centimeters of adjustment, offering designated size pairings like 100 to 120 centimeters or 115 to 135 centimeters to suit different hiker heights. Understanding your pole design helps you determine whether height changes occur across multiple telescoping collars or exclusively at the upper shaft.
Calibrating Lever Lock Tension and Thumbscrew Torque
A loose lever lock poses a significant trail hazard because a sudden shaft collapse can cause a dangerous fall on uneven terrain. To calibrate clamp tension, swing the cam lever into its fully open position and locate the knurled thumbscrew or tension nut on the opposite side. Turn the thumbscrew clockwise by hand in small quarter-turn increments to tighten the clamping collar against the inner shaft. Close the lever firmly; you should feel distinct resistance midway through the arc, requiring solid palm pressure to snap the lever flush against the tubing.
If the lever snaps shut with minimal effort or flips open when brushed against trail brush, the tension screw remains too loose. Avoid over-tightening the thumbscrew to the point where you must force the lever shut with excessive pressure, which can crack plastic collars or strip aluminum threads. Many modern trekking poles feature tool-free adjustment dials, allowing quick field calibration without hunting through your repair kit for a screwdriver. Checking this clamping tension before your hike ensures your selected pole height remains rock-solid throughout the day.
Executing the Vertical Load Check Before Trail Use
Visual inspection alone cannot confirm whether your locking collars are tight enough to support your full body weight during an emergency slip. After adjusting your poles to the desired height and snapping the levers closed, always perform a physical load verification on level ground. Plant both tips firmly onto the dirt or floor, grasp the handles firmly, and lean your upper body weight downward with deliberate force. The shaft sections should hold firm without slipping downward or making audible clicking sounds under your sustained downward pressure.
If either shaft segment creeps downward even a fraction of an inch during this test, reopen the cam lever immediately. Tighten the adjustment screw an additional half turn, clamp the lever shut, and repeat the downward force test until slippage stops completely. Never assume that factory-tightened levers are trail-ready right out of the box, as temperature shifts and shipping vibration can loosen tension dials. Conducting this thirty-second check at the trailhead prevents sudden collapses when you vault over boulders or step across river crossings.
Equalizing Multi-Section Telescoping Poles
Standard three-section telescoping poles feature two independent locking collars that control the middle and lower shaft tubes. A common mistake among beginner hikers is extending the bottom section completely to its limit while leaving the middle section fully retracted. Extending one section fully while keeping the other compressed creates uneven mechanical stress, increasing shaft flex and concentrating vibration at a single joint. Distributing your height adjustment equally across both telescoping sections maximizes structural rigidity and balances the overall swing weight of the pole.
Quality telescoping models feature laser-etched centimeter or inch markings printed along both the middle and lower tubing sections. If your ideal walking height is 120 centimeters, adjust both the lower and middle sections to the matching 120-centimeter line on each tube. This balanced setup ensures equal shaft overlap inside each locking collar, providing the greatest resistance against bending under downward loads. Keeping both sections at identical numerical markings also makes fine-tuning on the trail fast and repeatable without second-guessing your measurements.
Observing Stop Lines and Maximum Extension Limits
Every adjustable trekking pole features a distinct warning line, typically labeled as “STOP” or “MAX,” printed near the bottom of each telescoping tube. This indicator marks the absolute minimum amount of tube overlap required inside the upper collar to maintain structural integrity. Extending any shaft section past this stop mark leaves inadequate tubing inside the clamping joint, creating an extreme leverage vulnerability. Placing heavy downward or lateral force on an over-extended shaft can bend aluminum alloys or cause catastrophic failure in carbon fiber tubing.
If you reach the stop line and your elbow still sits at an obtuse angle pointing downward, your poles are simply too short for your frame. Tall hikers should seek out models designed specifically for extended heights, such as the Hiking Poles, Ultra-Light Telescopic Trekking or 54-inch telescoping options. Tri-fold models from covacure explicitly warn users against exceeding their designated limit lines during installation and height setup. Respecting these factory boundaries ensures your walking sticks remain strong enough to catch unexpected balance slips.
Wrist Strap Sizing and Load-Bearing Ergonomics
Trekking pole height adjustments work in direct partnership with properly sized wrist straps to minimize hand and forearm fatigue. Many hikers mistakenly grip the handle without utilizing the strap, forcing their fingers to clutch the rubber, cork, or foam tightly for miles. To use straps correctly, slide your hand upward through the bottom of the loop, then lower your palm down over the top of the handle grip. The webbing strap should wrap smoothly across the back of your hand and sit snugly against your palm under the base of your thumb.
Once properly threaded, pull the strap adjustment tab until the loop supports your wrist firmly without cutting off blood circulation. When the strap is sized correctly, you can rest the full downward weight of your arm onto the webbing while maintaining a relaxed, loose grip. This technique transfers walking forces directly through your skeletal structure, preventing hot spots, blisters, and forearm cramping during long trekking days. Pairing ergonomic wrist strap support with natural cork handles or contoured EVA foam creates an effortless, natural swing on the trail.
Packability, Collapsed Length, and Travel Considerations
Understanding how compact your poles can collapse is just as important as knowing their maximum extended trail height. Telescoping three-section designs generally pack down to between 24 and 26 inches, making them easy to lash to exterior gear loops on daypacks. Folding Z-pole designs collapse down much smaller, with models like the covacure Hiking Poles, 7075 Aluminum Tri-fold folding down under 14 inches for convenient packing. If you frequently travel to hiking destinations by airplane, reviewing carry-on backpack size considerations helps you decide whether your collapsed sticks will fit inside your luggage.
Transportation Security Administration rules generally prohibit trekking poles with sharp metal carbide tips from being carried inside airplane passenger cabins. Packing your collapsible poles inside checked baggage ensures your gear travels safely without airport security confiscations. Ultra-compact folding poles slip effortlessly into duffel bags, suitcases, or travel packs without protruding past luggage seams. Once you arrive at your destination, unfolding and locking your poles back into your memorized centimeter markings takes only moments.
Trail Maintenance to Prevent Height Slippage
Trail grit, moisture, and fine mineral dust can accumulate inside telescoping shaft joints over extended backcountry journeys. Contaminants inside the tubing reduce the frictional contact between the clamping collar and the inner shaft, leading to creeping height adjustments. After hiking in wet or muddy conditions, pull each telescoping section completely apart and wipe the tubes clean with a dry, lint-free cloth. Allow the disassembled sections to air-dry thoroughly before reassembling them, preventing internal corrosion or oxidation on aluminum alloy shafts.
Never apply lubricants, grease, silicone spray, or WD-40 to the sliding surfaces of your trekking pole shafts. Lubricating these sections destroys the friction required for cam levers to lock firmly, guaranteeing that your poles will collapse under downward load. If your lever locks begin to feel loose after hundreds of trail miles, clean the bare shafts with rubbing alcohol to remove grease and skin oils. Routine shaft cleaning and periodic thumbscrew tightening keep your poles locking securely and holding their calibrated height season after season.
Taking time to master pole height adjustments ensures your gear works in harmony with your body across every trail gradient. Establishing a neutral ninety-degree elbow angle on flat terrain provides a reliable baseline for making quick uphill and downhill adjustments. Verifying your clamp tension with a firm downward load test before stepping onto technical terrain prevents unexpected slips and joint strain. With properly sized walking sticks and dialed locking hardware, you can tackle steep mountain ascents and rocky descents with complete confidence.








Write Your Review
No reviews yet. Be the first to share your experience!