


Steep mountain scrambles, thick brush, and rocky river crossings often require both hands free for balance and safety. Learning how to put trekking poles on backpack allows hikers to transition smoothly between rugged ascents and technical terrain without breaking stride or fumbling with loose hardware. Much like mastering the fundamentals of attaching external gear to a backpack, securing your walking sticks properly prevents dangerous shaft swings and trail snagging. A solid mounting method protects the locking mechanisms, shields delicate carbon fiber or aluminum shafts from impact, and keeps the sharp carbide tips safely pointed away from you and your hiking partners.
Whether your pack features dedicated ice axe loops, side compression webbing, or requires aftermarket elastic cord anchors, the mounting process should be quick, quiet, and secure. Loose poles can rattle against pack frames, throw off your center of gravity, or slide downward through straps on steep drops. Modern collapsible trekking poles and folding Z-poles offer versatile storage choices, ranging from external side-pocket holsters to compact interior stowage. Understanding the exact mechanical interfaces on your pack ensures that your poles stay firmly anchored through miles of demanding wilderness terrain.




Essential Methods for Securing Trekking Poles to Your Pack
Securing hiking sticks to a pack requires matching the pole design with the specific lashing points built into your outdoor gear. Hikers often face sudden transitions when trails switch from rolling forest dirt to steep rock slabs that demand three points of physical contact. Knowing how to put trekking poles on backpack cleanly ensures that sharp carbide tips do not tear pack fabrics or pose injury hazards to trail companions. By understanding the mechanical differences between tool loops, compression straps, aftermarket bungees, and internal pack sleeves, you can choose the most stable configuration for any wilderness route.
Built-In Tool Loops and Bungee Shaft Collars
Most technical hiking backpacks include traditional tool loops at the base of the pack panel alongside elastic bungee collars near the top. These lower loops were originally engineered for mountaineering ice axes, but they accommodate standard trekking poles exceptionally well. To use this attachment method, collapse each pole section to its shortest functional setting and close all external lever locks securely. Insert the carbide tip downward through the lower webbing loop so the mud or snow basket catches against the strap fabric. Once the tip is positioned through the loop, rotate the pole shaft upward one hundred eighty degrees against the pack body to lock the basket in place.
After rotating the shaft upward, align the upper section of the pole with the dedicated shock cord or bungee collar on the pack body. Thread the shafts through the elastic loop and cinch the plastic cord lock tight against the upper aluminum or carbon tubing. Placing the bungee collar just below the handle grip prevents the pole from slipping downward through the lower strap during vigorous movement. When carrying a pair of poles simultaneously, nesting the shafts together with their wrist straps wrapped around the upper tubes eliminates annoying metallic chatter. A quick upward tug on the shafts will confirm that the lower baskets are firmly trapped against the bottom webbing.
Side Stretch Pockets and Lateral Compression Straps
Utilizing side water bottle pockets combined with side compression straps offers another dependable way to carry poles externally. This approach works especially well on daypacks or lightweight packs that lack dedicated mountaineering tool loops. When managing gear volume in a smaller pack, understanding the capacity of a compact daypack helps hikers decide whether to lash poles to external side loops or tuck them inside. Start by collapsing the pole sections completely and verifying that all cam levers or twist locks are tight. Slide the tips or handles directly into the elastic side pocket, making sure the base reaches the bottom of the pocket.
Once the lower ends are seated in the pocket, route the pack compression straps across the exposed shafts and buckle them tightly. Most packs feature upper and lower compression straps, which allows you to create two distinct contact points along the length of the shafts. Tightening both straps firmly pulls the poles flush against the pack frame, which minimizes lateral movement. To prevent gear from popping out on rugged ascents, route the compression strap through the pole wrist straps before buckling it. Always check that the external cam levers face inward toward the pack body to prevent brush from catching the release tabs.
Aftermarket Elastic Fasteners and Daisy Chain Webbing
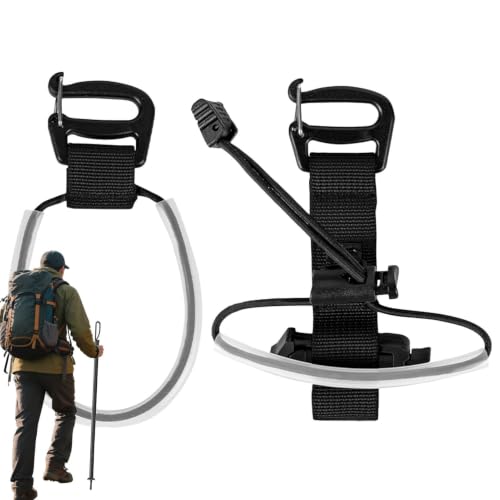
Many modern ultralight packs eliminate heavy mountaineering loops and rigid straps to save base weight, leaving hikers with plain daisy chains. In these scenarios, modular accessories like the 10pcs Hiking Stick Holder Straps Backpack Bungee provide an adaptable and lightweight solution. These elastic cords feature adjustable plastic buckles and pig nose cord locks that attach directly to exterior webbing loops. You can loop one fastener through a lower lash point to cradle the pole tips and attach a second fastener higher up on the pack panel. The elasticity of high-grade rubberized cord maintains continuous clamping force against the poles even as the pack compresses during your hike.
Versatile straps like the luzen 2Pcs Black Backpack Hiking Pole Ropes and 6 Pcs Backpack Hiking Stick Holders allow custom placement across shoulder straps, waist belts, or side panels. When installing these aftermarket cords, select attachment points that keep the poles vertical and close to the load-bearing frame of your pack. Thread the elastic band through the pack webbing, feed the plastic buckle through the loop, and pull it taut to eliminate slack. Place your collapsed hiking poles against the pack fabric, stretch the cord around the shafts, and lock the slider into place. Using two separate bungee fasteners per pole prevents the shafts from pivoting like a pendulum during steep descents.
Front Harness Systems and Running Quivers for Fast Access
Trail runners, fastpackers, and speed hikers frequently require rapid pole access without stopping to unbuckle their packs. Fast-access systems mount directly to the front shoulder straps or feature a dedicated rear quiver like the AONIJIE Trekking Pole Pouch Waterproof Hiking. Front-mounted bungee loops allow you to stow your poles horizontally across your chest or vertically along the front shoulder harness. This setup keeps the handles near your ribs and the tips safely pointed downward toward your hips. When approaching a runnable flat section or steep rock scramble, you can fold your poles and latch them into the harness clips in seconds.
Rear-mounted pole quivers and pouches attach to upper shoulder anchor points and lower pack webbing, acting like an archer quiver for your hiking sticks. Waterproof fabrics and reinforced bases protect the pouch interior from sharp carbide tips while keeping moisture away from other gear. Drainage holes at the bottom of the pouch allow rainwater and trail mud to exit quickly instead of pooling around the pole components. With a quick-pull retention cord, you can reach over your shoulder, slide the folded poles out, and deploy them on the fly. This design eliminates the need to remove your running vest or pack whenever trail gradients change.
Stowing Collapsible and Folding Poles Inside the Main Pack
Storing your poles inside the main pack bag is often the cleanest option when traveling through overgrown brush or taking public transit to trailheads. Folding Z-poles and ultra-compact telescoping designs like the Ryno Tuff Trekking Poles, Fits Inside A Backpack collapse to small lengths that slide effortlessly into main pack compartments. When evaluating packing strategies for multi-day trips, isolating dirty hardware from your sleeping bag and dry insulation is essential. Placing poles inside prevents them from snagging on thick rhododendron, branches, or tight rock chimneys where external gear can get ripped away. It also protects carbon fiber shafts from direct rock scrapes during technical scrambling.
To pack poles internally without damaging your gear, always utilize a dedicated sleeve such as the Scicalife Hiking Pole Storage Bag. A water-resistant fabric sleeve traps trail mud, grit, and moisture, preventing contamination of your dry clothing, sleeping quilt, or tent body. Position the packed poles vertically against the internal frame sheet or back panel of your backpack. Keeping dense aluminum or carbon hardware close to your spine maintains an optimal center of gravity and prevents the load from pulling backward. Before sliding poles into their storage bag, brush off any loose dirt, dried mud, or moisture from the locking mechanisms and shaft tubes.
Tip Orientation and Trail Safety Considerations
Choosing between tip-down and tip-up orientation is one of the most debated safety considerations when securing hiking sticks to an exterior pack panel. The vast majority of outdoor instructors and gear designers recommend mounting poles with the tips pointing downward. Exposed carbide tips are extremely sharp and can easily cause puncture wounds to hikers walking closely behind you on steep switchbacks. Pointing tips downward also reduces the risk of eye injuries when leaning over or turning around in crowded group hiking scenarios. In addition, downward tips are much less likely to puncture overhead pack covers or snag on low canopy branches.
Whenever you carry trekking poles externally with the tips exposed, installing rubber road tips or protective storage caps is good trail etiquette. Rubber caps cover the aggressive tungsten carbide points, preventing accidental tears to your pack mesh or clothing during transport. Mud baskets and snow baskets also act as physical spacers, preventing the shaft from sliding too far through mounting loops. If terrain requires mounting poles with tips upward, wrap a heavy nylon tip protector securely over the exposed points before tightening the straps. Check that the tips do not extend above the top lid of your backpack where they could catch overhead obstacles.
Balancing Pack Weight and Preventing Rattle on Technical Terrain
Carrying trekking poles externally alters the weight distribution of your pack if the attachment is loose or uneven. A loose pair of poles creates an oscillating pendulum effect that tugs at your shoulders with every stride, increasing fatigue over long trail days. To avoid this unnecessary strain, cinch all attachment cords and compression straps until the poles become an immovable extension of the pack body. Distribute the weight evenly by mounting one pole on each side of the pack if you use dual side pockets. Alternatively, if mounting both poles together on the rear panel, center them precisely along the spine of the pack.
Shaft rattle is another common frustration that can ruin the peaceful ambiance of wilderness hiking and indicate loose hardware. Metallic chatter occurs when bare aluminum or carbon shafts vibrate against each other or strike external pack frame stays. You can eliminate trail noise by nesting the poles with their handles opposed or wrapping the wrist straps tightly around both shafts before securing them. Many hikers slip a wide rubber band or hook-and-loop cable tie around the middle sections to dampen vibrations completely. A quiet pack indicates that your gear is firmly anchored and will not shift during sudden balance maneuvers.
Resolving Common Attachment Mistakes and Field Adjustments
One of the most frequent mistakes hikers make is relying solely on a single elastic strap to hold two heavy trekking poles. Over time, trail jostling causes the poles to pivot sideways, slipping out of the strap and dragging along the ground behind the hiker. Always ensure at least two separate points of contact along the pole shafts, spaced as far apart as practical. Another common oversight is overtightening rigid compression straps directly over thin carbon fiber tubing. Excessive clamping pressure against hollow carbon walls can crush the structural weave, leading to catastrophic failure later when you place full body weight on the pole.
Hikers also frequently forget to inspect their external cam lever locks before lashing poles to a pack exterior. If an external lever is left loose or unlatched, trail branches can catch the lever arm, pulling the telescoping section out or snapping the plastic cam. Take the time to snap all lever locks firmly closed and verify that the thumbscrews are properly tensioned before strapping the poles down. If your poles use internal twist expanders, give each section a firm twist to confirm they are locked tight. Securing all mechanical joints prevents lost lower sections and keeps the collapsed length compact and rigid.
Mastering the various ways to attach your trekking poles allows you to adapt to changing terrain, weather, and trail demands with complete ease. Whether you rely on classic ice axe loops, modular bungee cords, side compression webbing, or protective internal storage sleeves, the key is stability and safety. Keeping your poles firmly anchored protects your investment, shields your gear from punctures, and ensures your hands are free when you need them most. Taking a few moments to inspect your attachment setup before hitting the trail ensures a quiet, balanced, and enjoyable trek.








Write Your Review
No reviews yet. Be the first to share your experience!