


Sudden joint stiffness, post-surgical rehabilitation, or persistent balance hesitation can make daily walking feel uncertain. Choosing a supportive mobility aid restores walking confidence, but setting that device to the proper anatomical height is what protects your posture and joints. An incorrectly sized cane forces awkward gait compensations that can strain your shoulders, fatigue your lower back, and increase your risk of tripping. Understanding what is the best height for a cane allows you to offload lower-body stress effectively while maintaining a steady, natural stride.
When adjusted correctly, a walking cane transfers significant weight away from a painful hip, knee, or ankle during every step. Active walkers managing joint discomfort often pair a properly fitted cane with supportive knee mobility apparel to keep surrounding muscles warm and responsive outdoors. The secret to dependable mobility support lies in aligning the handle with your body’s natural skeletal structure before taking your first stride. Establishing that exact relationship between handle height, elbow flexion, and walking mechanics ensures your cane delivers maximum protection on every surface.


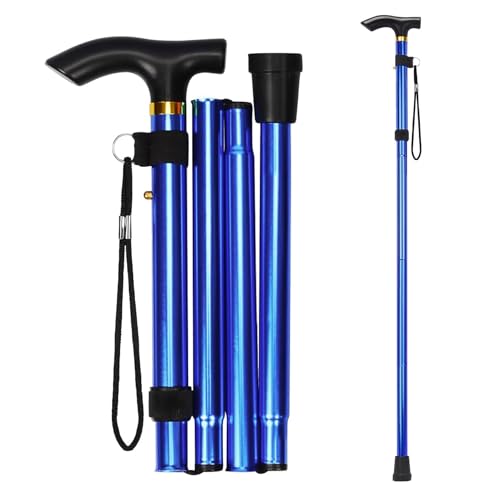
Determining the Correct Cane Height for Optimal Stability and Posture
The standard clinical guideline establishes that the top of the cane handle should align directly with your wrist crease when you stand upright with your arms hanging naturally at your sides. When you grip the handle at this height, your elbow should form a comfortable flexion angle between 15 and 20 degrees. This precise alignment allows you to push downward through your arm with mechanical efficiency without elevating your shoulder or rounding your spine. Setting this foundational height creates the balance needed to offload lower-extremity stress and maintain a smooth, rhythmic walking pattern.
Anatomical Landmarks for Measuring Cane Height
Locating the correct anatomical landmarks is the first step toward getting an accurate measurement. The primary reference point is the distal wrist crease, which is the horizontal skin fold where your hand meets your forearm. When your arms hang loosely along your torso, this crease sits on nearly the same horizontal plane as your greater trochanter, the prominent bony protrusion on the side of your upper hip. Measuring the vertical distance from the floor to either of these landmarks provides your ideal target cane length.
You must always wear your everyday walking shoes during the measurement process. Different footwear choices introduce varying heel heights, cushioned sole thicknesses, and rocker bottoms that alter your distance from the floor by an inch or more. Measuring while barefoot or in flat house slippers will produce a cane that is noticeably too short once you put on thick-soled sneakers or outdoor walking shoes. If you regularly alternate between different styles of footwear, measure while wearing the pair you plan to use most frequently during daily errands.
Biomechanics of the Fifteen to Twenty Degree Elbow Bend
The slight 15 to 20 degree bend in your elbow serves an essential biomechanical function during weight bearing. A locked, straight arm cannot absorb sudden floor impacts and transfers jarring vibrational shocks directly into your wrist and shoulder joints. Conversely, a modest elbow bend allows your triceps and shoulder muscles to contract effectively, providing controlled downward force whenever your leg requires relief. This slight flex also gives your arm sufficient travel to push downward and recover balance if you encounter an unexpected floor threshold or uneven pavement.
When a cane is adjusted too tall, your elbow bends beyond 20 degrees and forces your shoulder upward toward your ear. This elevated arm position causes chronic tension across the upper trapezius muscles and restricts your ability to push down firmly through the handle. A cane that is set too short forces you to stoop forward, throwing your center of gravity ahead of your base of support and straining your lumbar spine. Maintaining the correct elbow bend keeps your head, shoulders, and pelvis aligned in an upright, energy-efficient posture throughout the day.
Step-by-Step Procedure to Measure and Set Your Cane at Home
Measuring your required height at home requires minimal equipment and takes only a few minutes. Put on your typical walking shoes and stand on a level, hard floor surface such as tile or hardwood rather than thick carpet. Stand tall with your shoulders relaxed, your feet positioned about shoulder-width apart, and your arms hanging loosely at your sides. Having a friend, family member, or caregiver take the measurement is strongly recommended, as leaning forward to read a tape measure yourself will distort your posture and skew the reading.
Have your assistant place the zero mark of a flexible measuring tape flat on the floor directly beside the outer edge of your heel. Extend the tape vertically along your leg to the small crease on the inside of your wrist joint. Note this measurement to the nearest half-inch, as this distance represents the total target height from the bottom of the rubber tip to the top surface of the cane grip. If you do not have an assistant available, you can back up against a wall, mark your wrist crease height with a light pencil mark or piece of tape, and measure from the floor to that mark.
Once you have your target measurement, transfer that dimension to your adjustable walking cane. Most modern aluminum canes feature push-button telescoping pins that lock into pre-drilled adjustment holes along the shaft. Depress the dual brass detent pin, slide the lower shaft until the overall height matches your measurement, and allow the pin to click fully into the corresponding hole. Always tighten the threaded anti-rattle silencing collar around the adjustment joint, as this lock nut prevents mechanical clicking and stabilizes the inner shaft against shifting under load.
Proper Cane Placement and Contralateral Walking Technique
A common mistake among new cane users is holding the device on the same side as the painful or injured leg. Unless specifically directed otherwise by a physical therapist, you should always hold the cane in the hand opposite your affected lower limb. This contralateral placement mirrors the body’s natural reciprocal gait, where the opposite arm swings forward with the advancing leg. Holding the cane on the unaffected side broadens your base of support and creates a stable tripod effect that offloads 15% to 25% of your body weight away from the sensitive joint.
Coordinating your steps requires a simple, rhythmic sequence on flat indoor and outdoor surfaces. Advance the cane forward at the same time you step forward with your weaker or injured leg, keeping the rubber tip even with the lead foot. Plant the rubber tip securely on the ground and transfer partial body weight through your hand as you step through with your stronger, unaffected leg. Dressing in comfortable, flexible outdoor walking apparel allows your hips and knees to move freely without fabric restriction during these reciprocal strides.
Negotiating stairs demands a deliberate, safety-first cadence that differs from walking on level ground. Remember the traditional physical therapy rule: step up with the good leg first, and step down with the bad leg first. When ascending stairs, place your stronger foot onto the upper step, push down to lift your body, and then bring the cane and your weaker leg up to meet it. When descending, lower the cane and your affected leg onto the bottom step together to absorb impact before stepping down with your stronger leg. Always grip an available handrail with your free hand whenever ascending or descending staircases.
Sizing Differences Across Handle Geometries and Grips
Handle geometry influences not only hand comfort but also how vertical load is directed down the cane shaft. Offset handle canes, such as the Medline Aluminum Offset Walking Cane, feature a distinctive curved neck that centers the user’s downward weight directly over the vertical axis of the shaft. This curved configuration reduces wrist extension strain and provides greater stability for individuals recovering from joint replacements or managing knee arthritis. When sizing an offset cane, measure to the exact top surface of the horizontal foam or vinyl handgrip where your palm rests.
Traditional crook handles feature a classic curved hook that works well for casual balance, but they position weight slightly behind the shaft axis. Derby and Fritz handles offer a flatter, contoured perch that distributes downward force evenly across the thenar eminence of the palm, reducing localized nerve pressure. Anatomical palm-molded grips are sculpted specifically for left or right hands to alleviate severe discomfort associated with rheumatoid arthritis or carpal tunnel syndrome. Because grip thicknesses vary between padded foam and contoured hard rubber, always confirm that your 15 to 20 degree elbow bend remains intact when resting your hand on the actual grip.
Specialty canes also incorporate multi-functional handle designs that alter daily standing mechanics. For example, some models of the TIRAROME Walking Cane include a secondary fold-out lower handle designed to provide ergonomic leverage when rising from deep armchairs or low sofas. While this secondary handle assists with sit-to-stand transitions, overall cane height must still be calibrated according to the upper primary grip. Establishing the correct primary grip height guarantees that your arms, wrists, and shoulders stay in a neutral alignment once you reach a fully upright standing position.
Base Dynamics and Stability Footprints
The design of the cane base directly affects stability, swing weight, and overall measured height. Standard single-point walking canes rely on a flexible rubber ferrule that provides agile maneuvering across tight hallways, doorways, and outdoor curbs. However, single-point canes cannot stand independently and will slide to the floor if leaned haphazardly against smooth countertops or tables. When measuring or replacing single-point tips, remember that heavy-duty rubber ferrules add between one and two inches of vertical height to the bottom of the bare metal shaft.
Free-standing articulating pivot bases provide enhanced stability on flat floors while maintaining traction across slight surface angles. Models such as the HONEYBULL Foldable Walking Cane utilize an extra-wide, three-pronged rubber base that pivots smoothly to mimic natural ankle motion. This wide footprint allows the cane to remain upright on flat surfaces, eliminating the painful bending required to pick up dropped mobility aids. Users should ensure that articulating bases are placed flat against the floor during weight bearing to prevent uneven edge loading and sudden tipping.
Quad canes feature a wide or narrow four-legged metal platform that provides substantial balance support for individuals with significant gait instability. When setting up a quad cane, the flat edge of the base must always face inward toward the user’s leg to prevent tripping hazards. Quad bases add noticeable height and weight compared to single tips, making precise push-button adjustments essential to avoid hiking your shoulder. Furthermore, quad canes require careful placement on stairs, as all four contact points must rest completely flat on the stair tread without hanging over the edge.
Matching User Height to Cane Adjustment Ranges
Walking canes are manufactured with specific telescoping ranges that must be matched to your physical stature. Standard adjustable models typically accommodate heights between 29 and 38 inches, fitting the majority of adults who stand between 5 feet 2 inches and 6 feet tall. For individuals outside this average range, choosing a model with the proper adjustment envelope is critical to avoid improper postures. Using a cane adjusted to its absolute highest or lowest pin setting can sometimes compromise shaft rigidity if the internal overlap between telescoping tubes is minimal.
Petite individuals often struggle with standard canes that remain too tall even on their lowest setting. Certain models, like the compact TIRAROME walking cane, offer a 5-level adjustment range spanning 31 to 35 inches that is specifically recommended for users between 5 feet and 5 feet 7 inches tall. Taller individuals, conversely, require extended shafts to prevent stooping and back pain. The Days Standard Bariatric Offset Cane extends from 37 to 46 inches, providing tall adults and bariatric users supporting up to 500 lbs with the structural length needed to walk comfortably without spinal flexion.
Active individuals who travel frequently often prioritize compact folding mobility aids that fit inside luggage or vehicle compartments. The COMFYTHERA Folding Cane collapses down to 11 inches while still providing a five-level adjustment range between 33 and 37 inches. When using folding travel canes, verify that internal elastic shock cords maintain firm tension and that all joint sleeves seat securely together without lateral wobble. A loose folding joint can introduce unsettling flex and alter your effective handle height during weight bearing.
Routine Hardware Inspection and Wear Signs
Regular inspection of your walking cane hardware is a vital component of ongoing fall prevention. The bottom rubber ferrule endures constant friction against concrete, asphalt, and tile, causing the tread pattern to wear smooth over time. A worn rubber tip loses its slip resistance on wet entryways and polished floors, dramatically increasing your risk of an unexpected fall. Check the bottom of the tip weekly for thinning tread, cracked rubber, or internal metal washers that have worn through the rubber base.
Replacement rubber tips must match the exact outer diameter of your cane shaft to ensure a secure friction fit. Standard cane shafts typically feature an outer diameter of 3/4 inch or 7/8 inch, as seen on the Days bariatric offset cane. Installing a tip with an incorrect interior bore will result in a loose tip that can detach mid-stride or split prematurely under load. When replacing tips, push the new rubber ferrule firmly onto the cleaned shaft end and tap the cane against the floor to seat it completely.
Mechanical components along the shaft also require periodic checking to preserve structural integrity. Inspect the push-button locking pins to confirm that they spring out fully through the adjustment holes and do not stick inside the tube. Check that the threaded anti-rattle silencer nut remains tight, as a loose nut allows the inner shaft to rattle and vibrate during walking. If your cane develops structural cracks, loose rivets, or bent tubing after a fall or heavy impact, retire the device immediately and replace it with a sound unit.
Recognizing When to Transition Beyond a Cane
Walking canes provide unilateral mobility assistance, transferring between 15% and 25% of body weight to relieve a single limb or steady mild balance hesitation. However, a cane is not designed to support your entire body weight or compensate for bilateral lower-limb weakness. If you find yourself leaning heavily over the handle, experiencing frequent near-falls, or needing to support yourself with both hands on furniture, a cane may no longer provide sufficient security. Continuing to rely on a single cane when your physical needs exceed its capacity increases your risk of catastrophic falls.
When balance deficits worsen due to progressive neurological conditions, severe joint degeneration, or generalized frailty, transitioning to a standard walker or four-wheeled rollator is the safest course of action. Bilateral mobility devices provide a much broader base of support, allow dual-arm weight offloading, and often feature built-in seating for resting during fatigue. Always consult a licensed physical therapist or physician for a comprehensive gait evaluation if you feel uncertain about your stability. A mobility professional can assess your walking mechanics, verify your cane height, and prescribe the appropriate assistive device for your lifestyle.
Establishing the best cane height is a straightforward process that yields immediate rewards in stability, comfort, and walking endurance. By aligning the handle with your wrist crease, maintaining a 15 to 20 degree elbow bend, and holding the cane on your stronger side, you create a harmonious balance system that protects your joints. Take the time to measure accurately with your everyday walking shoes, check your locking hardware regularly, and walk with the steady confidence that proper biomechanical support provides. Consistent attention to these sizing details keeps your posture upright and your steps secure wherever your day takes you.







Write Your Review
No reviews yet. Be the first to share your experience!