


Setting up an outdoor camp during sudden weather shifts requires a stable shelter that sheds high winds and heavy downpours. Backcountry travelers frequently rely on standalone overhead coverage when natural anchor points like trees are scarce or awkwardly spaced across open terrain. Knowing how to pitch a tarp with poles gives you complete freedom to erect an A-frame, lean-to, or modified wing configuration anywhere from alpine gravel bars to exposed desert plateaus. When packing gear into a sturdy expedition backpack, carrying dedicated upright supports transforms an ordinary square fabric sheet into a resilient, storm-worthy fortress.
Achieving a taut, structural pitch depends heavily on managing tension lines, stake holding power, and proper vertical support hardware. Many campers struggle with sagging ridge lines or collapsing shafts when gusts catch the canopy fabric unexpectedly. Using durable aluminum telescoping rods or trekking poles provides rigid axial load resistance to maintain structural integrity under continuous strain. Understanding basic pitching geometry and guyline angles ensures your shelter stays upright through severe weather, protecting both your sleep system and campsite gear.




Mastering Tarp Pitching Mechanics With Upright Support Poles
Rigging an outdoor tarp without natural tree anchors requires a firm grasp of opposing structural forces. A tarp possesses no inherent rigidity, so its strength relies entirely on the dynamic tension established between rigid vertical poles, fabric tie-outs, and ground anchors. When upright poles provide dependable axial compression and guylines supply counterbalancing outward pull, the canopy transforms into a drum-tight, aerodynamic barrier. Mastering this tension equilibrium allows campers to construct dependable shelters across open beaches, alpine meadows, and windswept plains.
Core Shelter Geometries: A-Frame, Lean-To, and Modified Wing
The classic A-frame shelter remains the standard choice for campers demanding balanced weather protection and predictable airflow. Setting up an A-frame requires two vertical poles placed at opposite ends of the central ridgeline, elevating the fabric while the sides slope downward toward the soil. This symmetrical roofline effectively channels torrential rainfall down both flanks while creating ample interior living space along the central spine. Angling the pitch lower to the ground improves wind deflection during severe squalls, whereas raising the pole height maximizes ventilation during humid summer nights.
A lean-to configuration offers rapid deployment and expansive visibility when storms approach from a single fixed direction. In this arrangement, two or more poles elevate the windward or viewing edge of the tarp, while the opposite hem stakes directly into the earth at a steep incline. The slanted canopy creates a broad windbreak that forces oncoming gusts up and over the sleeping area, preserving a calm microclimate underneath. Campers frequently choose this profile in cooler weather because an open front allows ambient heat from a campfire or clear atmospheric radiation to circulate freely.
The flying diamond and modified wing pitches serve outdoor travelers who need aerodynamic stability in shifting gale-force winds. Rigging a diamond requires anchoring three perimeter corners close to the ground while using a single elevated pole to hoist the primary windward apex. This geometric distribution creates steep, continuous slopes that shed driving precipitation instantly without allowing water to pool along flat seams. Because the aerodynamic profile minimizes flat surface exposure, gusts glance off the diagonal tension lines without buckling the central upright.
Step-by-Step Assembly: Establishing the Central Ridgeline
Before unrolling your canopy fabric, assess the campsite topography and prevailing wind patterns to determine optimal shelter orientation. Align the lowest, most securely anchored edge of your planned structure directly into the wind to avoid turning the tarp into an uncontrollable sail. Lay the fabric completely flat on the terrain, ensuring the corner tie-out points and center grommets remain free of hidden roots or sharp rocks. Pre-staking the windward corners into the ground creates a stable baseline that prevents the sheet from blowing away while you assemble the upright hardware.
Once the baseline anchors are secure, prepare your upright poles and secure your primary ridgeline guylines to the top fittings. Thread each guyline through the designated pole tip ring or grommet, securing the cord with a reliable bowline knot or slip loop. Many modern poles feature designated metal pins that slide cleanly into corner brass grommets, providing a secure pivot point for the cordage. Ensure your guylines are at least twice the length of your intended pole height so you can achieve wide, stable anchoring angles on the ground.
Raise the primary support pole into a vertical position while walking the attached guyline outward at an angle of roughly forty-five degrees. Drive a heavy stake deeply into the ground, loop the line around it, and apply moderate tension using a taut-line hitch or integrated mechanical cord tensioner. Repeat this exact sequence with a second guyline positioned forty-five degrees in the opposite direction, creating a balanced V-shaped anchor array that braces the pole against lateral sway. The upright shaft should now remain balanced under its own counteracting tension before you even touch the opposing side of the shelter.
Move to the opposite end of the ridgeline, insert the second upright support, and pull the canopy fabric taut along the central seam. Walk out the secondary guylines, drive the corresponding ground stakes, and tension the cordage until the ridgeline shows zero visible droop. Working in a clockwise circle around the perimeter, stake out the remaining side tie-outs, pulling each hem diagonally outward to erase wrinkles. Fine-tune the tension across all lines sequentially, creating equalized resistance that keeps the entire structure taut and resonant when tapped.
Locking Mechanisms and Axial Load Dynamics
Upright poles endure continuous downward axial force generated by guyline tension and buffeting wind shears. Understanding the mechanical differences between locking styles is critical for selecting gear that will not collapse under sudden gusts. Friction-based twist locks, such as those found on the REDCAMP 2Pack Telescoping Tarp Poles 3-8.2ft and Sunnyglade 2 Pcs Adjustable Tarp Poles Telescoping, rely on internal nylon expander plugs that wedge against the inner tube wall when rotated. These twist mechanisms offer smooth, continuous length adjustment, but they require clean surfaces and firm hand torque to prevent slipping when damp weather reduces internal friction.
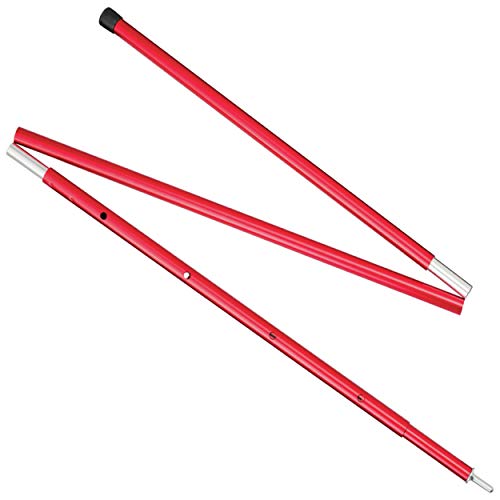
Mechanical push-button and spring-detent systems provide positive physical engagement that eliminates the possibility of creeping friction slippage. The UEAKPIC Camping Tarp Poles 3.28-8.2FT Telescoping utilizes an indexed press-lock design with multiple precision holes, allowing campers to synchronize matching pole heights effortlessly. Similarly, the MSR Adjustable, Collapsible Pole for Tarp and Wing incorporates spring-loaded locking detents within aircraft-grade aluminum sections to secure broad wing shelters against severe downdrafts. These mechanical detent systems cannot accidentally loosen from fabric vibration, making them exceptionally reliable during long overnight storms.
Shaft diameter directly governs resistance against catastrophic buckling when side winds push against a broad tarp wall. Lightweight models measuring under an inch in diameter work well for fair-weather backpacking, but severe conditions demand thickened aluminum tubing. The Tarp Poles Heavy Duty Adjustable from AVOFOREST addresses this challenge by incorporating a broad 1.26-inch tube diameter paired with a dual-layer lock design. Likewise, the KJE 2 Pack Adjustable Heavy-Duty Tarp Poles features a reinforced 1.26-inch aluminum profile to support large family awnings without bowing under high tensile forces.
Managing Pole Tip Interfaces and Fabric Protection
The junction between the metallic pole tip and the tarp fabric represents the most common failure point in backcountry shelters. Standard tarps feature reinforced perimeter corners fitted with brass or aluminum grommets designed to seat a narrow metal pin. The GEEWAY Tarp Poles for Camping provides dedicated pin heads with cord holes that allow guylines to anchor the canopy directly through the grommet opening. Seating the pin completely through the metal ring ensures the pulling force transfers to the reinforced hem webbing rather than tearing raw canopy threads.
Pushing a bare metallic pole directly against bare canopy fabric without a grommet will quickly cause puncture damage under wind tension. To solve this problem, manufacturers supply modular rubber caps that slip over the narrow terminal pin to create a broad, blunt contact point. The 4 Pack Adjustable Tarp Poles Telescoping Aluminum includes multi-purpose rubber caps designed to support rainflies from underneath without tearing waterproof polyurethane coatings. Similarly, the Dreamtrue Tarp Poles Telescoping relies on tear-resistant, non-slip rubber caps that distribute upward thrust evenly across nylon or polyester panels.
Specialized protective caps also enhance nighttime visibility and weather safety around your shelter perimeter. The Tent Poles for Tarp, AVOFOREST Camping Tent Tarps incorporates glow-in-the-dark tip caps that help hikers avoid snagging guylines or bumping uprights in pitch darkness. Many outdoor pole systems, including models from KJE and AVOFOREST, also feature large lightning protection covers that shield the upper apex from static electrical discharge while capping blunt tips. Using these protective caps ensures your fabric stays intact regardless of whether your pitch requires pin-through-grommet or interior push-up geometry.
Guyline Angles, Ground Stakes, and Anchor Security
Anchoring geometry dictates whether an upright pole remains perfectly vertical or tips inward when the tarp billows. To maximize mechanical holding power, position every guyline at a forty-five-degree angle relative to both the pole shaft and the terrain surface. Driving stakes into the earth at a reverse forty-five-degree angle, tilted away from the direction of pull, creates maximum resistance against soil shear failure. Placing stakes vertically or leaning them toward the shelter drastically reduces holding force, allowing lines to pull stakes free during sudden gusts.
Soil conditions vary dramatically between lush forest floors, hard-packed river clay, loose sand, and rocky alpine talus. Standard aluminum wire stakes hold well in firm sod, but rocky ground demands heavy-duty forged steel or angled Y-beam stakes that resist bending. When setting up camp on scree or sandy riverbanks, secure your lines using the deadman technique by burying crossbars, large stones, or branches horizontally beneath the substrate. Moving through dense underbrush and uneven terrain to source natural anchors is easier when wearing durable, lightweight hiking pants that resist snags and abrasions.
Cordage characteristics also directly influence pitch longevity and overnight safety in rough conditions. Low-stretch polyester or braided UHMWPE cords prevent the midnight sag that commonly plagues nylon guylines after hours of steady rain. Reflective tracers woven into the cord sheath illuminate brightly under headlamp beams, preventing dangerous campsite trip hazards around low-hanging lines. Utilizing aluminum camming line adjusters or learning simple friction hitches allows you to tension your lines smoothly without repeatedly retying complex knots in cold weather.
Weather Mitigation: High Winds, Water Pooling, and Shed Angles
Water accumulation on flat canopy sections creates massive hydrostatic weight that can snap metal poles or rip corner tie-outs. Preventing water pools requires maintaining steep pitch angles that force precipitation toward the perimeter gutters immediately. If your setup features a broad horizontal porch or awning, lower one corner pole significantly to create a dedicated drainage trough. Regularly checking fabric deflection during torrential rain ensures you catch subtle water pockets before excessive weight stretches the fabric past its elastic recovery threshold.
High winds require a proactive approach to shelter height and frontal profile management. When heavy gusts hit your campsite, lower the telescoping sections to drop the entire roofline closer to the ground, reducing wind drag. Angling the pole shafts slightly away from the center of the canopy transfers downward tension into lateral stabilization, bracing the fabric against severe side-loading. Never extend multi-section poles past their designated stop marks, as insufficient overlap between nesting aluminum sleeves weakens the joint and invites bending.
Silnylon fabrics naturally absorb moisture and elongate during prolonged rainstorms, causing initially tight pitches to develop slack. This material relaxation reduces aerodynamic efficiency and allows wind to flap fabric panels noisily against the upright poles. Check your guyline tension before going to bed and again at first light, taking up any slack using your adjustable line tensioners. Maintaining consistent, drum-tight fabric tension prevents abrasive friction between the tarp and pole tips, preserving the longevity of your waterproof coatings.
Field Maintenance, Grit Clearing, and Long-Term Care
Backcountry grit, fine sand, and trail mud represent the primary enemies of telescoping aluminum support poles. When mineral dust enters the clearance gaps between telescoping sections, it acts as an abrasive paste that scores metal and jams internal locks. After camping in sandy or dusty environments, pull each pole segment apart completely and wipe the aluminum walls with a clean, dry microfiber cloth. Avoid applying WD-40, silicone lubricants, or grease inside telescoping poles, as petroleum residues attract dirt and cause friction-based twist locks to slip.
Moisture trapped inside nested aluminum tubes leads to galvanic oxidation and chalky white corrosion over time. Always dismantle your poles fully after wet trips and allow the individual tubing sections to air dry completely before storing them in their carry bags. Inspecting ferrule joints, shock cords, and push buttons during regular cleaning ensures all mechanical components move freely on your next adventure. Performing this routine camp chore is much more comfortable when dressed in supportive trail clothing that offers freedom of movement during gear pack-down.
Check the rubber foot caps and upper pin hardware periodically for signs of excessive wear, cracking, or metal burrs. Worn bottom caps allow dirt to enter the lower tube and cause the pole base to slide uncontrollably across wet rock slabs or smooth grass. Smoothing down sharp burrs on metal pins with fine sandpaper prevents accidental tears when sliding tips through delicate tarp grommets. Storing poles in a breathable storage sack keeps all included stakes, guylines, and replacement caps organized and ready for immediate backcountry deployment.
Key Operational Takeaway for Backcountry Rigging
Constructing a durable, weather-resistant shelter with upright poles is fundamentally an exercise in balanced mechanical tension. By pairing appropriate pole heights with opposing forty-five-degree guylines, you distribute wind and precipitation loads evenly across the entire structure. Choosing the right pole locking system, protecting fabric interfaces with rubber caps, and anchoring firmly for the local soil conditions ensures complete campsite stability. With these practical rigging principles mastered, your tarp will provide dependable comfort across any wilderness terrain, regardless of what the weather brings.








Write Your Review
No reviews yet. Be the first to share your experience!