


Winter hiking through deep drifts and crusty snowpack transforms an ordinary trail into an exhausting workout when trekking pole tips sink deep into the surface. Navigating powdery terrain requires proper surface area to keep pole shafts from plunging past their lower locking collars. Learning how to put snow baskets on trekking pole hardware transforms summer hiking sticks into stable four-season platforms that support your balance across frozen slopes. Equipping your poles with broad baskets prevents frustrating tip burial and reduces upper-body fatigue when breaking trail.
Before heading into sub-freezing conditions, backpackers review their gear setup just as carefully as a multi-day backpacking trip checklist before an extended wilderness trek. Trekking pole lower sections feature distinct mounting points, ranging from fine plastic threads to smooth friction stops. Matching the basket bore diameter to the pole tip taper ensures that winter accessories stay attached through crust and snowdrifts. Understanding how to align, press, and thread these components gives you reliable stability without damaging lightweight shaft hardware.
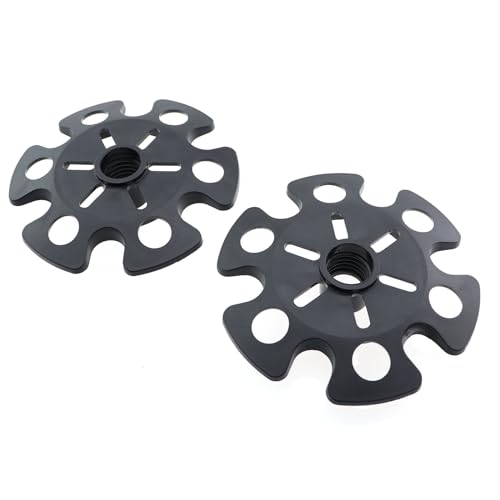


Essential Steps for Putting Snow Baskets on Trekking Poles
Installing winter baskets requires clearing the tip assembly, checking shaft dimensions, and threading or pushing the basket onto the lower collar. Standard trekking poles arrive equipped with narrow mud discs or bare tungsten carbide flex tips designed for dirt trails. Replacing small trail discs with wide powder baskets gives the pole the flotation needed for snowshoeing, winter backpacking, and mountaineering. Taking a few deliberate steps prevents loose fittings, lost baskets, and damaged plastic threads on cold mountain routes.
Understanding Basket Flotation Mechanics and Contact Area
Trekking pole tips are engineered to penetrate hard earth and grip granite slabs with minimal surface resistance. In winter powder or deep slush, that narrow profile causes the shaft to sink until the locking cam or hiker hand stops it. Snow baskets function like miniature snowshoes by distributing downward pole planting force across a wider surface area. A standard mud disc usually measures around 50 millimeters wide, which works well for loose gravel but fails completely in soft powder.
Oversized winter baskets typically feature diameters between 85 and 100 millimeters to create adequate flotation. Accessories like the Foxelli Trekking Poles Snow Baskets provide a wide diameter of nearly 100 millimeters to keep shafts floating above deep drifts. The TREKOLOGY Trekking Pole Rubber Tips and Snow kit uses an 87-millimeter basket diameter to stop deep plunging during backcountry snowshoe excursions. Expanding the ground contact zone maintains your natural rhythm and prevents sudden balance checks when stepping through hidden hollows.
Surface openings within the basket structure also serve a critical mechanical role during winter travel. Perforated snowflake profiles, such as those found on the 6 PCS Mud Ski Basket Snowflake Basket Replacement, let loose powder sift through rather than clinging as dead weight. Solid discs tend to collect damp snow that freezes into heavy clumps over long trail miles. Hollow channels reduce swing weight while still establishing enough resistance to keep the pole tip near the snowpack surface.
Matching Tip Barrel Diameters and Internal Bore Sockets
Trekking pole accessories do not share a single universal mounting diameter across all manufacturers. Most hiking pole tip barrels feature an external diameter between 13 millimeters and 16 millimeters just above the carbide tip. Installing a replacement basket requires checking the inner bore diameter of the plastic socket against your pole collar. For instance, the M METERXITY 4 Pack Trekking Pole Replacement baskets feature a 13-millimeter inner diameter engineered for snug engagement.
Larger poles or specific outdoor brands require matching sockets to prevent loose wobble or cracked collars. The Keenso Trekking Pole Mud Basket,12 Pcs Snow options feature a 16-millimeter inner bore compatible with wider lower sections. Meanwhile, models like the KKUANG 2PCS Trekking Pole Snow Baskets Universal utilize a tapered bore design measuring 15 millimeters at the top and 13 millimeters at the lower opening. Inspecting your shaft tip taper with a caliper or ruler avoids forcing an undersized plastic collar onto an oversized shaft.
Attempting to force an undersized basket onto a thick lower shaft frequently splits the cold plastic sleeve. Conversely, placing an oversized basket on a narrow barrel causes the disc to spin freely and drop off in crusty drifts. When combining snow baskets with heavy footwear, hikers often look into wearing durable long hiking pants to shield lower legs from frozen crust and hidden brush. Verifying that the internal socket diameter matches the tip barrel ensures a firm mechanical seat that resists lateral trail torque.
Step-by-Step Installation for Threaded Tip Barrels
The installation process begins by removing any rubber road caps, asphalt boots, or existing mud baskets from the pole tip. Rubber storage tips pull straight off the metal carbide end, though road grime can sometimes make them stubborn. Once the tip is bare, inspect the plastic barrel located roughly two to three inches above the carbide point for molded threads. Clean away dried mud or pine needles from the thread channels using an old toothbrush or a dry rag.
Slide the snow basket over the metal carbide tip with the wide cup or dished side facing upward toward the grip. Guide the central socket over the tip barrel until the internal threads contact the male threading on the pole collar. Turn the basket clockwise with steady hand pressure, ensuring that the plastic ring stays perpendicular to the pole shaft. Avoid forcing the turn if you feel immediate binding, as crooked threads will strip the soft composite barrel.
Continue turning the basket until it seats firmly against the upper mechanical stop of the tip barrel. The connection should feel snug without needing pliers or excessive manual torque that could strip plastic threads. Products like the Mons Peak IX Trekking Hiking Ski Poles Mud Snow use secure screw-on threading with a serrated rim that helps hikers grip the edge while rotating. Once fully seated, give the basket a gentle tug along the shaft axis to confirm that the threads are engaged completely.
Installing Push-On and Friction-Fit Baskets
Some trekking pole designs dispense with threaded barrels entirely, relying instead on friction stops or notched detent rings. The 4-Pack Trekking Pole Mud & Snow Basket Kit provides slip-on mounting designed for standard 14-millimeter pole shafts without requiring specialized tools. To install a friction basket, align the socket opening squarely over the carbide tip and slide it upward along the plastic sleeve. Maintain even pressure around the rim of the basket rather than pushing from a single side.
Push the basket firmly past the initial resistance ridge until it snaps over the retaining ring or seats against the stop collar. You can place the pole tip on a solid wooden block or firm floor and press downward on the basket with both hands. This technique applies balanced vertical force without bending the lower aluminum or carbon fiber shaft section. A distinct tactile click or firm resistance indicates that the inner collar has reached its intended operational position.
Friction-fit baskets must be inspected regularly because extreme cold can cause plastics to contract or expand at rates different from aluminum. Cold temperatures might make the plastic stiff, making installation tougher in sub-freezing basecamp conditions. Warming the basket indoors or in your jacket pocket before installation softens the plastic slightly for easier seating over retaining detents. Once snapped into place, the basket should sit level without wobbling on the pole tip.
Preventing Cross-Threading and Cold-Weather Plastic Damage
Cross-threading represents the most frequent user mistake when attaching screw-on snow accessories to trekking poles. Because both the pole barrel and the basket socket are typically molded from polymers or engineering plastic, misaligned threads strip easily. If a basket feels stiff after only half a turn, stop immediately and reverse the rotation counter-clockwise until you feel the thread drop. Re-align the basket perpendicular to the shaft before restarting the clockwise turn.
Sub-zero trail conditions significantly increase the brittleness of standard plastic outdoor gear. The 8 PCS Mud Ski Basket Snowflake Basket Replacement components use impact-resistant plastics engineered for low temperatures, but all polymers lose flexibility in deep freezes. Never strike a snow basket with a rock or trekking pole grip to force it over a tip collar. Excessive impact easily cracks the internal mounting ring, turning a brand-new basket into trail litter within minutes.
Harsh winter environments also demand proper clothing choices, such as pairing gaiters with protective trail pants to prevent cold air and crust from impacting your lower joints. Taking time to warm stiff accessories in your palms before trailside adjustments prevents unnecessary gear breakage. Gentle, consistent hand pressure is always preferable to aggressive twisting when threading cold plastic components. Clean threads and deliberate alignment keep your equipment intact throughout challenging winter expeditions.
Field Verification and Load Checks Before Hitting the Trail
Conducting a physical load test before walking away from the trailhead ensures that baskets will not pull free in deep snowpack. Plant both trekking poles vertically into packed snow or soft ground and apply moderate downward body weight onto the grips. The snow baskets should maintain a horizontal plane and support the shafts without slipping past their mounting detents. If the basket twists diagonally or slides upward, remove it and check whether the threads or friction stops engaged correctly.
Next, pull the poles upward sharply through resistance to simulate extracting them from dense, wet snow. A common failure point occurs when crusty snow grabs the underside of the basket and pulls it off the tip. The AbbiyyZ Trekking Pole Baskets offer increased surface support designed to withstand upward pulling forces in deep drifts. If the basket pulls off during a simple hand extraction test, it is either mismatched in diameter or improperly seated.
Check that your pole locking mechanisms, whether external cam levers or twist locks, hold firm when bearing your weight. Downward planting forces increase in snow because the ground provides variable support compared to dry summer singletrack. Verify that lower shaft sections do not slip into middle sections when the basket engages crust. Establishing firm lock tension and secure basket seating creates a reliable foundation before you step into remote backcountry terrain.
Troubleshooting Spinning, Loose, or Frozen Baskets
Hikers sometimes discover that a threaded basket spins freely without tightening or backing off the pole tip. This symptom usually indicates stripped internal threads on the basket socket or worn ridges on the tip barrel. If the basket spins without loosening, press upward against the bottom of the basket while turning counter-clockwise to help the remaining threads catch. If threads are completely stripped, replacing the basket with a fresh replacement disc is necessary for trail security.
Ice accumulation inside the thread barrel can also freeze a basket solid, preventing seasonal replacement or trail adjustments. Forcing an ice-locked basket by twisting forcefully with bare hands can snap the tip barrel off the lower shaft section. Instead, bring the trekking poles inside a warm shelter or pour lukewarm water over the basket collar to melt trapped ice. Avoid using boiling water or direct flames, as excessive heat warps composite tip housings and weakens shaft epoxy bonds.
Carrying spare baskets in your winter daypack provides cheap insurance against sudden loss in deep drifts. Having backups like the multi-pack replacements from Holmgillick or JOBGV allows you to replace a cracked disc immediately without cutting your trek short. When a basket pulls off deep beneath the snow surface, finding it is often impossible. A quick replacement restored at the rest stop keeps your poles functioning properly for the remainder of the route.
Post-Trip Cleaning, Removal, and Storage Practices
Leaving snow baskets installed on trekking poles throughout spring and summer can cause trail dirt, salt, and moisture to seize the threads. After completing your winter trips, unscrew or slide the snow baskets off the shafts to inspect the underlying hardware. Wash the tip barrels and baskets with mild dish soap and warm tap water to remove road salt, grit, and mud. Dry all components thoroughly with a clean cloth before packing them away.
Inspect the tungsten carbide tips and plastic collars for hairline stress cracks or rounded points while the baskets are removed. Replace your snow baskets with compact mud discs or slip-on rubber tips for summer hiking on firm singletrack. Storing oversized snow discs in a dry gear tote away from direct sunlight protects the polymers from ultraviolet degradation. Taking proper care of your modular pole accessories ensures that your winter setup is ready for immediate deployment whenever the next cold season arrives.
Setting up winter baskets on your trekking poles takes only a couple of minutes once you understand proper thread alignment and diameter matching. Taking the time to clean the tip barrels, verify socket dimensions, and perform a solid pull check ensures reliable support through deep drifts. Stable footing and balanced flotation turn demanding winter routes into enjoyable backcountry adventures.








Write Your Review
No reviews yet. Be the first to share your experience!